# Introduction

The document covers all aspects of [Keepnet’s Extended Human Risk Management Platform](https://keepnetlabs.com/), which not only addresses traditional phishing methods but also provides robust defenses against more complex attacks such as Vishing (Voice Phishing), Smishing (SMS Phishing), MFA Phishing (Multi-Factor Authentication), Quishing (QR code phishing), and Callback Phishing (Telephone Oriented Attack Delivery).

Our documentation ensures you get maximum value from our products. It comprehensively covers its core functionalities and detailed features, providing clear, step-by-step instructions for effective utilization.

## Target Audience

Our documentation is designed for anyone who works with Keepnet products—whether you’re actively using them, selling them, or exploring their capabilities. It supports roles such as HR, IT, Compliance, and SOC teams, helping them maximize value from the platform. Whether sending targeted training, analyzing and containing email threats, or managing human risk across the organization, the resources are tailored to guide each role in achieving their objectives effectively.

## Purpose of the documentation

The primary purpose of our documentation is to empower customers to independently use our products without relying heavily on the Keepnet support team. We provide comprehensive resources, including articles, tutorials, and troubleshooting guides, to ensure customers have the knowledge and tools to maximize our platform's capabilities.

## The scope of the documentation

The documentation covers an extensive scope, encompassing details about various products within the Keepnet ecosystem. It includes the [Dashboard](/next-generation-product/platform/dashboard),[ Threat Intelligence](https://keepnetlabs.com/products/threat-intelligence), [Awareness Educator](https://keepnetlabs.com/products/security-awareness-training),[ Phishing Simulator](https://keepnetlabs.com/products/phishing-simulator),[ Vishing Simulation](https://keepnetlabs.com/products/vishing), [Callback Simulator,](/next-generation-product/platform/callback-simulator) [Email Threat Simulator](https://keepnetlabs.com/products/email-threat-simulator),[ Smishing Simulator](https://keepnetlabs.com/products/smishing-simulator), [Quishing Simulator](/next-generation-product/platform/quishing-simulator), [Threat Sharing](/next-generation-product/platform/threat-sharing), [Phishing Reporter](/next-generation-product/platform/phishing-reporter), and[ Incident Responder](https://keepnetlabs.com/products/incident-responder). Each product's functionalities, features, and usage guidelines are explained to help users understand and utilize them effectively.

## The structure of the documentation

To ensure a seamless experience, our documentation is structured in alignment with the Keepnet product interface. Starting with the Dashboard, users can navigate through each section, such as Threat Intelligence, Awareness Educator, and beyond. This intuitive structure allows users to easily find relevant information and logically progress through the documentation.

## How to get help with the documentation

Should you require assistance using our documentation, we recommend carefully reading the instructions and guidelines. The outlined steps and best practices will help you derive the most value from available resources. If you need further support, our support team is available to address any specific queries or concerns. [Reach out to us](/resources/keepnet-support-help-desk), and we will be more than happy to assist you in making the most of our documentation and achieving your desired outcomes.

Thank you for choosing Keepnet as your cybersecurity partner. Together, we can create a safer digital environment for businesses worldwide.

Build your security culture to STOP phishing!


# Getting Started

Welcome to Keepnet! We're excited to be partnering with you on your human-risk management strategy.

This Getting Started guide will be your key resource in successfully implementing the technical setup of Keepnet and, therefore, mitigating human-related cybersecurity risks.

**The steps you will follow:**

1. ​[Invite System Users​](/next-generation-product/getting-started/1.-invite-system-users)
2. ​[Add Target Users​](https://github.com/ucarozan/keepnet-docs/blob/main/next-generation-product/getting-started/2.-add-target-users)
3. ​[Email Deliverability​](https://github.com/ucarozan/keepnet-docs/blob/main/next-generation-product/getting-started/3.-email-deliverability)
4. ​[Setup Phishing Reporter​](https://github.com/ucarozan/keepnet-docs/blob/main/next-generation-product/getting-started/6.-setup-phishing-reporter)
5. [​Incident Responder Setup](https://github.com/ucarozan/keepnet-docs/blob/main/next-generation-product/getting-started/7.-incident-responder-setup) (Only for customers who have Incident Responder product)

(Recommended) [Track Opened Emails](/next-generation-product/getting-started/recommended-track-opened-emails)

(Recommended) [Allow Phishing URLs](/next-generation-product/getting-started/recommended-add-domains-to-url-protection)


# 1. Invite System Users

You will need to add all people responsible for managing and performing all activities on Keepnet to the platform. This should include any AD Admins required for technical setup.

{% hint style="danger" %}
This is **only for System Admins.** Employees will be added on Target Users section
{% endhint %}

#### **Step 1.**

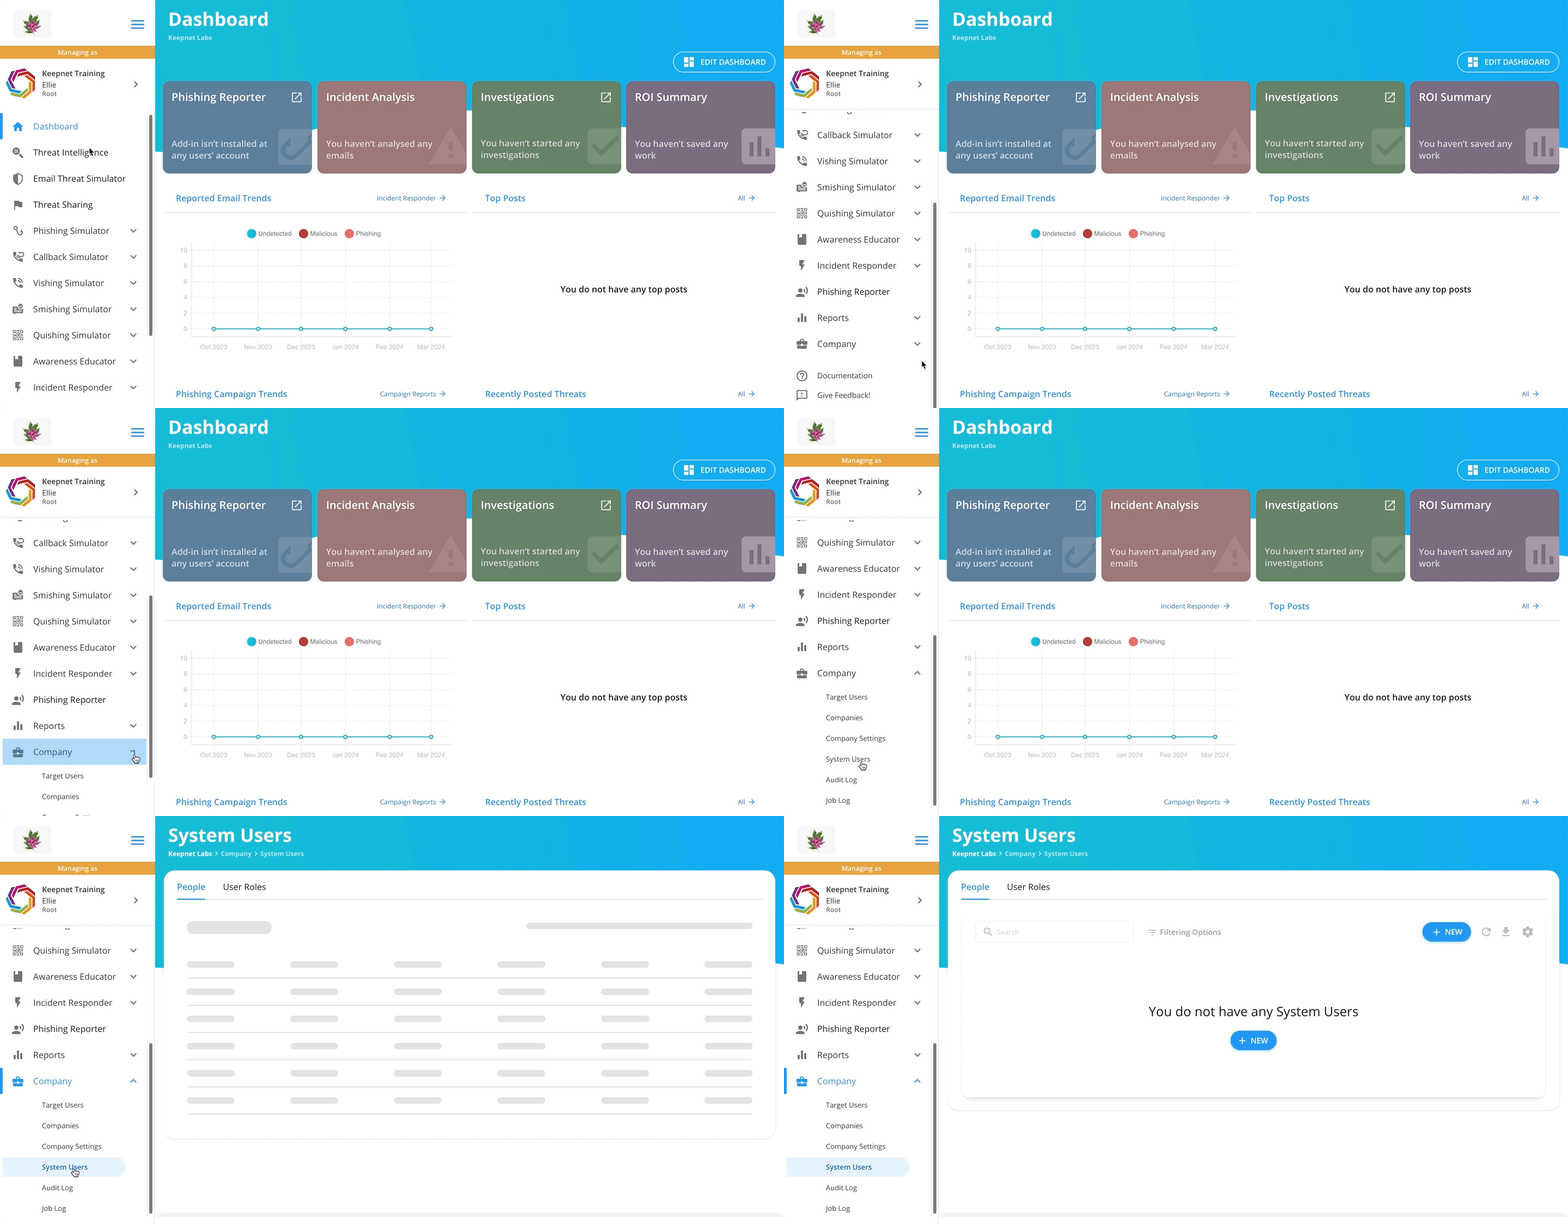
First go to the **Company** tab on the left hand side and then into **System Users**. Here you can find all System Users already added.

<figure><img src="https://files.gitbook.com/v0/b/gitbook-x-prod.appspot.com/o/spaces%2FlKFxOYqYqSykikkXpwjG%2Fuploads%2FL7xYZ3ObpLqcQfGwbmA5%2Fsystem%20users%20step%201.gif?alt=media&#x26;token=1774d91f-5c6f-44f3-ab49-4797445707a8" alt="Invite system users — step 1."><figcaption><p>Invite system users — step 1.</p></figcaption></figure>

{% hint style="warning" %}
You need to be an authorized admin to create a system user in this menu.
{% endhint %}

#### **Step 2.**

By clicking the **+ New** button in the upper right corner, you can create a new system user.

For more information on some of the fields, see below:

{% tabs %}
{% tab title="Phone Number" %}
This information is required for MFA purposes for System Users
{% endtab %}

{% tab title="Status" %}
Set users as active to allow them to access Keepnet Labs. Set system users as inactive to stop their access to Keepnet Labs.
{% endtab %}

{% tab title="Role" %}
**Company Admin:** Full admin access across the environment user has been added to.

**Reseller:** Full admin access across company they user has been added to AND all subsidiary companies.

You can create custom roles for your users and limit their access to various products on the platform. Please click here for more information
{% endtab %}
{% endtabs %}

**✅ You have now added your first System User! Now you need to** [**Add your Target Users**](https://github.com/ucarozan/keepnet-docs/blob/main/next-generation-product/getting-started/2.-add-target-users) **➡️**


# 2. Add Target Users

Your Target Users are the people who will receive simulation emails, training emails or any other emails from the platform. They will not have a login to Keepnet or require any access to the platform.

{% hint style="warning" %}
Email addresses are required for all users even for our Vishing, Smishing and Callback tools to successfully verify your email domains
{% endhint %}

**⬇️ You have several options for adding target users:**

* [**Manually Add Users**](/next-generation-product/getting-started/2.-add-target-users/add-users-via-csv)
* [**SCIM Integration**](/next-generation-product/getting-started/2.-add-target-users/add-users-via-scim) **(most common:** add users from your identity management provider directly into Keepnet. Automatically add people who join your business and remove people who leave\*\*)\*\*
* [**LDAP integration**](/next-generation-product/getting-started/2.-add-target-users/add-users-via-ldap)
* [**Add users via API**](/next-generation-product/getting-started/2.-add-target-users/add-users-via-api)

{% hint style="info" %}
We recommend using an integration to ensure that new employees are automatically added and people who leave your business are automatically removed. This ensures reporting is as accurate as possible.
{% endhint %}


# Add Users via CSV

{% hint style="info" %}
**Note**: by using this method, you will be responsible for adding new employees and removing leavers to maintain accurate reporting.
{% endhint %}

#### **Step 1.**

Navigate to **Company > Target Users** on the left hand side menu. Click the **"+New"** blue button.

<figure><img src="/files/zri9c9RELgnfglNww5Gv" alt="Target Users — add users step 1."><figcaption><p>Target Users — add users step 1.</p></figcaption></figure>

#### **Step 2.**

Select **Add users manually** to add target users one by one. Alternatively, select **Import from file** to upload a CSV or XLS(x) file.

{% hint style="info" %}
**Top Tip:** Download a CSV template by clicking **Import from file** and selecting 'Download Example Sheet'.

<img src="/files/tAwcDsGWe8v9LoWkkOI5" alt="Target Users — add users via CSV interface." data-size="original">
{% endhint %}

#### **Step 3.**

**Select Group:** If you haven't added any users yet, you will need to create a new group. Some suggested User Groups our customers use:

* Test Group - for your cyber team to test phishing campaigns
* All Users - to easily send campaigns to all employees
* Department Specific e.g. Finance - to easily send targeted campaigns to specific departments

<figure><img src="/files/C0gdFz4aNN8Ct2eTvlOv" alt="Add New Group."><figcaption><p>Add New Group.</p></figcaption></figure>

**Step 4.**

**Field Mapping:** Ensure the fields you are adding in are matched with the correct heading. For example, the user's first name matched with the heading, 'First Name'. Click Next once complete.

<figure><img src="/files/M1jLcdnU5vH5NZo7JIYR" alt="CSV column mapping for target users."><figcaption><p>CSV column mapping for target users.</p></figcaption></figure>

**Step 5.**

**Import Users:** Either pick the users you wish to add and click **Import Selected**, or click **Import All** to add all the users.

<figure><img src="/files/CdjyxWqhT1v4VUrn9yRp" alt="Target users CSV upload result."><figcaption><p>Target users CSV upload result.</p></figcaption></figure>

✅ **You have now added your first Target Users. Now you need to** [**ensure users are able to receive emails from Keepnet**](https://github.com/ucarozan/keepnet-docs/blob/main/next-generation-product/getting-started/3.-email-deliverability) **successfully ➡️**


# Add users via SCIM

By setting up a SCIM integration, you can ensure all new employees are added in auto-enrolled training and phishing simulations. There are 2 key steps to setting up your SCIM integration:

1. **Get your secret token**
2. **Complete setup in your AD portal**

### First, get your secret token <a href="#first-get-your-secret-token" id="first-get-your-secret-token"></a>

#### **Step 1: Create a new SCIM Setting**

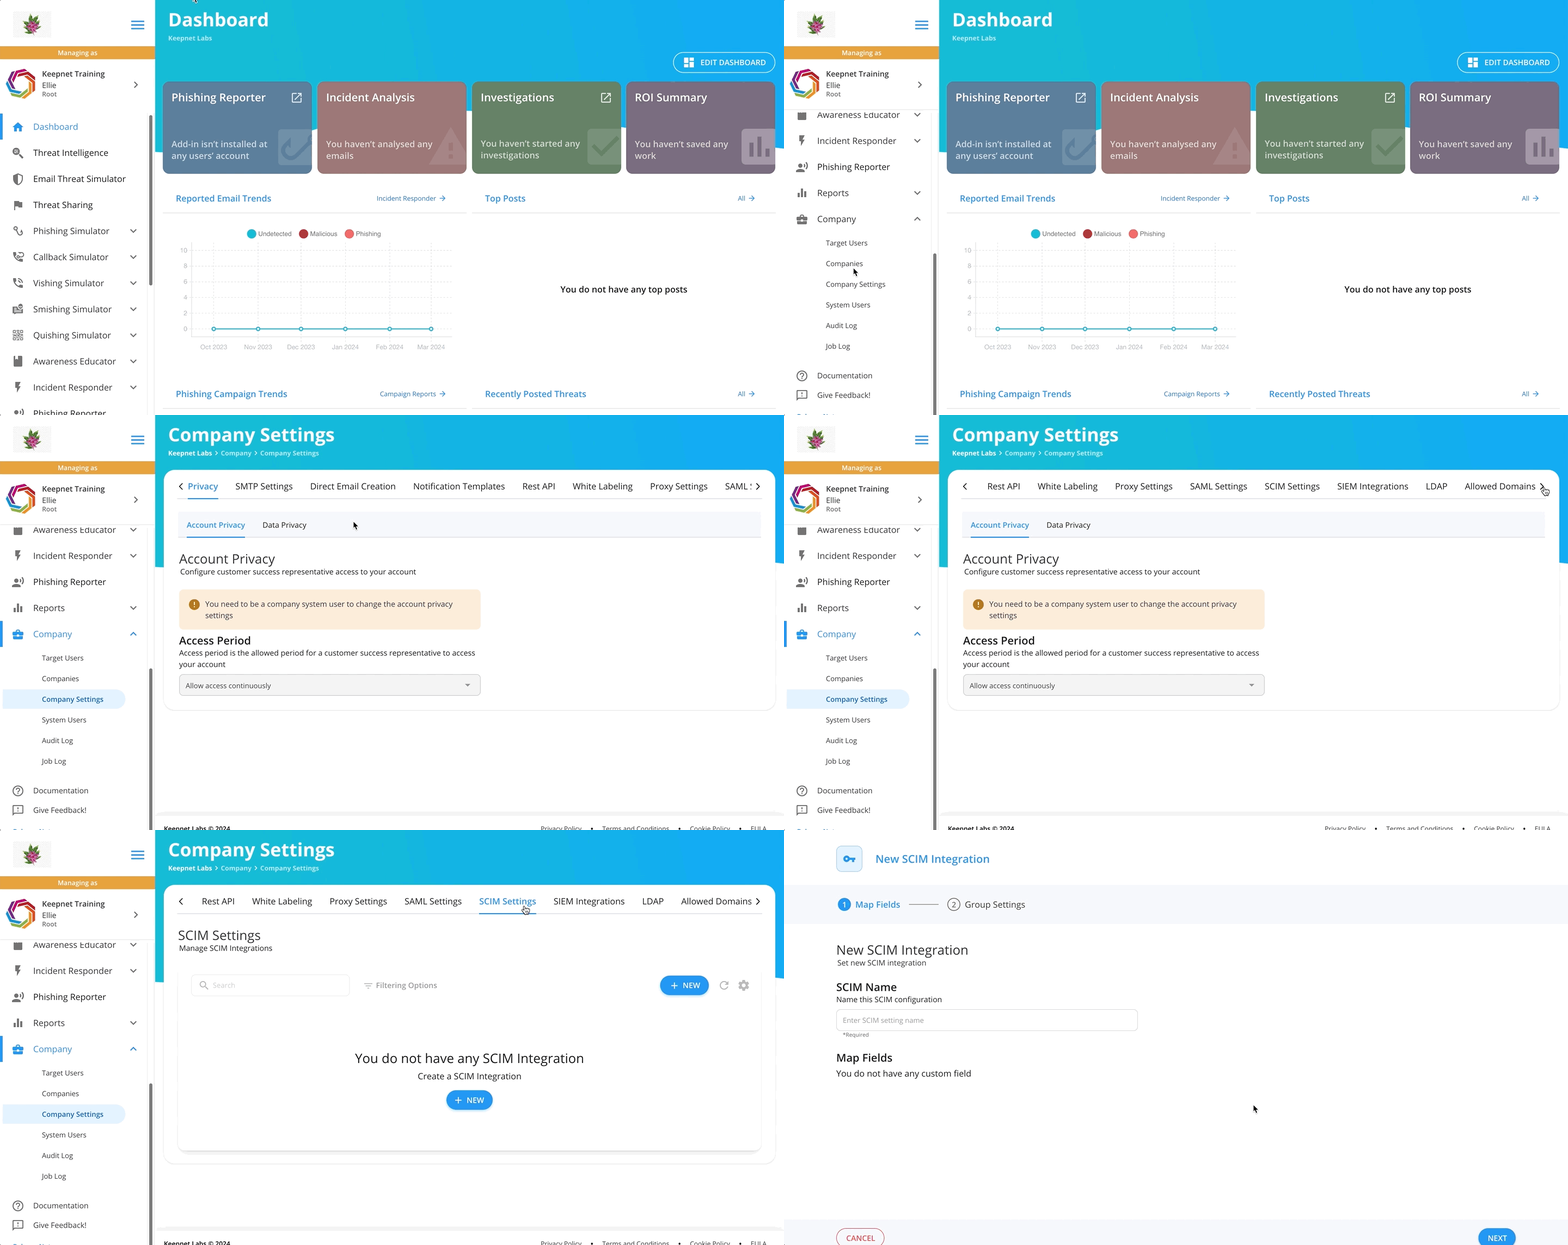
Go to **Company > Company Settings > SCIM Settings** page. Click the **‘+New’** button to create a SCIM setting.

<figure><img src="https://files.gitbook.com/v0/b/gitbook-x-prod.appspot.com/o/spaces%2FlKFxOYqYqSykikkXpwjG%2Fuploads%2FcfJ6v1frE5N19HfDr8iL%2Fscim%20step%201.gif?alt=media&#x26;token=bd96034a-3496-4639-824a-0965b5c22e5b" alt="SCIM Settings — Create new SCIM setting (+ New)."><figcaption><p>SCIM Settings — Create new SCIM setting (+ New).</p></figcaption></figure>

#### **Step 2: Map a Field (Optional)**

Some of our customers add custom fields to add information in addition to email, first name, last name, department and phone number. If you would like to set this up click here, otherwise you can skip.

#### **Step 3: Group Settings**

**Group Name:** If you would like to synch all users to one target group please select the group here. You can leave empty and group by department instead.

**Grouping Criteria:** You must select one of these

* **Select a SCIM field to determine user groups:** Group users by department (or a custom mapped field such as location). This will group all users by the Entra ID property "Department"
* **Synchronise groups with identity management platform:** Groups are mirrored directly from Entra ID. If you select a group called "Keepnet UK" on Entra ID, this group will be named exactly the same in Keepnet and contain the exact same users.

<figure><img src="/files/83izWk5hfbYSJPQ5knAN" alt="SCIM Group Settings and Grouping Criteria."><figcaption><p>SCIM Group Settings and Grouping Criteria.</p></figcaption></figure>

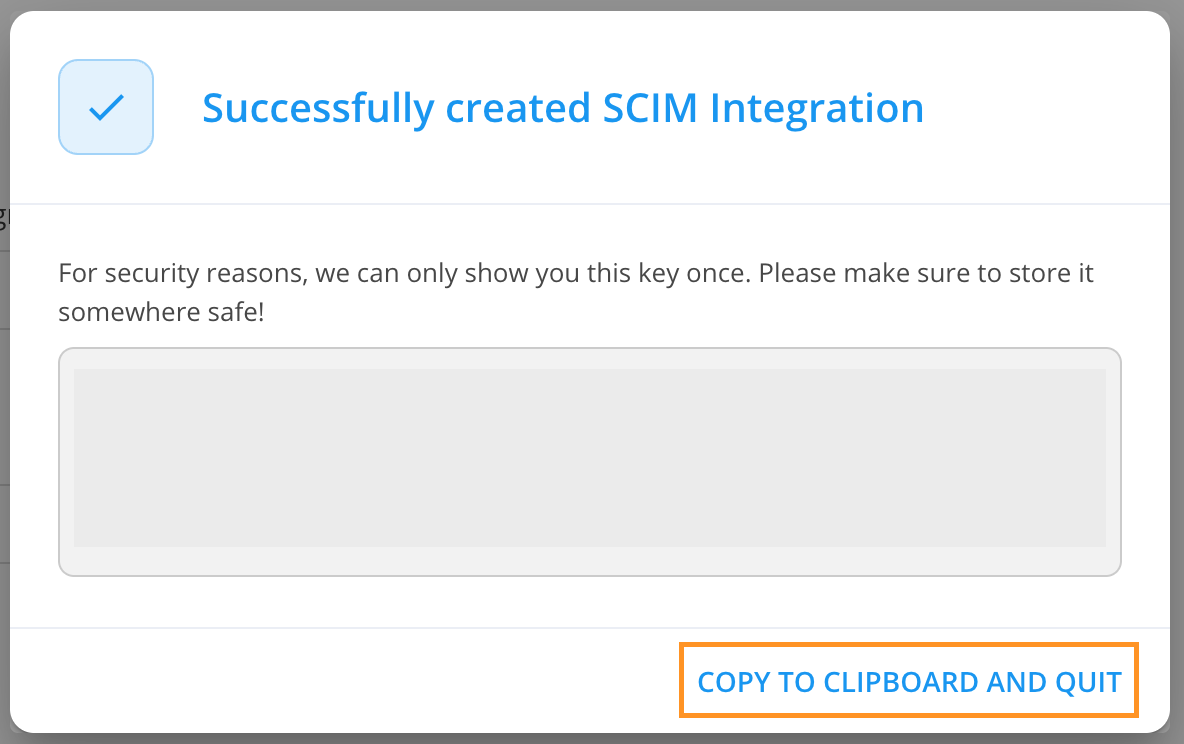
#### **Step 4: Copy your Secret Token**

Click **Save** and make sure to **copy the unique token information.**

<figure><img src="https://files.gitbook.com/v0/b/gitbook-x-prod.appspot.com/o/spaces%2FlKFxOYqYqSykikkXpwjG%2Fuploads%2FrEvHb8iFGYuuosH4OohG%2FScreenshot%202024-03-08%20at%2015.23.13.png?alt=media&#x26;token=0d9e56cd-210b-4bb5-91bf-fc59c77baa8a" alt="Copy Secret Token after Save."><figcaption><p>Copy Secret Token after Save.</p></figcaption></figure>

✅ **You can now use the following shortcuts to complete the final settings on your identity provider platform.**

### Shortcuts <a href="#shortcuts" id="shortcuts"></a>

* ​[How to integrate Azure AD SCIM​](/next-generation-product/getting-started/2.-add-target-users/add-users-via-scim/scim-setup-in-entra-id)
* ​[How to integrate Okta SCIM](/next-generation-product/getting-started/2.-add-target-users/add-users-via-scim/scim-setup-in-okta)​
* [​How to integrate Onelogin SCIM​](/next-generation-product/getting-started/2.-add-target-users/add-users-via-scim/scim-setup-in-onelogin)
* [How to integrate JumpCloud SCIM](/next-generation-product/getting-started/2.-add-target-users/add-users-via-scim/scim-setup-in-jumpcloud)​


# SCIM Setup in Entra ID

This document shows how to synchronize users' information from the Azure AD identity provider to the platform. Please make sure to set up the mandatory settings from the ‘[SCIM Integration](/next-generation-product/getting-started/2.-add-target-users/add-users-via-scim)’ page before following the below steps:

1. [Add New Enterprise Application](#add-new-enterprise-application)
2. [Provisioning Settings](#provisioning-settings)
3. [Synchronize Users / Groups](#synchronize-users-or-groups)

## **Add New Enterprise Application** <a href="#add-new-enterprise-application" id="add-new-enterprise-application"></a>

#### **Step 1. Login**

Log in to <https://portal.azure.com/> as an **Azure** **Admin.**

#### **Step 2. Add new Enterprise Application**

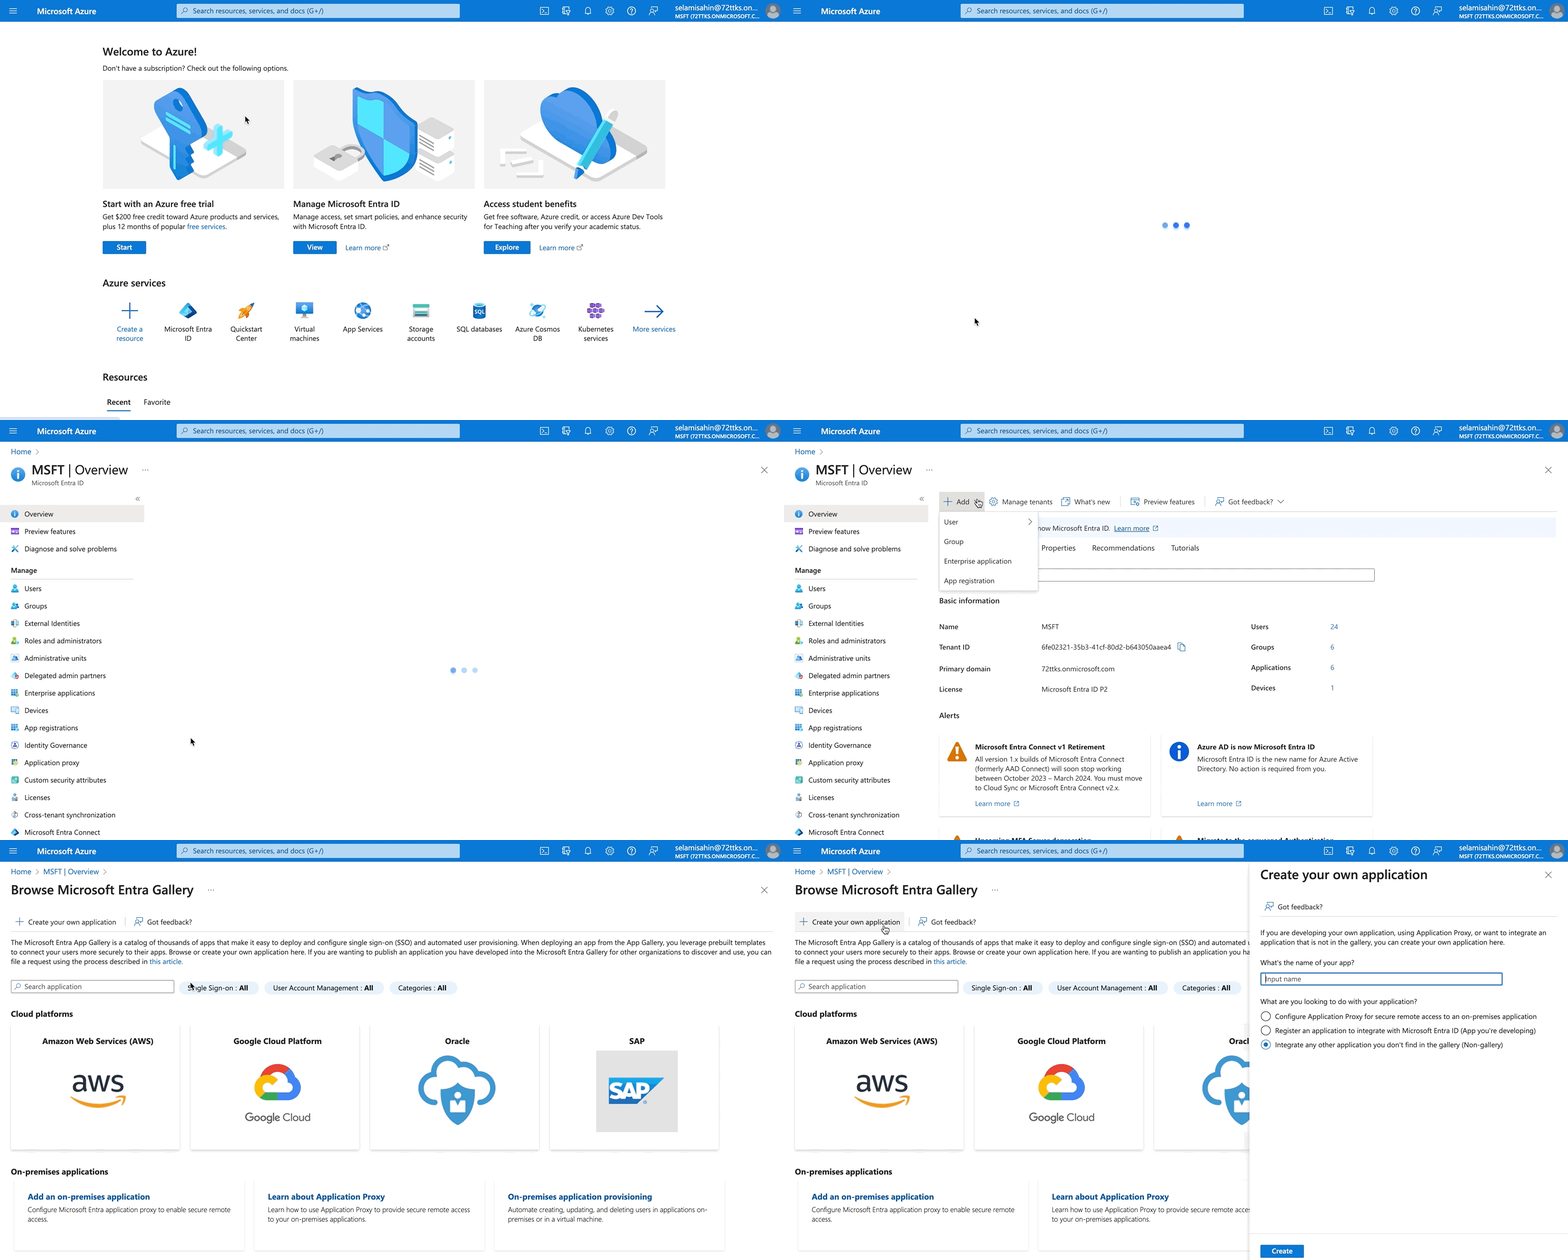
1. Click on **Microsoft Entra ID.**
2. Click on **+Add** at the top left hand side.
3. On the drop down select **Enterprise Application**.
4. Click on **+Create your own application.**

<figure><img src="https://files.gitbook.com/v0/b/gitbook-x-prod.appspot.com/o/spaces%2FlKFxOYqYqSykikkXpwjG%2Fuploads%2FuNfGntXnc8sF4FpwJPhC%2Fscim%20step%202.gif?alt=media&#x26;token=5889f92b-5204-447f-b47f-a6649d36418c" alt="Azure — Add Enterprise Application, Create your own application."><figcaption><p>Azure — Add Enterprise Application, Create your own application.</p></figcaption></figure>

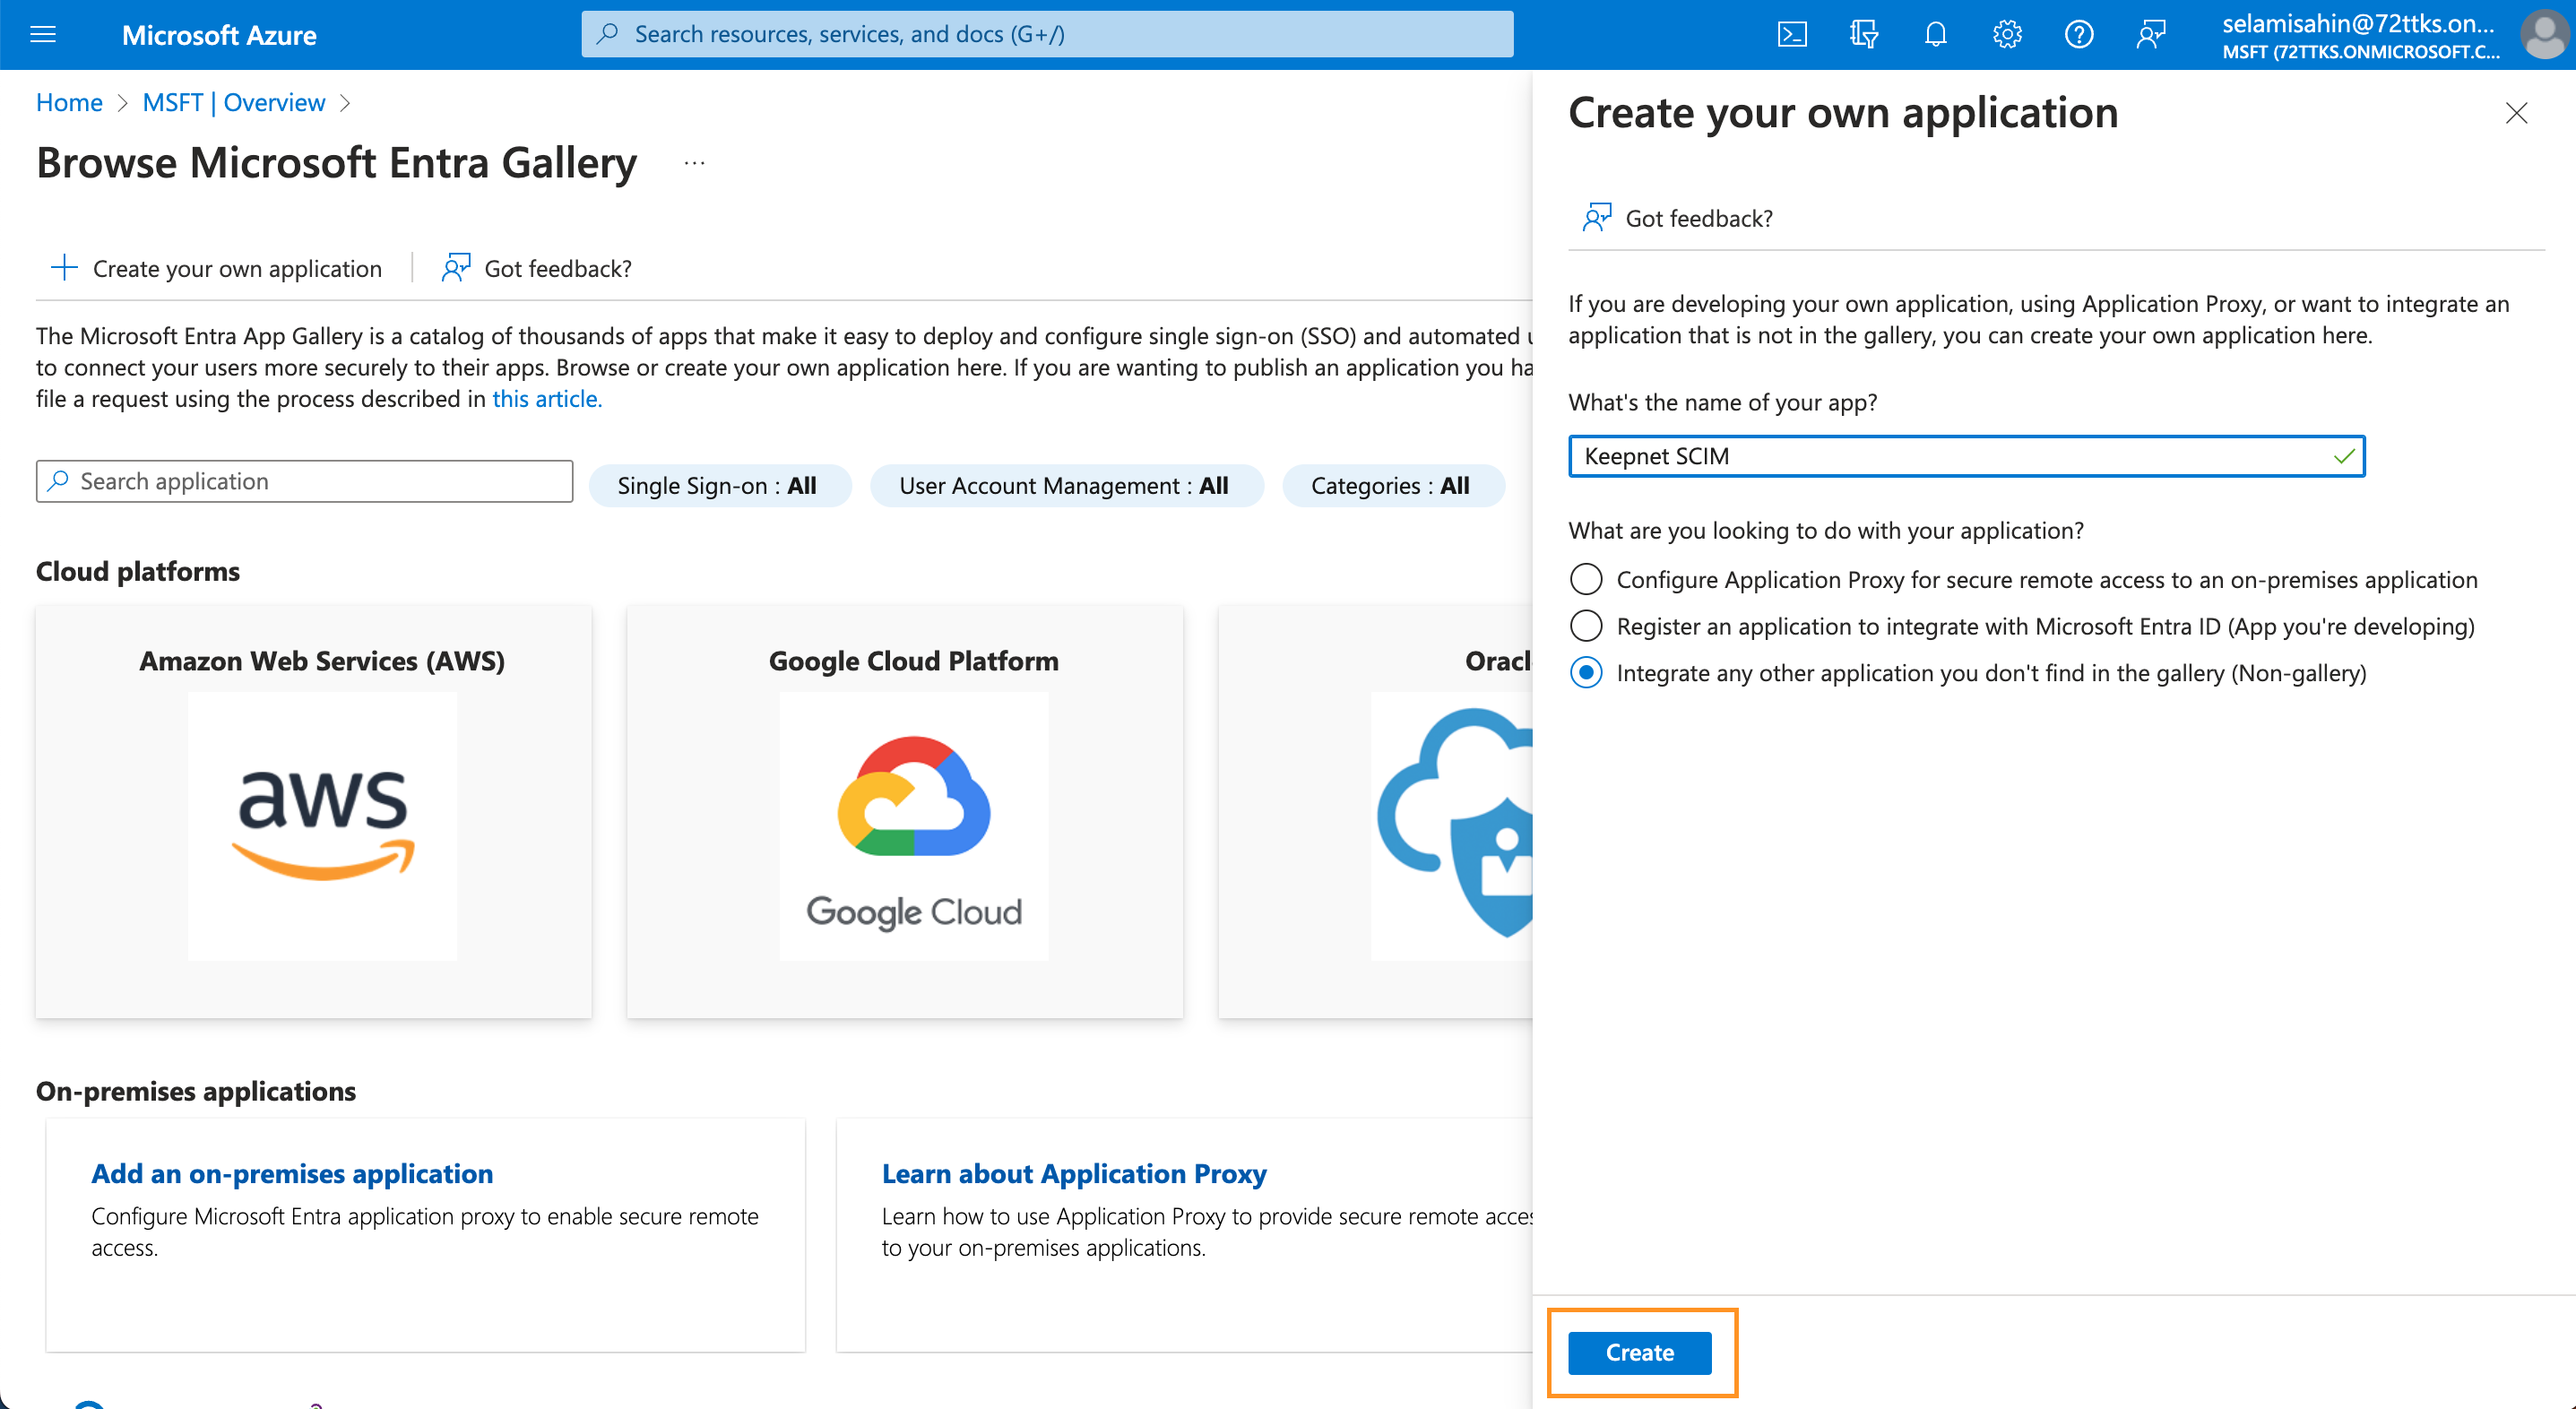
#### **Step 3: Create your own application**

1. **Enter a name** for the application.
2. Select **‘Integrate any other application you don't find in the gallery (Non-gallery)’** option.
3. Click the **Create** button to create the application.

<figure><img src="https://files.gitbook.com/v0/b/gitbook-x-prod.appspot.com/o/spaces%2FlKFxOYqYqSykikkXpwjG%2Fuploads%2FEhQ3oE5Bx5qlPoMYsj23%2FScreenshot%202024-03-08%20at%2015.36.13.png?alt=media&#x26;token=8ac06147-4e42-4a7c-89b0-996651acbd45" alt="Create your own application — name and Non-gallery option."><figcaption><p>Create your own application — name and Non-gallery option.</p></figcaption></figure>

## **Provisioning Settings** <a href="#provisioning-settings" id="provisioning-settings"></a>

1. Select the **‘Provisioning’** menu from the left side.
2. Click the **‘New Configuration’** button and then enter the following information.

**Tenant URL:** <https://scim-api.keepnetlabs.com/scim>

**Secret Token:** Enter the token which was created on the Keepnet platform.

3. Click the **‘Test Connection’** button to test your configuration. If it’s successful, click the **Save** button to save settings.

<figure><img src="/files/AnjYFVf4ZZc1BK8S0zN2" alt="Provisioning settings — Tenant URL, Secret Token, Test Connection."><figcaption><p>Provisioning settings — Tenant URL, Secret Token, Test Connection.</p></figcaption></figure>

## **Synchronize Users and Groups**

When synchronizing users, customers have 2 options:

* Synchronize all users in Entra-ID
* Synchronize only assigned users and groups

#### **Synchronize all users and groups in your Entra-ID**

1. Within the provisioning section, use the Settings drop down
2. You will notice it defaults to 'Synchronize only assigned users and groups'
3. Click on '**Synchronize all users and groups'**
4. Save

#### **Synchronize only assigned users and groups**

1. Click on **Users and Groups** in the left hand menu under **Manage**
2. Click on 'Add users/groups'
3. Click on 'None Selected' on the left hand side
4. On the right, you will see a list of your users and groups populate
5. Most customers find it useful to use Groups - if you select a Group, any new members of this group will automatically be added to Keepnet
6. Click Select then Assign on the bottom of the page

<figure><img src="/files/wseig0BhbjsU4aRYZqrr" alt="Users and groups — Add users/groups, assign groups for SCIM sync."><figcaption><p>Users and groups — Add users/groups, assign groups for SCIM sync.</p></figcaption></figure>

## Start Provisioning

The final step is to start provisioning. Simply go to Overview on the left hand menu and select **Start Provisioning** on the top of the page.

Your users will sync from Microsoft to Keepnet every 40 minutes, ensuring any new employees who belong to one of your assigned groups is automatically added to Keepnet

{% hint style="info" %}
You can see target users on the platform approximately in a few minutes. The Azure AD rechecks the application for new users, changes or deleted users every 40 minutes.
{% endhint %}

✅ **You have now added your first Target Users. Now you need to** [**ensure they are able to receive emails from Keepnet** ](https://github.com/ucarozan/keepnet-docs/blob/main/next-generation-product/getting-started/3.-email-deliverability)**successfully ➡️**

## Tutorial Video

This video tutorial shows the documentation steps for synchronizing users' information from the Azure AD identity provider to the platform.

{% embed url="<https://youtu.be/Lg-4aF6yGh8>" %}

A


# SCIM Setup in Okta

The document show step-by-step how to synchronize users' information from the Okta identity provider to the platform.

Please make sure to set up the mandatory settings from the ‘[Getting Started](https://app.gitbook.com/o/-LMcQ_WBbT5jibln-2Mt/s/lKFxOYqYqSykikkXpwjG/next-generation-product/getting-started/2.-add-target-users/step-2-add-target-users/scim-integration/okta-scim-integration)’ page in this document before proceeding to the following step.

## **OKTA Configuration** <a href="#okta-configuration" id="okta-configuration"></a>

1. Please log in to <https://www.okta.com/> as an admin user.
2. Click on **Applications** and go to **Applications** from the left menu.
3. Click on the **Browse App Catalog** and search **SCIM 2.0 Test App (OAuth Bearer Token)** and then click **Add** button.
4. Enter a name for the application like **My SCIM Integration** and click on the **Next** button.
5. Choose **SAML 2.0** with the default settings and click on the **Done** button.
6. The application is now created successfully, go to the **Provision** menu and click the **Configure API Integration** button and then enable the **API Integration** option.
   1. **Tenant URL:** <https://scim-api.keepnetlabs.com/scim>
   2. **Secret Token:** Enter the token which was created on the platform.
   3. Click the **‘Test API Credentials’** button to test your configuration. If it’s successful, click the **Save** button to save settings.
   4. While on the **Provisioning** menu, go to the **‘To App’** menu and click the **Edit** button to enable the following fields. Please make sure to click the **Save** button after enabling the following fields.
      1. Create Users
      2. Update User Attributes
      3. Deactivate Users.

Okta configuration has been successfully finished. You can proceed with the following step.

## **Synchronization Users or Groups** <a href="#synchronization-users-or-groups" id="synchronization-users-or-groups"></a>

1. Go to the **Assignments** menu and click on the **Assign** button to assign **Users or Groups** to this SCIM application which will be synchronized to the platform.
2. To import **user(s)** or **group(s)**, click on the **Assign** button to synchronize users or groups to synchronize to the platform.

✅ **You have now added your first Target Users. Now you need to**[ **ensure they are able to receive emails from Keepnet**](https://github.com/ucarozan/keepnet-docs/blob/main/next-generation-product/getting-started/3.-email-deliverability) **successfully ➡️**

### Tutorial Video <a href="#tutorial-video" id="tutorial-video"></a>

This video tutorial shows the documentation steps for synchronizing users' information from the Okta identity provider to the platform.

{% embed url="<https://youtu.be/3XXAkrxhAm4>" %}


# SCIM Setup in Onelogin

The document show step by step how to synchronize users' information from the Onelogin identity provider to the platform.

## **Onelogin Configuration**

1. Please log in to[ https://www.onelogin.com/](https://www.onelogin.com/) as an admin user.
2. Click on **Applications** and click **Add App** on the top of the screen.
3. Search **‘SCIM Provisioner with SAML (SCIM v2 Enterprise)'** and click on the **Add** button.
4. Enter a name for the application like **My SCIM Integration** and click on the **Save** button.
5. Once you have successfully created the application, enter the application details and go to the **Configuration** menu and enable the **API Connection.**
   1. **Tenant URL:** <https://scim-api.keepnetlabs.com/scim>
   2. **SCIM JSON Template:** Please fill up this field with the following code.
   3. {\
      "urn:ietf:params:scim:schemas:extension:enterprise:2.0:User": {\
      "department": "{$parameters.department}",\
      "manager": {\
      "managerId": "{$parameters.external\_manager\_id}",\
      "displayName": "{$user.manager\_firstname} {$user.manager\_lastname}"\
      }\
      },\
      \
      "active": "{$user.active}",\
      "emails": \[\
      {\
      "value": "{$user.email}",\
      "type": "work",\
      "primary": true\
      }\
      ],\
      "meta": {\
      "resourceType": "User"\
      },\
      "name": {\
      "familyName": "{$user.lastname}",\
      "givenName": "{$user.firstname}",\
      "formatted": "{$user.display\_name}"\
      },\
      "userName": "{$parameters.scimusername}",\
      "id": null,\
      "schemas": \[\
      "urn:ietf:params:scim:schemas:core:2.0:User"\
      ]\
      }
   4. **SCIM Bearer Token:** Enter the token which was created on the platform.
   5. Click on the **Save** button the proceed.
6. Go to the **Provisioning menu** and enable the following options under the **Workflow title**.
   1. Enable Provisioning.
   2. Create User
   3. Delete User
   4. Update User

OneLogin configuration has been successfully finished. You can proceed with the following step.

## **Synchronization Users or Groups**

You can find how to synchronize users or groups from [here](https://developers.onelogin.com/scim/create-app) under the **‘Provisioning Users into Groups’** title.

✅ **You have now added your first Target Users. Now you need to** [**ensure they are able to receive emails from Keepnet**](https://github.com/ucarozan/keepnet-docs/blob/main/next-generation-product/getting-started/3.-email-deliverability) **successfully ➡️**


# SCIM Setup in JumpCloud

The document show step-by-step how to synchronize users' information from the JumpCloud identity provider to the platform.

## **SCIM Configuration in JumpCloud**

1. Please log in to JumpCloud as an **admin** and follow the following steps.
2. Please create a group and assign users to the group for synchronization.
3. Go to **SSO** > **+** > and then click the **Custom SSO SAML.**
4. Enter a name for the **Application name**.
5. Go to the **SSO** submenu and **enter a number like ‘1’** into the **‘IdP Entity ID’** and **‘SP Identity ID’** fields.
6. Go to the **Identity Management** submenu and then go to the bottom of the page to fill up the following fields.
   1. **SCIM Version:** SCIM 2.0
   2. **Base URL:** <https://scim-api.keepnetlabs.com/scim>
   3. **Token Key:** Please enter the secret token.
   4. Click the **‘Test Connection’** button to test the connection and then please click the **‘Activate’** button next to the **‘Test Connection’ button**.
   5. Edit the **SSO** rule and then go to the **SSO** menu to **Disable the SSO** at the bottom of the page.

JumpCloud configuration has been successfully finished. You can proceed with the following step.

## **Synchronization Users or Groups**

1. Go to the **SAML** application and then select **Groups** that contain users that will be synchronized to the platform and then click the **Save** button.
2. The users will be synchronized to the platform in approximately a few minutes.

✅ **You have now added your first Target Users. Now you need to** [**ensure they are able to receive emails from Keepnet**](https://github.com/ucarozan/keepnet-docs/blob/main/next-generation-product/getting-started/3.-email-deliverability) **successfully ➡️**


# Google Provisioning

This document provides a step-by-step guide on how to synchronize users' information, such as **First** **Name**, **Last** **Name**, **Email** **Address**, **Department** **Name**, etc., from the **Google** **Workspace** email server to the platform.

{% hint style="danger" %}
You must have an admin account to set up the Google Workspace integration.
{% endhint %}

Please follow the steps below.

1. Go to **Company > Company Settings > Google User Provisioning** page.
2. Click the **CONNECT TO GOOGLE** button.
3. Click **Continue** and then click the **Allow** button to grant the requested permissions.
4. After successful integration, please proceed with the following configurations.
5. In the **Select Sync Source** field, choose one of the following options:
   1. **Sync Organizational Units (OU):** Sync users from the organizational units. Select all organizational units or choose the ones you wish to sync users from.
   2. **Sync Groups:** Sync users from group(s) that are from your Google Workspace. Select all groups or choose the ones you wish to sync users from.
6. In the **Select Sync Method** field, choose one of the following three options:
   1. **Sync all users to target users:** This will sync all users from the selected organizational units or groups.
   2. **Sync all users to a target group:** This will sync all users from the selected organizational units or groups and add them to the selected target group on the platform.
   3. **Sync users and create a matching group:** This option will sync users from the selected organizational units or groups, and the system will automatically create target groups with the same names on the platform. The users will then be assigned to the corresponding groups or organizational units on the platform.
7. Now, click the **START SYNC** button to begin synchronization.

The synchronization may take some time depending on the number of target users. Once the synchronization is complete, you can view the synced users on the **Company > Target Users** page.

The synchronization automatically repeats every 24 hours to ensure all users are updated with the latest information from Google Workspace, or to remove any target users who are no longer available in Google Workspace.

If you wish to sync the user's latest information to the platform immediately without waiting 24 hours, please click the **SYNC NOW** button.

## How to Remove Google Workspace Integration

If you no longer need to sync users from Google Workspace to the platform and wish to remove the integration, you can follow the steps below.

{% hint style="danger" %}
Once the integration is removed, the synced users will be deleted from the platform.
{% endhint %}

* Go to **Company > Company Settings > Google User Provisioning** page.
* Click the Unlink **Integration** button to remove the integration.

The integration is now successfully deleted.


# Add users via LDAP

This document explains the functionality of the LDAP feature as well as how to set up an LDAP to synchronize target users information such as **Name**, **Surname**, **Email**, **Department**, **Phone Number** or other information to the platform automatically.

## **What Is LDAP?**

LDAP is a standard protocol that allows the platforms to access an active directory to fetch target user’s information such as **Name**, **Surname**, **Email**, **Department**, **Phone Number**, and other information to synchronize these user’s information to the platform automatically.

## **How To Set LDAP**

Go to **Company > Company Settings > LDAP** from the platform menu to access the following LDAP configuration.

### Settings

<table><thead><tr><th width="154"></th><th width="530"></th><th data-hidden></th></tr></thead><tbody><tr><td>Server URL</td><td>URL and Port number to access the active directory.</td><td></td></tr><tr><td>Bind Username</td><td>Read-only access account name in the active directory.</td><td></td></tr><tr><td>Bind User Password</td><td>Password of the read-only account.</td><td></td></tr><tr><td>Base DN</td><td>The starting point for searches in the LDAP directory server. Example of DC=company and DC=domain.com.</td><td></td></tr><tr><td>Relative DNS</td><td>A relative search will be conducted on the subbranches of base DN for LDAP users whose objectType=user. You can enter a different relative DN on each line.</td><td></td></tr><tr><td>Status</td><td>Disable the LDAP is no need to use more.</td><td></td></tr><tr><td>Connection</td><td>Test your configuration if successful to connect the active directory.</td><td></td></tr><tr><td>Save Changes</td><td>Saves the changes</td><td></td></tr></tbody></table>

If the test connection is successful, you will see that it’s successful, if not please see the detailed pop-up message.

Usually, a allow list rule is needed to access to the local Active Directory from the platform's IP address. You can contact support team to get IP address of the platform.

### Scheduled Syncs

This is where you can see your scheduled LDAP rules. This means LDAP will automatically scan daily for new users to add/update/delete to your specified target group.

The components of the Scheduled Syncs page are explained in detail in the table below.

<table><thead><tr><th width="189"></th><th></th></tr></thead><tbody><tr><td>Name</td><td>Name of target group</td></tr><tr><td>Status</td><td>Disables the scheduled rule if you don’t want the rule to work anymore.</td></tr><tr><td>Date Created</td><td>Date and time that the scheduled rule was created.</td></tr><tr><td>Last Run</td><td>The last time LDAP was scanned for new changes.</td></tr><tr><td>Next Run Time</td><td>The next time LDAP will be scanned for new changes.</td></tr><tr><td>Edit</td><td>Edit the scheduled rule to change the settings.</td></tr><tr><td>Delete</td><td>Delete LDAP synchronization if the LDAP rule shouldn’t work anymore.</td></tr></tbody></table>

### **Field Mapping**

This is where you can choose which information that will be fetched and imported to the specific column on the platform. The admin can fetch specific information from the active directory such as the **Manager**, **Country**, **City**, or other attributes and synchronize this information of the users.

The components of the **Field Mapping** page are explained in detail in the table below.

<table><thead><tr><th width="154"></th><th></th></tr></thead><tbody><tr><td>Email</td><td>User’s <strong>Email Address</strong> that will be imported</td></tr><tr><td>First Name</td><td>User’s <strong>First Name</strong> that will be imported</td></tr><tr><td>Last Name</td><td>User’s <strong>Last Name</strong> that will be imported</td></tr><tr><td>Department</td><td>User’s <strong>Department</strong> that will be imported</td></tr><tr><td>Phone Number</td><td>User's <strong>Phone</strong> <strong>Number</strong> that will be imported.</td></tr><tr><td>Timezone</td><td>User's <strong>Timezone</strong> that will be imported.</td></tr></tbody></table>

## **How to fetch custom attributes?**

While the **Email**, **First Name**, **Last Name**, or **Department** attributes are the most popular field mapping categories, you can have the option to synchronize **Display Name**, **Office**, **Telephone Number (Mobile** or **Home)**, **Address (Street**, **City**, **State**, **P.O Box**, **Country**, **Zip Code)**, **Company**, and more.

* Go to **Target Users > People** menu and then click the **Table Settings** button on the right top of the screen to click the **EDIT FIELDS** button.
* Create a custom field and then click the **Save** button.
* To map this custom field with LDAP, go to **Company Settings > LDAP > Field Mapping** and map any listed active attributes to a created custom field.

Do not forget to save changes by clicking the **Save Changes** button and then proceed to the following title.

## **Import Users with LDAP**

Follow the steps below to import target users to the platform from the integrated Active Directory by using the LDAP.

* Go to **Company > Target Users** from the platform menu.
* Click the **+ NEW button** on the top right of the page and then select the **‘Import users from LDAP’** option.

There is two following option to import users.

### **Entire LDAP**

This option fetches all unique email users in your active directory, no matter what active directory groups they are in.

* If this option is selected, please choose a target group that all users will be imported to on the platform.
  * If the target group is not selected, all users will be imported as a single member on the platform without being assigned to a target group. No worries, all users can be imported to a single target group later.
* There are three options to import users.
  * Choose **‘Select Manually’** if all users need to be imported manually without creating auto-synchronization.
  * Choose **‘Sync All Users’** if all users need to be synchronized automatically.
    * This process repeats every 24 hours automatically to fetch new users or update changes on the users.
  * Choose **‘Sync By Query’** if all users need to be synchronized users by criteria.
    * This process repeats every 24 hours automatically to fetch new users or update changes on the users that match the criteria.
    * Use the filters to create criteria to filter users out of all users to synchronize and then use the **View Users** button to see filtered users that will be synchronized.

### **LDAP Groups**

This option fetches unique email users that are in certain groups in your active directory.

* If this option is selected, please choose LDAP groups which users that are inside will be imported to the platform.
  * If the target group is not selected, all users will be imported as a single member on the platform without being assigned to a target group. No worries, all users can be imported to a single target group later.
* There are three options to import users.
  * Choose **‘Select Manually’** if all users need to be imported manually without creating auto-synchronization.
  * Choose **‘Sync All Users’** if all users need to be synchronized automatically.
    * This process repeats every 24 hours automatically to fetch new users or update changes on the users.
  * Choose **‘Sync By Query’** if all users need to be synchronized users by criteria.
    * This process repeats every 24 hours automatically to fetch new users or update changes on the users that match the criteria.
    * Use the filters to create criteria to filter users out of all users to synchronize and then use the **View Users** button to see filtered users that will be synchronized.
    * Click **‘+ Add Condition’** to add more conditions for filtering the users.

✅ **You have now added your first Target Users. Now you need to** [**ensure they are able to receive emails from Keepnet**](https://github.com/ucarozan/keepnet-docs/blob/main/next-generation-product/getting-started/3.-email-deliverability) **successfully ➡️**

## Video Tutorial

The following video shows how to set up an LDAP connection and import or synchronize users to the platform.

{% embed url="<https://youtu.be/uodN6jBFxSE>" %}


# Add Users via API

Using the platform's APIs, target users may be effortlessly migrated. The API endpoints that are required are detailed below.

{% hint style="info" %}
Use your own domain if you are using an on-premise version. e.g. <https://api.PLATFORM\\_DOMAIN/docs/index.html>
{% endhint %}

**Instructions for adding target users using an API**

<mark style="color:green;">**POST**</mark> **​/api​/target-users**

* Go to the Swagger [link](https://api.keepnetlabs.com/docs/index.html).
* Click the **Authorize** button on the top right side of the page.
* Complete the authorization step with the **Client ID** and **Client Secret** key that you created on the platform.
* Make sure that the **api1** option is checked (✓) on the **Scopes** section.
* Then use this endpoint to add a **new target user** to the platform.

{% hint style="info" %}
The most up-to-date format of the body content that you need to use for requesting an API is available on the Swagger interface.
{% endhint %}

**Searching for a user using API**

<mark style="color:green;">**POST**</mark> **​/api​/target-users​/search**

* Go to the Swagger [link](https://api.keepnetlabs.com/docs/index.html).
* Click the **Authorize** button on the top right side of the page.
* Complete the authorization step with the **Client ID** and **Client Secret** key that you created on the platform.
* Make sure that the **api1** option is checked (✓) on the **Scopes** section.
* Then use this endpoint to **search for a target user** on the platform.

{% hint style="info" %}
The most up-to-date format of the body content that you need to use for requesting an API is available on the Swagger interface.
{% endhint %}

**Editing Target Users using API**

<mark style="color:orange;">**PUT**</mark> **​/api​/target-users​/{resourceId}**

* Go to the Swagger [link](https://api.keepnetlabs.com/docs/index.html).
* Click the **Authorize** button on the top right side of the page.
* Complete the authorization step with the **Client ID** and **Client Secret** key that you created on the platform.
* Make sure that the **api1** option is checked (✓) on the **Scopes** section.
* Then use this endpoint to **edit a target user** on the platform.

{% hint style="info" %}
The most up-to-date format of the body content that you need to use for requesting an API is available on the Swagger interface.
{% endhint %}

​✅ **You have now added your first Target Users. Now you need to** [**ensure they are able to receive emails from Keepnet**](https://github.com/ucarozan/keepnet-docs/blob/main/next-generation-product/getting-started/3.-email-deliverability) **successfully ➡️**

### Video Tutorial <a href="#video-tutorial" id="video-tutorial"></a>

{% embed url="<https://youtu.be/S0nN_uE8NjQ>" %}


# 3. Email Deliverability

It is essential that your employees are able to receive all emails sent via Keepnet platform for you to accurately measure how your employees behave when faced with evolving social engineering threats.

**To ensure emails are delivered in Microsoft 365, you have 2 options::**

* [**Direct Email Creation**](/next-generation-product/platform/company/company-settings/direct-email-creation)
* [**Allow Listing​**](/next-generation-product/getting-started/3.-email-deliverability/microsoft-365/m365-allow-listing)

{% hint style="success" %}
You only need to do one of these options. Customers do not need to complete both.
{% endhint %}

## **Direct Email Creation** <a href="#direct-email-creation" id="direct-email-creation"></a>

**Direct Email Creation (DEC)** is a feature that connects to your O365 or Google Workspace with a few required API permissions. This feature creates the phishing simulation email directly in the user’s inbox instead of sending the emails over SMTP protocol.**Key Benefits:**

1. Remove false positives that allow listing tools cause when analyzing links.
2. Eradicate maintenance and challenges of allow listing for the purpose of email delivery (you may need to allow list in your URL protection solutions such as Defender or ZScaler)
3. Very simple and quick setup (can be completed in a couple of minutes!)

## Allow Listing <a href="#whitelisting" id="whitelisting"></a>

**Allow Listing** is common practise for ensuring emails from specific domains are delivered successfully to the inboxes of your employees. Allow Listing is a method used by many organisations to ensure emails are successfully delivered.

The **key challenge** our customers face with allow listing is email analysis tools often open links within emails to check for maliciousness, impacting the accuracy of your reporting data. For example, it may show that your employees have opened the phishing link when they have not. This will directly influence who receives the behavioural-based training.

#### **⬇️ Please follow the relevant steps for your email provider:**

[​Microsoft 365​​](/next-generation-product/getting-started/3.-email-deliverability/microsoft-365)

[Google Workspace](/next-generation-product/getting-started/3.-email-deliverability/google-workspace)

​​[Exchange 2013 and 2016](/next-generation-product/getting-started/3.-email-deliverability/exchange-2013-and-2016)​


# Microsoft 365

It is essential that your employees are able to receive all emails sent via Keepnet platform for you to accurately measure how your employees behave when faced with evolving social engineering threats.

**To ensure emails are delivered in Microsoft 365, you have 2 options:**

​[Direct Email Creation](/next-generation-product/getting-started/3.-email-deliverability/microsoft-365/m365-direct-email-creation) (recommended)

[Allow Listing](/next-generation-product/getting-started/3.-email-deliverability/microsoft-365/m365-allow-listing)

{% hint style="success" %}
You only need to do one of these options. Customers do not need to complete both.
{% endhint %}

## **Direct Email Creation** <a href="#direct-email-creation" id="direct-email-creation"></a>

**Direct Email Creation (DEC)** is a feature that connects to your O365 or Google Workspace with a few required API permissions. This feature creates the phishing simulation email directly in the user’s inbox instead of sending the emails over SMTP protocol.**Key Benefits:**

1. Remove false positives that allow listing tools cause when analyzing links.
2. Eradicate maintenance and challenges of allow listing for the purpose of email delivery (you may need to allow list in your URL protection solutions such as Defender or ZScaler)
3. Very simple and quick setup (can be completed in a couple of minutes!)

## Allow Listing <a href="#whitelisting" id="whitelisting"></a>

**Allow Listing** is common practise for ensuring emails from specific domains are delivered successfully to the inboxes of your employees. Allow Listing is a method used by many organisations to ensure emails are successfully delivered.

The **key challenge** our customers face with allow listing is email analysis tools often open links within emails to check for maliciousness, impacting the accuracy of your reporting data. For example, it may show that your employees have opened the phishing link when they have not. This will directly influence who receives the behavioural-based training.


# M365: Direct Email Creation

## **Direct Email Creation** <a href="#direct-email-creation" id="direct-email-creation"></a>

**Direct Email Creation (DEC)** is a feature that connects to your O365 with a few required API permissions. This feature creates the phishing simulation email directly in the user’s inbox instead of sending the emails over SMTP protocol.**Key Benefits:**

1. Remove false positives that come from email delivery.
2. Eradicate maintenance and challenges of allow listing for the purpose of email delivery (you may need to allow list in your URL protection solutions such as Defender or ZScaler)
3. Very simple and quick setup (can be completed in a couple of minutes!)

## How to Configure Direct Email Creation <a href="#how-to-configure-direct-email-creation" id="how-to-configure-direct-email-creation"></a>

#### **Step 1.**

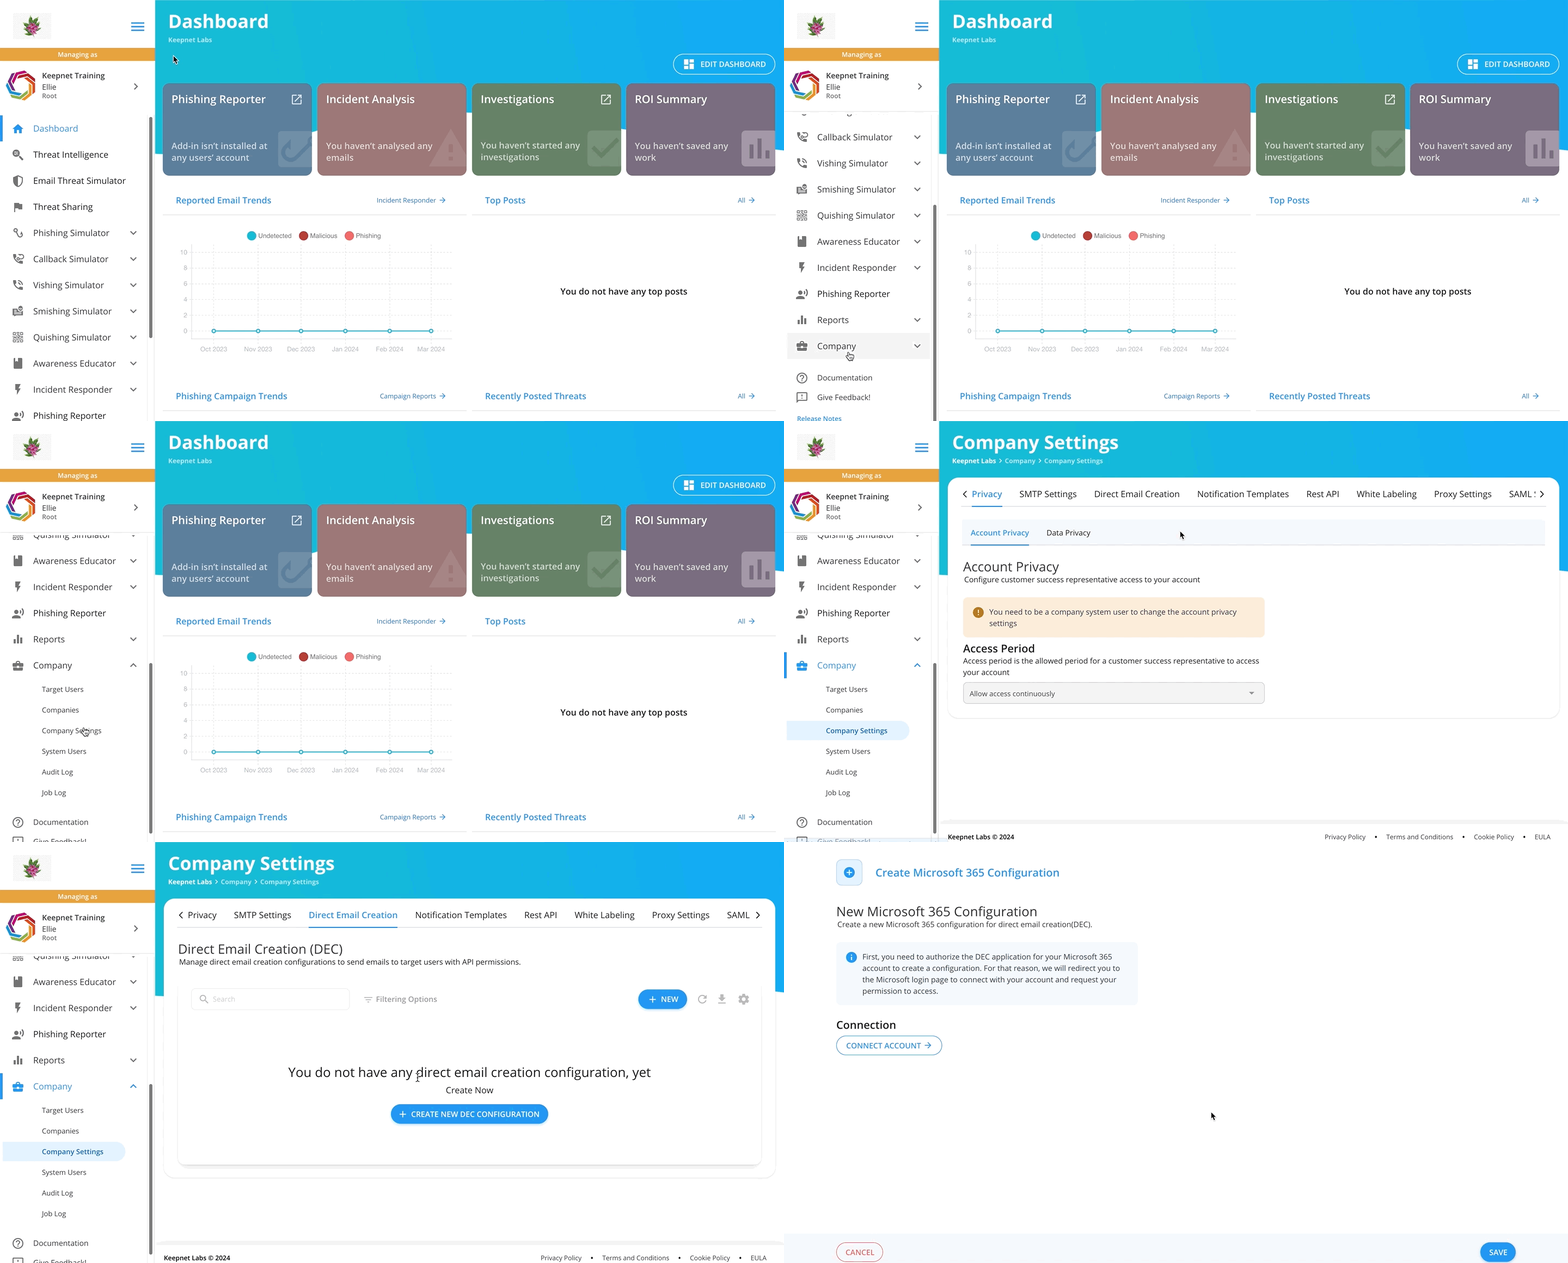
Go to **Company > Company Settings > Direct Email Creation** from the main menu. Click on **+ NEW** to create a direct email creation setting.

<figure><img src="https://files.gitbook.com/v0/b/gitbook-x-prod.appspot.com/o/spaces%2FlKFxOYqYqSykikkXpwjG%2Fuploads%2FXriRwZsAJwPZfjBHZc8B%2FDEC%20step%201.gif?alt=media&#x26;token=cb569e01-98e0-493c-bf3a-189156e51641" alt="Direct Email Creation — Company Settings, + NEW, create DEC setting."><figcaption><p>Direct Email Creation — Company Settings, + NEW, create DEC setting.</p></figcaption></figure>

#### **Step 2.**

Click on **Connect Account** button to connect your O365 with the Direct Email Creation (DEC) application to create a configuration.

{% hint style="info" %}
You can find all API permission settings [here](#about-required-api-permissions)
{% endhint %}

#### **Step 3.**

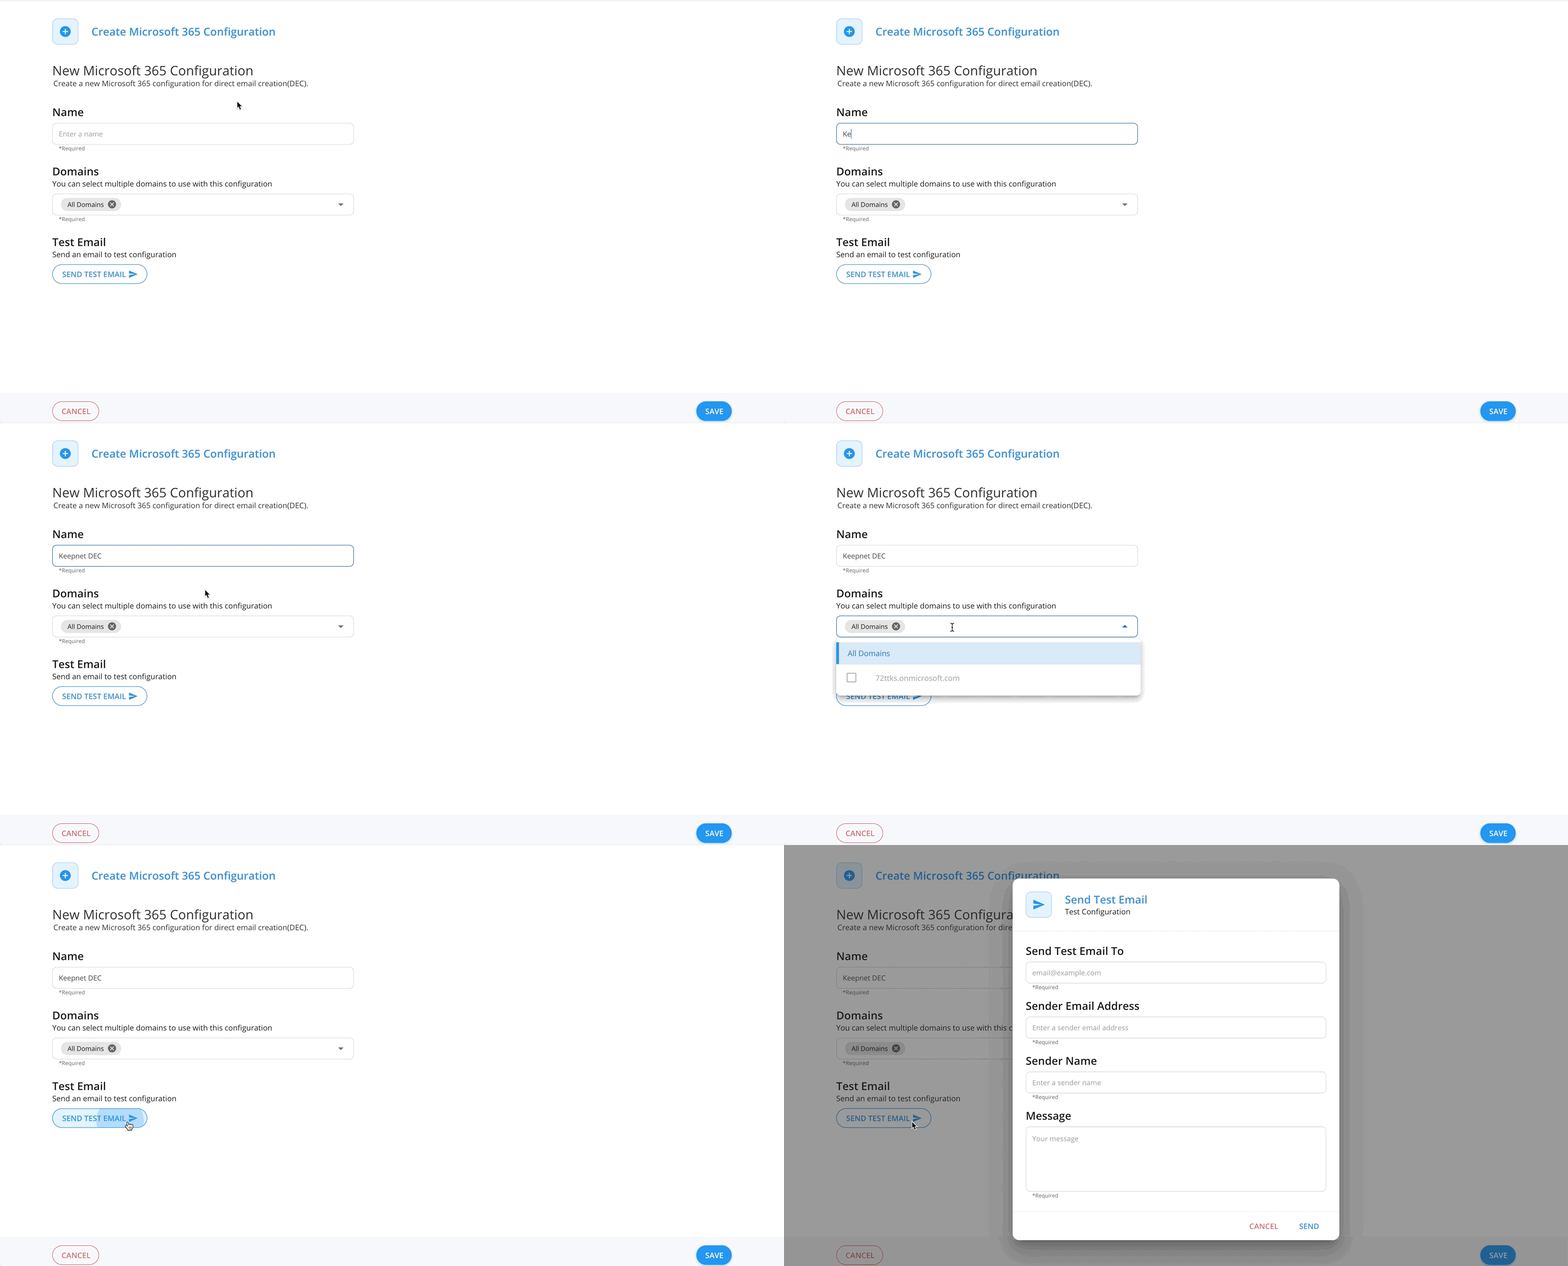
Name your DEC, select which domains you will send phishing simulation emails to and **Send Test Email.**

* **Send Test Email To:** Enter the email of the person receiving the test email.
* **Sender Email Address:** Enter any email - you can now send emails from any email address!
* **Sender Name:** Enter a sender name.
* **Message:** Enter a message.
* Click **SAVE** to create configuration settings.

<figure><img src="https://files.gitbook.com/v0/b/gitbook-x-prod.appspot.com/o/spaces%2FlKFxOYqYqSykikkXpwjG%2Fuploads%2FdThslnbhmjb5z08eWaQx%2Fdec%20step%202.gif?alt=media&#x26;token=9661f21c-7a4e-47b9-9a47-4339270dce6e" alt="Connect Account and DEC configuration — name, domains, test email."><figcaption><p>Connect Account and DEC configuration — name, domains, test email.</p></figcaption></figure>

#### **Step 4.**

Make Direct Email Creation your **Default** Delivery Method - this will save you lots of time and remove delivery errors when you start sending phishing campaigns.

<figure><img src="/files/iVAXdAFuU3uS4ZGAuNj9" alt="Set Direct Email Creation as default delivery method."><figcaption><p>Set Direct Email Creation as default delivery method.</p></figcaption></figure>

{% hint style="info" %}
**Top Tip:** Make sure to select **Direct Email Creation** in your **Email Delivery** settings when running a new phishing campaign.

<img src="/files/YRDq6NOGl1JSFo3t8ej2" alt="How to configure DEC in Email Delivery settings." data-size="original">
{% endhint %}

## About Required API Permissions

Keepnet follows [Microsoft's secure design principles](https://learn.microsoft.com/en-us/entra/identity-platform/permissions-consent-overview?WT.mc_id=Portal-Microsoft_AAD_RegisteredApps) for third-party applications and has received approval from Microsoft. The app uses permissions solely to create simulated phishing emails in users' inboxes. It does not include permission to read, send email or access other mailbox functionalities.

The following permissions are required for customers using the **Microsoft** **365** email server.

<table data-header-hidden><thead><tr><th width="189"></th><th></th></tr></thead><tbody><tr><td>Read and write all applications</td><td>It is used only when the customer uses a custom domain instead of dash.keepnetlabs.com to access the platform. This ensures that the customer can successfully configure the DEC settings on the platform while using the custom whitelabeled domain.</td></tr><tr><td>Read domains</td><td>It is used to fetch the domains that the customer owns in Microsoft 365 and allows the customer to select the relevant domains so the platform can create simulation emails in the user's inbox under the selected domains.</td></tr><tr><td>Read and write mail in all mailboxes</td><td>It is used to create a simulation email in the user's inbox. Please see following screenshot for more information about this permission</td></tr><tr><td>Read all users' full profiles</td><td>It is used to read the user's profile information, retrieve email account details (e.g., email address), and switch to the user's profile to create simulation emails in their inbox.</td></tr><tr><td>Sign in and read user profile<br></td><td>It is used to read basic company information of the signed-in user who grants permission.</td></tr></tbody></table>

Microsoft bundles permissions together. The following Microsoft screenshot shows a '**Mail**' permission group. There's no separate **Write** permission — only the **Mail.ReadWrite** permission, which handles **Write** **actions**.

<figure><img src="/files/O9QsBQEyjAkjJWX2L1I3" alt="Microsoft Mail permission group — Mail.ReadWrite for DEC."><figcaption><p>Microsoft Mail permission group — Mail.ReadWrite for DEC.</p></figcaption></figure>

The following permissions are required for customers using the **Microsoft** **Exchange** **Online** email server.

<table data-header-hidden><thead><tr><th width="180"></th><th></th></tr></thead><tbody><tr><td>Access mailboxes as the signed-in user via Exchange Web Services</td><td>It is used to access user's mailbox in order to create simulation email in the inbox.</td></tr><tr><td>Use Exchange Web Services with full access to all mailboxes</td><td>It is used to create a simulation email in the user's inbox without using a sign-in account.</td></tr><tr><td>Manage Exchange As Application</td><td>It is used to allow the app to manage the organization's Exchange environment without any user interaction.</td></tr></tbody></table>

In summary, customers only need to share the necessary permissions based on their specific environment, whether they use **Microsoft** **365**, **Microsoft** **Exchange** **Online**, or a **hybrid of both**. Keepnet requests these permissions to create simulation emails in the user's inbox across **any of these environments**.

For example, if you use just only **Microsoft** **Exchange** **Online**, then Keepnet only uses the related permission groups for **Exchange** **Online**, other permissions are not used.

## **How to Provide Proof of DEC App Activity for Compliance and Security**

To view the activity of the DEC application created by the platform and confirm that it is only creating simulation emails (and not reading any emails), please follow these steps:

1. **Log in** to the [Microsoft Compliance Portal](https://compliance.microsoft.com/).
2. Navigate to the **Audit** menu.
3. If not already enabled, click to **Enable Audit Logging**.
4. **Set up the DEC configuration** successfully on the platform, and send a test email using the DEC settings to generate activity logs.
5. Go back to the **Audit menu** and search for logs related to the user who sent the test email with DEC settings. Also, you may copy the **Application** **ID** of the DEC application and paste it under the Keyword Search field to search logs.

In the logs, you should see activities such as **"Created mailbox item"**, confirming the application's behavior. For example:

<figure><img src="/files/1511u8btvriQbAkyyoW8" alt="Microsoft Compliance Portal — audit log Created mailbox item for DEC app."><figcaption><p>Microsoft Compliance Portal — audit log Created mailbox item for DEC app.</p></figcaption></figure>

This log indicates that the application is only creating mailbox items and not accessing or reading mailboxes.

✅ **You have now ensured your target users will receive emails through Keepnet. Now you need to** [**Allow List Domains**](/next-generation-product/getting-started/recommended-add-domains-to-url-protection) **so your target users can successfully open Keepnet email links. ➡️**

## Video Tutorial

This video tutorial explains how to configure direct email creation settings and launch a campaign with these settings to create phishing emails directly in the user's inbox instead of launching with the SMTP option.

{% embed url="<https://www.youtube.com/watch?v=qBnJFVtqz_c>" %}

## FAQ

### Q: Which permissions does the DEC feature work with?

A: Click [here](#about-required-api-permissions) for more information.

### Q: Can I launch a campaign with DEC settings using the Fast Launch option?

A: No, you can only launch a campaign with DEC settings using Campaign Manager. If you launch a campaign with Fast Launch, the campaign will be started with default SMTP settings.

### Q: Do I need to allow list if I use the DEC feature?

A: If you use only the [Phishing Simulator](https://keepnetlabs.com/products/phishing-simulator) product and use the DEC feature, you don’t need to do [allow listing](/next-generation-product/miscellaneous/allow-listing). If you’re using other products, such as Awareness Educator, you need to do allow listing since the DEC feature only works for now with the [Phishing Simulator](https://keepnetlabs.com/products/phishing-simulator) product.

### Q: Can I resend the campaign email to the users whose status shows Error in the Sending Report menu in the campaign report?

A: No, the users whose status shows Error means the destination email user account hasn’t been found in the O365, or there might be another problem for these users' email accounts which platform will show you as a tooltip if you hover your mouse over the error status.

### Q: What action should I take for users whose status shows an error ("domain.com" is not in the allowed domain list) in the Sending Report menu after the launch campaign?

A: You can check and make sure you selected the related domain addresses in the DEC configuration, and then you can try to resend the campaign to these users from the Sending Report menu in the campaign report.

### Q: What are the security risks if we authorize the DEC feature on the O365 server?

A: Authorizing the DEC feature on the O365 server doesn’t involve any potential security considerations. Keepnet provides encryption to secure data and prevent unauthorized access to keep your data safe.

First, we encrypt data and apply it to our [cryptography policy](https://doc.keepnetlabs.com/resources/compliance#cryptography-policy) and [data protection policy](https://doc.keepnetlabs.com/resources/compliance#data-protection-policy) to make data secure and prevent potential vulnerabilities.

Furthermore, we have a strict access policy and do not allow unauthorized gain access to sensitive data; please see our access policy [here](https://doc.keepnetlabs.com/resources/compliance#access-management-procedure).

Keepnet does its best to maintain rigorous security protocols such as regular audits of access rights, continuous monitoring for abnormal activities, and thorough vulnerability assessments.

You can see other data security measures on our [platform security page](/resources/compliance).


# M365: Allow Listing

It's suggested to use all the methods explained in this documentation step by step for allow listing successfully. The customer may skip the related step if there is no feature in their O365 environment due to the license.

#### **🚨 If you have additional security solutions (e.g. Mimecast) please make sure to allow list in these security solutions by following these steps:**

[​Allow Listing in Security Solutions​](/next-generation-product/miscellaneous/allow-listing/allow-listing-in-other-security-solutions)

## How to Allow List Using the Third-party Phishing Simulations Feature in Office 365

The below instructions will show you how to allow list the emails such as notification, training, or phishing simulation emails that will be sent from the platform to users by allow listing **Sender** **IPs** in the O365 environment in the **Phishing Simulation** feature.

{% hint style="info" %}
To complete this procedure, you must have security administrator privileges with the Microsoft Security & Compliance Center or be a member of the Microsoft Exchange Online Organization Management administrator group.
{% endhint %}

1. Note the [IP addresses](/next-generation-product/miscellaneous/allow-listing#ip-addresses-and-domains-to-allow) to be allowed.
2. Sign in to the [Microsoft Security & Compliance](https://security.microsoft.com/homepage) Center.
3. Click the **Policies & rules** item on the left sidebar menu.
4. Go to **Threat policies > Advanced delivery**.
5. Click the **Phishing simulations** tab and click **Edit**.
6. Add the **IP address** to **Sending IP** section\*\*.\*\*
7. Add the **Domain** address (also known as the **MAIL** **FROM** address) used in the phishing campaign into the **Domains** section.
8. Add the **phishing domains** [here](/next-generation-product/miscellaneous/allow-listing/allow-listing-in-other-security-solutions#whitelisting-platform-addresses) by using **\*.domain.com/\*** wildcard syntax to **Simulation URLs to allow** section.
9. Click **Save** to complete the process.

## How to Allow List Using the Threat Policies Feature in Office 365

The below instructions will show you how to allow list the emails such as notification, training, or phishing simulation emails that will be sent from the platform to users by allow listing **Sender** **IPs** in the O365 environment in the **Threat Policies** feature.

{% hint style="info" %}
To complete this procedure, you must have security administrator privileges with the Microsoft Security & Compliance Center or be a member of the Microsoft Exchange Online Organization Management administrator group.
{% endhint %}

1. Note the [IP addresses](/next-generation-product/miscellaneous/allow-listing#ip-addresses-and-domains-to-allow) to be allowed.
2. Sign in to the [Microsoft Security & Compliance](https://security.microsoft.com/homepage) Center.
3. Click the **Policies and rules** > **Anti-Spam** under the **Policies.** To go directly to the Anti-spam policies page, use <https://security.microsoft.com/antispam>
4. Click the **Connection Filter Policy** and select the **Edit** **connection** **filter**.
5. Add the IP addresses to the section labeled **Always allow messages from the following IP addresses or address range**.
6. Enable the **Turn on safe** list option.
7. Click **Save** to complete the process.

## How to Allow List Using the Spam Filter Bypass Feature in Office 365

The below instructions will show you how to allow list the emails such as notification, training, or phishing simulation emails that will be sent from the platform to users by allow listing the **Sender** **IPs** in the O365 environment in the **Bypass Spam Filter** feature.

{% hint style="info" %}
To complete this procedure, you must have security administrator privileges with the Microsoft Security & Compliance Center or be a Microsoft Exchange Online Organization Management administrator group member.
{% endhint %}

1. Sign in to the [admin](https://admin.microsoft.com/AdminPortal/) portal.
2. Go to **Exchange > Mail flow > Rules** and click the **+ Add a rule** butto&#x6E;**.**
3. Click the **"Create a New rule"** option.
4. Enter a name for your allow listing rule.
5. Scroll down to the **"Apply this rule if..."** section and select "**The** **sender"** and then select **"IP address is in any of these ranges or exactly matches"**
   1. To the right you'll see **"Enter text...",** click **"Enter Words"** to bring up a new window labeled **specify** **IP** **address** **ranges,** and enter the **IPs** listed [here](/next-generation-product/miscellaneous/allow-listing#ip-addresses-and-domains-to-allow) and then click the **Save** button.
6. Scroll down to the "**Do the following"** section.
   1. Select the "**Modify the message properties"** option and then select the "**Set the spam confidence level(SCL)"** option.
   2. And then click the **Set the spam confidence level (SCL) to '-1'** option and select "**Bypass spam filtering"** and click the **Save** butto&#x6E;**.**
7. Next to the **"Do the following"** field, click **+** button to create a new rule.
   1. Select the **"Modify the message properties"** option and then select the **"set a message header"** option.
   2. Click **"Enter** **Words"** and type **"X-MS-Exchange-Organization-BypassClutter"** and then click the **Save** button.
   3. Next, click **Enter** **Words** under the **"header value"** and type **"true".**
8. We recommend leaving the rest of the rule settings the same. Once you have completed these steps, click **Save** to save your allow listing rule.
9. Make sure the allow listing rule's status is enabled. If it's disabled, click on it and **Enable** it and click the **Edit** **Rule** **Settings** button on the opened page to save it.

## How to Bypass Advanced Threat Protection (ATP) "Link" by Using IP Address in Office 365

The below instructions will show you how to allow list the emails such as notification, training, or phishing simulation emails that will be sent from the platform to users by allow listing the **Sender** **IPs** in the O365 environment with the **"SkipSafeLinksProcessing**" rule.

{% hint style="danger" %}
This step is suggested to prevent scanning phishing simulation links by O365 sent by the platform.
{% endhint %}

{% hint style="info" %}
To complete this procedure, you must have security administrator privileges with the Microsoft Security & Compliance Center or be a Microsoft Exchange Online Organization Management administrator group member.
{% endhint %}

1. Sign in to the [admin](https://admin.microsoft.com/AdminPortal/) portal.
2. Go to **Exchange > Mail flow > Rules** and click the **+ Add a rule** butto&#x6E;**.**
3. Click on the **Create a new rule** option.
4. Enter a name for your allow listing rule.
5. Scroll down to the **"Apply this rule if..."** section and select "**The** **sender"** and then select **"IP address is in any of these ranges or exactly matches"**
   1. To the right, you'll see **"Enter text...",** click **"Enter Words"** to bring up a new window labelled **specify** **IP** **address** **ranges,** and enter the **IPs** listed [here](/next-generation-product/miscellaneous/allow-listing#ip-addresses-and-domains-to-allow) and then click the **Save** button.
6. Scroll down to the **"Do the following"** section.
   1. Select the **"Modify the message properties"** option and then select the **"Set a message header"** option.
   2. Set the message header to **"X-MS-Exchange-Organization-SkipSafeLinksProcessing"** and set the value to **"1"**.
7. We recommend leaving the rest of the rule settings the same. Once you have completed these steps, click **Save** to save your allow listing rule.
8. Make sure the allow listing rule's status is enabled. If it's disabled, click on it and **Enable** it and click the **Edit** **Rule** **Settings** button on the opened page to save it.

## How to Bypass Advanced Threat Protection (ATP) "Attachment" by Using IP Address in Office 365

The below instructions will show you how to allow list the attached files in the emails that will be sent from the platform to users by allow listing the **Sender** **IPs** in the O365 environment with the **"SkipSafeAttachmentProcessing"** rule.

{% hint style="danger" %}
This step is suggested to prevent scanning phishing simulation attachment files by O365 sent by the platform.
{% endhint %}

{% hint style="info" %}
To complete this procedure, you must have security administrator privileges with the Microsoft Security & Compliance Center or be a Microsoft Exchange Online Organization Management administrator group member.
{% endhint %}

1. Sign in to the [admin](https://admin.microsoft.com/AdminPortal/) portal.
2. Go to **Exchange > Mail flow > Rules** and click the **+ Add a rule** butto&#x6E;**.**
3. Click on the **Create a new rule** option.
4. Enter a name for your allow listing rule.
5. Scroll down to the **"Apply this rule if..."** section and select "**The** **sender"** and then select **"IP address is in any of these ranges or exactly matches"**
   1. To the right, you'll see **"Enter text...",** click **"Enter Words"** to bring up a new window labelled **specify** **IP** **address** **ranges,** and enter the **IPs** listed [here](/next-generation-product/miscellaneous/allow-listing#ip-addresses-and-domains-to-allow) and then click the **Save** button.
6. Scroll down to the **"Do the following"** section.
   1. Select the **"Modify the message properties"** option and then select the **"Set a message header"** option.
   2. Set the message header to **"X-MS-Exchange-Organization-SkipSafeAttachmentProcessing"** and set the value to **"1"**.
7. We recommend leaving the rest of the rule settings the same. Once you have completed these steps, click **Save** to save your allow listing rule.
8. Make sure the allow listing rule's status is enabled. If it's disabled, click on it and **Enable** it and click the **Edit** **Rule** **Settings** button on the opened page to save it.

## Troubleshooting

If the emails sent by the platform somehow is not delivered to the user's inbox, the admin can use the following steps to see why it's not delivered and find a solution for it.

1. Sign in to the [admin](https://admin.microsoft.com/AdminPortal/) portal.
2. Go to **Exchange > Mail flow > Message Trace** and click the **+ start a trace** butto&#x6E;**.**
3. Enter the from address to the **"Senders"** field which is expected to be delivered from the platform and click the **Search** button.
4. The O365 will list the emails that is delivered from the specified email address and then you can click on the emails to see more information.

#### **🚨 If you have additional security solutions (e.g. Mimecast) please make sure to allow list in these security solutions by following these steps:**

[​Allow Listing in Security Solutions​](/next-generation-product/miscellaneous/allow-listing/allow-listing-in-other-security-solutions)

✅ **You have now ensured your target users will receive emails through Keepnet. Now you need to** [**Allow List Domains**](/next-generation-product/getting-started/recommended-add-domains-to-url-protection) **so your target users can successfully open Keepnet email links ➡️**

## Video Tutorial

The following video playlist tutorial contains information about how to allow list in O365 environment.

{% embed url="<https://youtu.be/YTNp4ER-hWQ?list=PLTfpxvprC-_w5co46z8kqxeizCFR6ty2G>" %}


# Google Workspace

It is essential that your employees are able to open all emails sent via Keepnet platform for you to accurately measure how your employees behave when faced with evolving social engineering threats.

**To ensure emails are delivered in Google Workspace, you have 2 options:**

​[Direct Email Creation](/next-generation-product/getting-started/3.-email-deliverability/google-workspace/google-direct-email-creation) (recommended)

​[Allow Listing](/next-generation-product/getting-started/3.-email-deliverability/google-workspace/google-allow-listing)​

{% hint style="success" %}
You only need to do one of these options. Customers do not need to complete both.
{% endhint %}

## **Direct Email Creation** <a href="#direct-email-creation" id="direct-email-creation"></a>

**Direct Email Creation (DEC)** is a feature that connects to your O365 or Google Workspace with a few required API permissions. This feature creates the phishing simulation email directly in the user’s inbox instead of sending the emails over SMTP protocol.

**Key Benefits:**

1. Remove false positives that allow listing tools cause when analyzing links
2. Eradicate maintenance and challenges of allow listing for the purpose of email delivery (you may need to allow list in your URL protection solutions such as Defender or ZScaler)
3. Very simple and quick setup (can be completed in a couple of minutes!)

## Allow Listing <a href="#whitelisting" id="whitelisting"></a>

**Allow Listing** is common practise for ensuring emails from specific domains are delivered successfully to the inboxes of your employees. Allow Listing is a method used by many organisations to ensure emails are successfully delivered.

The **key challenge** our customers face with allow listing is email analysis tools often open links within emails to check for maliciousness, impacting the accuracy of your reporting data. For example, it may show that your employees have opened the phishing link when they have not. This will directly influence who receives the behavioural-based training.


# Google: Direct Email Creation

## **Direct Email Creation** <a href="#direct-email-creation" id="direct-email-creation"></a>

**Direct Email Creation (DEC)** is a feature that connects to your O365 with a few required API permissions. This feature creates the phishing simulation email directly in the user’s inbox instead of sending the emails over SMTP protocol.**Key Benefits:**

1. Remove false positives that allow listing tools cause when analyzing links.
2. Eradicate maintenance and challenges of allow listing for the purpose of email delivery (you may need to allow list in your URL protection solutions such as Defender or ZScaler)
3. Very simple and quick setup (can be completed in a couple of minutes!)

This page explains how to use the **Direct** **Email** **Creation** feature in **Google** **Workspace**. Please follow the steps below to set up DEC settings within your Google Workspace.

{% hint style="info" %}
The Google Workspace settings section requires global administrator privileges.
{% endhint %}

## First Settings on Platform

Please follow the steps below to make the necessary settings on the platform for the Direct Email Creation feature to be connected within your Google Workspace.

* Log in to the platform
* Go to **Company > Company Settings >** **Direct Email Creation** page.
* Click the **+ NEW** button and select **Google** **Workspace**.
* Fill in the following fields.
  * **Configuration Name:** Give a name for your DEC settings.
  * **Client ID:** Copy the Client ID ( 102720780747216042586 ).
* Select your **domain(s)** under the **Domains** field.
  * **IMPORTANT:** The selected domain(s) must be **Verified** on the **Allowed** **Domains** page and must be used in your **Google** **Workspace**. Otherwise, the selected domain will not work with this DEC configuration.
* Do not close this tab. The **Save** button will remain disabled until the configuration works. Please proceed to the following section.

## Seconds Settings on Google Workspace

Please follow the steps below to make the necessary settings for the Direct Email Creation feature to be connected to your Google Workspace.

* Log in to <https://admin.google.com/> your Google Workspace admin panel.
* On the left-hand side, go to **Security > Access and Data Control > API Controls.**
* From the **API** **Controls** page, click on the **"Manage Domain-wide Delegation"** button under the **"Domain-wide Delegation"** field.
* Click on the **Add** **New** button.
* Enter the **Client** **ID** ( 102720780747216042586 ) into the **Client** **ID** field.
* Enter the following URLs into the **OAuth** **Scopes** field.
  * <https://mail.google.com>
  * <https://www.googleapis.com/auth/gmail.insert>
  * <https://www.googleapis.com/auth/gmail.modify>
* Click on the **Authorize** button.

## Complete Final Settings and Test Email Direct Creation Feature

Now, we will complete the process in this section, test the connection between Google Workspace and the Direct Email Creation feature, and see if we can successfully create an email in the user's inbox.

* Go to your **Company > Company Settings >** **Direct Email Creation** settings page.
* Click on the **"Send Test Email"** button to test the email creation.
  * **To:** Enter the recipient's email address who will receive the test email in their inbox.
    * The **email** **domain** must be the domain that was selected previously in the **Domains** field.
  * **From:** Enter an email as a from address.
  * **Sender Name:** Enter a sender name.
  * **Message:** Enter a message for test purposes.
* Click on the **Send** button to create the email in the user's inbox. If successful, please click the **Save** button to complete the configuration.

If the test is not successful, please see the **Troubleshoot** section.

## How to Launch Phishing Campaign by DEC Settings

Go to **Phishing Simulator > Campaign Manager** from the main menu. Click on **+ NEW** to create a phishing campaign and launch it to your target users.

* Please complete the first, second, and third sections step by step. For more information about how to use each menu, see [here](/next-generation-product/platform/phishing-simulator/phishing-campaign-manager).
* When you get to the **Delivery** **Settings** page, inside of the **Email** **Delivery** field, select your **DEC** **settings.**
* Set up the rest of the settings as you wish, and then click on **Next** to go to the last page.
* Review all of your settings and click the **Launch** button to create phishing simulation emails in the selected target user's inbox.

✅ **You have now ensured your target users will receive emails through Keepnet. Now you need to** [**Whitelist Domains**](/next-generation-product/getting-started/recommended-add-domains-to-url-protection) **so your target users can successfully open Keepnet email links ➡️**

## Video Tutorial

This video tutorial explains how to configure direct email creation settings and launch a campaign with these settings to create phishing emails directly in the user's inbox instead of launching with the SMTP option.

{% embed url="<https://youtu.be/cEHtNP0-UcQ>" %}

## Troubleshoot

If you test the DEC configuration and the test is not successful, please try the following options.

* Please make sure the domain you selected in DEC settings is **Verified** in **the Allowed Domains** page. If it is not, please verify it.
* Please ensure the domain you selected in DEC settings is used in the employee's email address as main domain in Google Workspace.
* Please try to launch a phishing campaign to the test emails with DEC settings via Campaign Manager. Then, go inside the campaign report and go to the **Sending** **Report** menu. You can see more technical information if you hover your mouse over the delivery **Error** status.

If the options above are not resolved, please [contact the support team](/resources/keepnet-support-help-desk) for further assistance.


# Google: Allow Listing

## Google Workspace IP Bypass <a href="#google-workspace-ip-bypass" id="google-workspace-ip-bypass"></a>

The below instructions will show you how to allow list the emails such as notification, training, or phishing simulation emails that will be sent from the platform to users by allow list **Sender** **IPs** in the Google Workspace environment.

{% hint style="warning" %}
To complete this procedure, you must have security administrator privileges with Google Workspace.
{% endhint %}

1. Note the [IP addresses](/next-generation-product/miscellaneous/allow-listing#ip-addresses-and-domains-to-allow) to be allowed.
2. Sign in to [Google Admin.](https://admin.google.com/)
3. Select **Apps > Google Workspace > Gmail** from the left sidebar menu.
4. Go to the **Spam, Phishing, and Malware** page.
5. Select the **Email allowlist** tab and click the **Edit** button.
6. Add the IP addresses that are listed here.
7. Click the **Save** button.
8. Go back to the **Spam, Phishing, and Malware** page.
9. Select the **Inbound Gateway** option and click **Enable**, if not enabled.
10. Add the IP addresses and click **Save**.
11. Select **Automatically detect external IP** if not already selected.
12. <mark style="color:red;">**WARNING**</mark>**:** Leave the option of **Reject all mail not from gateway IPs** unchecked.
    1. This option must be 'unchecked'. **Do not enable this option!**
13. Select the option of **Require TLS for connections from the email gateways listed above**.
14. Click **Save** to complete the process.

#### **🚨 If you have additional security solutions (e.g. Mimecast) please make sure to allow list in these security solutions by following these steps:**

[​Allow Listing in Security Solutions​](/next-generation-product/miscellaneous/allow-listing/allow-listing-in-other-security-solutions)

​✅ **You have now ensured your target users will receive emails through Keepnet. Now you need to** [**Allow List Domains**](/next-generation-product/getting-started/recommended-add-domains-to-url-protection) **so your target users can successfully open Keepnet email links ➡️**

## Video Tutorial <a href="#video-tutorial" id="video-tutorial"></a>

{% embed url="<https://youtu.be/gsX6r_3gD8U>" %}


# Exchange 2013 and 2016

{% hint style="warning" %}
To complete this procedure, you must have security administrator privileges with the Microsoft Security & Compliance Center or be a member of the Microsoft Exchange Online Organization Management administrator group.
{% endhint %}

1. Note the [IP addresses](https://app.gitbook.com/o/-LMcQ_WBbT5jibln-2Mt/s/lKFxOYqYqSykikkXpwjG/next-generation-product/getting-started/3.-ensure-email-deliverability/exchange-2013-and-2016) to be allowed.
2. Log in to your exchange admin center.
3. From the left sidebar menu, go to **Mail flow > Connectors**.
4. Click **Add a connector**.
5. Select **Partner organization** in the **Connection** from the section.
6. Give the connector a name and click **Next**.
7. In the **Authenticating sent email** window, select the option that states **By verifying that the IP address of the sending server matches one of the following IP addresses that belong to your partner organization**.
8. Enter the IP addresses and click **Next**.
9. Uncheck the TLS option stating **Reject email messages if they are not sent over**.
10. Click **Next**, then click **Save** to complete the process.

You must complete the following steps once the **connector** is defined.

1. Go to the **Mail flow > Rules** page in the left sidebar menu.
2. Click the **+ icon** on the screen and select **Bypass spam filtering**.
3. In the **New rule** window, give the rule a name and select **The sender is ... > IP address is in any of these ranges or exactly matches.**
4. Enter the IP addresses and click **OK**.
5. In the **Do the following** section, select Set the message header to this value ... > Set a message header and enter **“X-MS-Exchange-Organization-Bypass Clutter”** in the text field, and click **OK**.
6. Set the value information to **true** with the enter text option on the right.
7. Click **Save** to complete the process.

#### **🚨 If you have additional security solutions (e.g. Mimecast) please make sure to allow list in these security solutions by following these steps:**

[​Allow Listing in Security Solutions​](/next-generation-product/miscellaneous/allow-listing/allow-listing-in-other-security-solutions)

​✅ **You have now ensured your target users will receive emails through Keepnet. Now you need to** [**Allow List Domains**](/next-generation-product/getting-started/recommended-add-domains-to-url-protection) **so your target users can successfully open Keepnet email links ➡️**

### Video Tutorial <a href="#video-tutorial" id="video-tutorial"></a>

The following video tutorial contains information about how to Allow List in Exchange 2013 or 2016 environment.

{% embed url="<https://youtu.be/GsSylrZqlxQ>" %}


# 4. Setup Phishing Reporter

## What is the Phishing Reporter?

Phishing Reporter is an add-in that allows users to easily report a suspicious email to cyber security teams. Quick, comprehensive analysis and response can be provided when used in conjunction with the Incident Responder.

### **There are 2 options:**

* **Integrate the Native Microsoft Reporter Button with Keepnet**
  * Use your existing reporter button whilst capturing who is showing secure reporting behaviour across your phishing simulations

{% content-ref url="/pages/IpXPbgXMopK5ag8sRm70" %}
[Integrate Native Microsoft Phishing Report Button with Keepnet](/next-generation-product/getting-started/6.-setup-phishing-reporter/integrate-native-microsoft-phishing-report-button-with-keepnet)
{% endcontent-ref %}

* **Use our highly customisable Keepnet Reporter Button**
  * Customise the language employees see when reporting and set up positive reinforcement messages for employees whilst still being able to redirect reported emails to your SOC team

{% content-ref url="/pages/HQKqzF89vfeF4H4NKBTf" %}
[Deploy Keepnet's Customisable Phishing Report Button](/next-generation-product/getting-started/6.-setup-phishing-reporter/deploy-keepnets-customisable-phishing-report-button)
{% endcontent-ref %}

{% hint style="success" %}
We have a [Phishing Reporter Announcement email template](/next-generation-product/platform/phishing-reporter/phishing-reporter-deployment/phishing-reporter-announcement-email-template) you can use to share the key benefits and expectations of your employees using this tool.
{% endhint %}


# Deploy Keepnet's Customisable Phishing Report Button

Most customers choose to deploy Keepnet's highly customisable Phishing Reporter Button. Our Keepnet button is fully customisable and allows customers to set up automatic positive messages to employees to reinforce secure behaviour.

Setup is super simple:

[Step 1. Configure the Phishing Reporter](/next-generation-product/getting-started/6.-setup-phishing-reporter/deploy-keepnets-customisable-phishing-report-button/step-1.-download-phishing-reporter)

[Step 2. Deploy Phishing Reporter](https://github.com/ucarozan/keepnet-docs/blob/main/next-generation-product/getting-started/6.-setup-phishing-reporter/step-2.-deploy-phishing-reporter)

For our full technical documentation on Phishing Reporter Button, please see below


# Step 1. Configure the Phishing Reporter

#### **Step 1.**

To download the Phishing Reporter, go to the **Phishing Reporter** tab on the left hand side and select **Configure Add-in** (or click on Settings).​

<figure><img src="/files/AelWpxH35fgEOqweDlCD" alt="Phishing Reporter Configure Add-in or Settings — first step to download."><figcaption><p>Phishing Reporter > Configure Add-in (or Settings) — first step to download.</p></figcaption></figure>

#### **Step 2.**

On the first settings page, **Add-in Settings**, is where you can customise how the Phishing Reporter appears in your employees inbox including:

* Logo
* Button labels
* Messages users receive when reporting emails

#### **Step 3.**

Your **Email Settings** page is where you select who will be notified about suspicious emails and the email you want them to receive. You can add as many emails as you would like here.

#### **Step 4.**

**Proxy**: If users are accessing the internet through a proxy, you can enable the plugin to detect the proxy configuration of the computer where it will be installed.

**API**: If you require any changes to be made to the API settings, please let our support team know on <support@keepnetlabs.com>.

**Enterprise Vault**: When selected, the suspicious email can be searched in the user's backup emails during the investigation. (*Only for MSI phishing reporter add-in*)

#### **Step 5. (Only for MSI add-in)**

The **Diagnostic Tool** provides information about the status of the add-in. For example, if the add-in has been disabled by a user, the **Diagnostic Tool** can be used to ensure automatic activation or make system admins aware.

{% hint style="warning" %}
The Diagnostic Tool is designed only for use on Outlook Desktop add-in with the MSI extension. When the add-in is distributed over Office 365 or Google Workspace, it is automatically installed and active for all users.
{% endhint %}

**✅ You have now customised the Phishing Reporter.**

**Now, go to** [**Deployment**](https://github.com/ucarozan/keepnet-docs/blob/main/next-generation-product/getting-started/6.-setup-phishing-reporter/step-2.-deploy-phishing-reporter) **➡️**


# Step 2. Deploy Phishing Reporter

## Shortcuts

* [How to Deploy the Microsoft Page View Add-in](/next-generation-product/getting-started/6.-setup-phishing-reporter/deploy-keepnets-customisable-phishing-report-button/step-2.-deploy-phishing-reporter/how-to-deploy-add-in-in-microsoft-365)
* [How to Deploy the Microsoft Ribbon Reporter Add-in](/next-generation-product/getting-started/6.-setup-phishing-reporter/deploy-keepnets-customisable-phishing-report-button/step-2.-deploy-phishing-reporter/how-to-deploy-the-microsoft-ribbon-reporter-add-in)
* [How to Deploy the Add-in in Exchange Admin Center](/next-generation-product/getting-started/6.-setup-phishing-reporter/deploy-keepnets-customisable-phishing-report-button/step-2.-deploy-phishing-reporter/how-to-deploy-add-in-in-exchange-admin-center)
* [How to Deploy the Add-in in Google Workspace](/next-generation-product/getting-started/6.-setup-phishing-reporter/deploy-keepnets-customisable-phishing-report-button/step-2.-deploy-phishing-reporter/how-to-deploy-add-in-in-google-workspace)
* [Phishing Reporter Announcement Email Template](/next-generation-product/platform/phishing-reporter/phishing-reporter-deployment/phishing-reporter-announcement-email-template)

## Comparison: Ribbon vs Page View vs MSI Outlook Phishing Reporter (Microsoft 365)

Use this chart to determine which **Phishing** **Reporter** add-in is best suited for your **Microsoft 365 environment.** The right choice depends on how your employees access Outlook—whether through desktop apps, web browsers, or mobile devices.

| Feature / Platform                              | Ribbon Phishing Reporter                             | Page View Phishing Reporter                          | MSI Outlook Add-in                             |
| ----------------------------------------------- | ---------------------------------------------------- | ---------------------------------------------------- | ---------------------------------------------- |
| **Outlook on Windows (Classic)**                | ✅ Supported (only version 2404 build 17530.15000)    | ✅ Supported                                          | ✅ Supported                                    |
| **Outlook on Windows (New)**                    | ✅ Supported                                          | ✅ Supported                                          | ❌ Not Supported                                |
| **Outlook Classic 2016+ on Windows (Exchange**) | ❌ Not Supported                                      | ✅ Supported                                          | ✅ Supported                                    |
| **Outlook on MacOS (Microsoft 365)**            | ✅ Supported (Version 16.81 (23121700) or later)      | ✅ Supported                                          | ❌ Not Supported                                |
| **Outlook on MacOS (Exchange)**                 | ❌ Not Supported                                      | ❌ Not Supported                                      | ❌ Not Supported                                |
| **Outlook on Web MacOS (Exchange)**             | ❌ Not Supported                                      | ✅ Supported                                          | ❌ Not Supported                                |
| **Outlook on the Web (Microsoft 365)**          | ✅ Supported                                          | ✅ Supported                                          | ❌ Not Supported                                |
| **Outlook on the Web (Exchange)**               | ❌ Not Supported                                      | ✅ Supported                                          | ❌ Not Supported                                |
| **Outlook on iOS (Microsoft 365)**              | ❌ Not Supported                                      | ✅ Supported                                          | ❌ Not Supported                                |
| **Outlook on Android (Microsoft 365)**          | ❌ Not Supported                                      | ✅ Supported                                          | ❌ Not Supported                                |
| **Outlook on iOS (Exchange)**                   | ❌ Not Supported                                      | ❌ Not Supported                                      | ❌ Not Supported                                |
| **Outlook on Android (Exchange)**               | ❌ Not Supported                                      | ❌ Not Supported                                      | ❌ Not Supported                                |
| **Shared Mailboxes (Outlook Desktop)**          | ❌ Not Supported                                      | ❌ Not Supported                                      | ✅ Supported (only within Classic Outlook)      |
| **Shared Mailboxes (Microsoft 365)**            | ❌ Not Supported                                      | ❌ Not Supported                                      | ❌ Not Supported                                |
| **Mobile Browser (OWA)**                        | ❌ Not Supported                                      | ❌ Not Supported                                      | ❌ Not Supported                                |
| **Installation Method**                         | Deploy via Microsoft 365 Admin Center (Manifest XML) | Deploy via Microsoft 365 Admin Center (Manifest XML) | Manual deployment via GPO or SCCM Tools        |
| **User Experience**                             | Ribbon button                                        | Side panel in reading view                           | Ribbon button (Classic Outlook interface only) |

## FAQ

### Q: The add-in was deployed to one of the listed email servers more than 12 hours ago but is still not visible on users' email applications. What can I do?

A: You can try to re-deploy the add-in. If it still does not appear, you should contact the support team of the email service provider.

### **Q: Can an Attacker hijack Outlook Add-in?**

A: The platform uses “Code Signing with Microsoft Authenticode” to protect tools against hacking attempt. For more information, please [click here](https://www.digicert.com/dc/code-signing/microsoft-authenticode.htm)​.

### **Q: Is it possible to centralise the distribution of add-in?**

A: Yes, it is. Many institutions manage the add-in (install, uninstall, enable, disable) with central administration tools, such as Microsoft SCCM, IBM Bigfix.

### Q: Does the Phishing Reporter Add-In work with the Outlook application on iOS?

A: Yes, if you distribute the Phishing Reporter Add-In as an XML package (Microsoft 365), it will be available in both OWA/Outlook applications and will also function within the Outlook application on iOS.

### **Q: Does the Phishing Reporter Add-In work in shared mailboxes in O365?**

**A:** The add-in works in shared mailboxes in the Outlook Desktop Application. However, it is not supported in shared mailboxes in OWA (Outlook Web Access).

### **Q: Does the new Outlook application on Windows 11 support MSI-based add-ins?**

**A:** No, the new Outlook application on Windows 11 does not support MSI-based add-ins. It is designed to work primarily with web-based add-ins such as [XML add-in of Keepnet Phishing Reporter](/next-generation-product/platform/phishing-reporter/phishing-reporter-deployment/how-to-deploy-the-add-in-in-microsoft-365). If you need MSI-based add-ins, we recommend using the classic Outlook for Windows desktop application. For more information, please find information under the "Extensibility" section in this [document](https://support.microsoft.com/en-us/office/feature-comparison-between-new-outlook-and-classic-outlook-de453583-1e76-48bf-975a-2e9cd2ee16dd).

### Q: Can I use the O365 XML Add-In on OWA in a mobile browser?

A: No, you can't use the add-in if you open OWA in a mobile browser. Microsoft 365 does not support third-party add-ins in mobile browsers for OWA. Please use the Outlook app instead.


# How to Deploy the Microsoft Page View Add-In

### How to Install the Microsoft Page View Phishing Reporter

1. Before deploying the button, we recommend customizing it. This can be done in the **Add-In Settings** tab under the [Phishing Reporter](/next-generation-product/platform/phishing-reporter/phishing-reporter-customization) menu on the Keepnet platform.
2. Once customization is complete, stay on the **Settings** tab. Scroll down to the bottom and click **Manage and Download**. A pop-up will appear—select **Connect** **Account** to proceed.

<figure><img src="/files/MgtSR7dgbdXTCDWm8e2K" alt="Download Button panel on Phishing Reporter page."><figcaption><p>Picture 3: Download Button panel on Phishing Reporter page</p></figcaption></figure>

3. Log in to your [Microsoft 365](https://admin.microsoft.com/) account using your **global admin credentials**.
4. Once you log in, the **Permissions** **requested** pop-up window will display. Read the permissions, then click **Accept**.

<figure><img src="/files/VYaepsneEa4Q3HMKj5of" alt="Required Graph API permissions for Microsoft Page View Phishing Reporter button." width="375"><figcaption><p>Picture 4: Required Graph API Permissions for<br>Microsoft Page View Phishing Reporter button</p></figcaption></figure>

#### Understanding Required Microsoft Graph API Permissions

The **Microsoft Page View Phishing Reporter** requires specific Microsoft Graph API permissions to function effectively within an organization’s Microsoft 365 environment. These permissions allow the application to interact with users’ emails, retrieve necessary details for reporting phishing attempts, and ensure smooth integration with the email infrastructure.

Below is a breakdown of the permissions required and their purpose:

**1. Mail Permissions**

* **Mail.Read**: Allows the Phishing Reporter to read the user’s email to retrieve necessary email details such as headers, attachments, and content.
* **Mail.Read.Shared**: Extends read access to shared mailboxes, ensuring that the application can retrieve phishing emails reported from shared accounts.
* **Mail.ReadWrite**: Provides both read and write access to the user’s mailbox, enabling modifications or tagging of emails as needed.
* **Mail.ReadWrite.Shared**: Extends read and write permissions to shared mailboxes for better handling of phishing reports.
* **Mail.Send**: Enables the application to send emails, which may be necessary when forwarding reported phishing emails.
* **Mail.Send.Shared**: Allows the application to send emails from shared mailboxes when the user has the appropriate permissions.

**2. User Profile Permissions**

* **profile**: Allows the Microsoft Page View Phishing Reporter to retrieve basic user profile information, ensuring accurate reporting and tracking.

5. Once you accept the permissions, the **GRAPH Authorization Successful** window will display.

<figure><img src="/files/0criJYcyVfxni83Ok9Rm" alt="Graph Authorization Successful message on Phishing Reporter page."><figcaption><p>Picture 5: Graph Authorization Successfull message on Phishing Reporter page</p></figcaption></figure>

6. Click the **Download** button for the **Page** **View** button under the **Microsoft** **365** to download the **Microsoft365PhishingReporterAddin.xml** file.
7. Log in to [Microsoft 365 Admin Center](https://admin.microsoft.com/AdminPortal/Home#/homepage) and go to [Add-ins](https://admin.microsoft.com/AdminPortal/Home#/Settings/AddIns).
8. Select **Deploy Add-in** and click **Next**.
9. Under **Deploy a custom add-in**, click **Download** **custom** **apps**.
10. Select **I have the manifesto.xml file**.
11. Click **Upload**.

<figure><img src="https://files.gitbook.com/v0/b/gitbook-x-prod.appspot.com/o/spaces%2FlKFxOYqYqSykikkXpwjG%2Fuploads%2Fa7mDhuhEs201oU8fKZQT%2Fadd-in%20step%201.gif?alt=media&#x26;token=c263c2cd-424f-4a1a-9471-390720123089" alt="Add-in deployment — step 1 (authorize or download)."><figcaption><p>Add-in deployment — step 1 (authorize or download).</p></figcaption></figure>

12. **Assign the users** who will have access to the add-in. We recommend selecting **Everyone** so the add-in will be installed on every user under the Microsoft 365 tenant.
13. **Select Deployment Method.** We recommend selecting Fixed which is the default option.
14. Click **Deploy**.

You will receive an email notification confirming your successful deployment. **It may take up to 24 hours for the add-in to be displayed** on the users' email applications. Users may need to relaunch email applications.

​✅ **You have now deployed the Phishing Reporter.**

**Next step is to** [**Setup Incident Responder**](https://github.com/ucarozan/keepnet-docs/blob/main/next-generation-product/getting-started/7.-incident-responder-setup) **(only for customers who have purchased the Incident Responder or xHRM package)**

## Video Tutorial <a href="#video-tutorial" id="video-tutorial"></a>

{% embed url="<https://youtu.be/OQoj9eXnz_c>" %}


# How to Deploy the Microsoft Ribbon Reporter Add-In

### How to Install the Microsoft Ribbon Phishing Reporter

1. Customize [Phishing Reporter](/next-generation-product/platform/phishing-reporter/phishing-reporter-customization) for your organization's needs
2. Go to **Phishing Reporter > Manage and Download** section and click **“Connect Account”**

<figure><img src="/files/20NinJ62FiupZ37DUmZS" alt="Phishing Reporter Manage and Download — Connect Account."><figcaption><p>Phishing Reporter Manage and Download — Connect Account.</p></figcaption></figure>

3. Log in to your Microsoft 365 account using your admin credentials.
4. Once you log in, the **Permissions** **requested** pop-up window will display. Read the permissions, then click **Accept**.

<figure><img src="/files/VYaepsneEa4Q3HMKj5of" alt="Permissions requested pop-up — Accept to grant Graph API permissions." width="375"><figcaption><p>Permissions requested pop-up — Accept to grant Graph API permissions.</p></figcaption></figure>

5. Once you accept the permissions, the GRAPH Authorization Successful window will display.

<figure><img src="/files/n02kCoiP8tdCri5K8RcC" alt="Graph Authorization Successful window."><figcaption><p>Graph Authorization Successful window.</p></figcaption></figure>

6. Click the **Download** icon below the **Microsoft** **Ribbon** **Phishing** **Reporter** option to download the **PhishingReporterRibbon.xml** file.
7. In a new tab of your browser, log in to your **Microsoft 365 admin center**.

<figure><img src="/files/jcSKevKJqsGr5kSzunhL" alt="Microsoft 365 admin center."><figcaption><p>Microsoft 365 admin center.</p></figcaption></figure>

8. From the menu on the left side of the page, click **Settings**.
9. From the **Settings** drop-down menu, select **Integrated** **apps**.

<figure><img src="/files/WxgEkSo3GLhfKhe6WeFI" alt="Settings — Integrated apps menu."><figcaption><p>Settings — Integrated apps menu.</p></figcaption></figure>

10. Click Add-ins at the top-right corner of the page. The Add-ins page will open

<figure><img src="/files/pSPFTURdyyHtVSbnejdN" alt="Add-ins button on Integrated Apps page."><figcaption><p>Add-ins button on Integrated Apps page.</p></figcaption></figure>

11. On the Add-ins page, click Deploy Add-In. The Deploy a new add-in pop-up window will open.

<figure><img src="/files/mjJ58JHvnUl8kT4tVuyH" alt="Deploy Add-In button."><figcaption><p>Deploy Add-In button.</p></figcaption></figure>

12. In the pop-up window, click Next.

<figure><img src="/files/xGc1ew9LZ55DUcV6UCeg" alt="Deploy a new add-in pop-up — Next."><figcaption><p>Deploy a new add-in pop-up — Next.</p></figcaption></figure>

13. Click Upload custom apps.

<figure><img src="/files/z3qZ0AObMl9gFfu55XwR" alt="Upload custom apps option."><figcaption><p>Upload custom apps option.</p></figcaption></figure>

14. Select the **I have the manifest file (.xml) on this device** option. Then, click **Choose** **File** and select the **PhishingReporterRibbon.xml** file that you downloaded in step 6.

<figure><img src="/files/oAJ3Olmd2d9zXetV77Zj" alt="Choose File to select PhishingReporterRibbon.xml."><figcaption><p>Choose File to select PhishingReporterRibbon.xml.</p></figcaption></figure>

15. Click **Upload** to install the Phishing Reporter. The **Configure** **add-in** pop-up window will open.

<figure><img src="/files/hwtEQfJia4lVuyAAIhlz" alt="Configure add-in pop-up after upload."><figcaption><p>Configure add-in pop-up after upload.</p></figcaption></figure>

16. From the pop-up window, select which users will have access to the Phishing Reporter and which method you would like to use to deploy the Phishing Reporter.

<figure><img src="/files/PJmdexKUH51MOL8m0Fyl" alt="Deploy Phishing Reporter — select users and deployment method."><figcaption><p>Deploy Phishing Reporter — select users and deployment method.</p></figcaption></figure>

{% hint style="info" %}
We recommend that you allow all users to access the Phishing Reporter. We also recommend that you use the Fixed deployment method.
{% endhint %}

17. Click **Next**, and additional app permissions will display.
18. Once you have read the permissions, click **Save**. The **Deploy** Phishing Reporter pop-up window will open.

<figure><img src="/files/aTlw8XvyMxMGI9Ezz2lt" alt="Add-in successfully installed message."><figcaption><p>Add-in successfully installed message.</p></figcaption></figure>

{% hint style="warning" %}
The expected timeframe for the Phishing Reporter to deploy is 24 hours, but timeframes can vary. For more information about deploying add-ins, see Microsoft's [Deploy add-ins in the Microsoft 365 admin center](https://learn.microsoft.com/en-us/microsoft-365/admin/manage/manage-deployment-of-add-ins?view=o365-worldwide#deploy-an-office-add-in-using-the-admin-center) article.
{% endhint %}

19. Once the pop-up window displays a confirmation that the add-in successfully deployed, click **Next**. The **Announce** **add-in** pop-up window will open and display a message about announcement recommendations from Microsoft.

<figure><img src="/files/jNyGwhzh4fYOZnZgLrJC" alt="Announce add-in pop-up — Microsoft recommendation message."><figcaption><p>Announce add-in pop-up — Microsoft recommendation message.</p></figcaption></figure>

{% hint style="info" %}
After you install and deploy the Phishing Reporter, you might receive an email from your mail service provider that contains information you can use to help you announce the Phishing Reporter add-in to your users. Keepnet does not send the email about the Phishing Reporter’s intended usage and benefits.
{% endhint %}

20. Click Close to close the pop-up window.

## Troubleshooting Microsoft Ribbon Phishing Reporter

### We were unable to process this item. Please try again later.

**"We were unable to process this item. Please try again later."** message in the Ribbon Phishing Reporter in Outlook.

<figure><img src="/files/V7XLOMauaCii6C8k366p" alt="Troubleshooting — We were unable to process this item Ribbon error."><figcaption><p>Troubleshooting — We were unable to process this item Ribbon error.</p></figcaption></figure>

<figure><img src="/files/PbWDgk9ttqvhUDIqwUQ1" alt="We were unable to process this item issue on Microsoft Ribbon Phishing Reporter."><figcaption><p><strong>We were unable to process this item issue on Microsoft Ribbon Phishing Reporter</strong></p></figcaption></figure>

The suggested solution is to "[Toggling on New Outlook](https://support.microsoft.com/en-gb/office/toggle-out-of-the-new-outlook-for-windows-ec102b39-5727-418e-ae1f-a1805434640c)"

<figure><img src="/files/PLRf1DXCJ6hxJAiSwMLD" alt="Toggling on New Outlook."><figcaption><p>Toggling on New Outlook</p></figcaption></figure>

## Tutorial Video

This video tutorial shows the documentation steps for deploying Microsoft Ribbon Phishing Reporter add-in on M365.

{% embed url="<https://youtu.be/SG1NUmP21mk>" %}


# How to Deploy Add-In in Exchange Admin Center

## Requirements

In order to use the Phishing Reporter add-in in the Exchange environment, your platform must meet the following requirements.

* Exchange 2013 - version (15.0.847.32) or above
* Exchange 2016 - version (15.1.225.42) or above
* Exchange 2019

## Deploy Add-in

To deploy the Phishing Reporter add-in, follow the steps below.

* Log in to the Exchange Admin interface.
* Go to **Exchange Admin Center > Organization > Add-ins (called Apps in some versions)**
* Click the **(+)** button and select **Add** **from** **file**. Install the Phishing Reporter .xml file that you previously downloaded and click **Next**.
* Make sure that these options are selected:
  * Make this add-in available to users in your organization
  * Mandatory is always enabled
  * Users can't disable this add-in.
* Click **Save** to complete the process.

{% hint style="warning" %}
It may take up to 12 hours for the add-in to be displayed on users' email applications. Users may need to relaunch their email applications.
{% endhint %}

✅ **You have now deployed the Phishing Reporter. Next step is to** [**Setup Incident Responder**](https://github.com/ucarozan/keepnet-docs/blob/main/next-generation-product/getting-started/7.-incident-responder-setup) **(only for customers who have purchased the Incident Responder or SOC package)**

## Video Tutorial

{% embed url="<https://youtu.be/92sH456BJQ0>" %}


# How to Deploy Add-In in Google Workspace

This document explains how to deploy **Keepnet's Phishing Reporter** button in Google Workspace to **all employees** or to **specific Organisation Units/Groups**.

{% hint style="warning" %}
This installation requires a Google Workspace Admin account.
{% endhint %}

## Keepnet Phishing Reporter Settings

1. First, [customise the Keepnet Phishing Reporter ](/next-generation-product/platform/phishing-reporter/phishing-reporter-customization)button to match your organisation's needs, including logo, text, and other settings.
2. Second, on the **Phishing Reporter customisation page**, scroll to the bottom and click **'Manage and Download'** to download the **Google Workspace zip file**. The zip file contains two files used in the Google Workspace deployment steps.

## Google Workspace Deployment Steps

### Step 1: Create Script

To deploy the Phishing Reporter add-in to users in Google Workspace, follow these steps:

* Go to[ script.google.com](http://script.google.com) and click on the **New Project** button.
* **Enter a name** for your new project (e.g Keepnet Phishing Reporter Button)
* Open the downloaded Keepnet zip file, **edit the Code.gs** **file**, copy all the code, paste it into the **Code.gs file of the new project,** and click the **Save** button to save the changes.
* While on the project page, on the left-hand side, click the **Project** **Settings** button, then enable the **'Show 'appsscript.json' manifest file in editor'** option under the **General Settings** tab.
* Open the downloaded Keepnet zip file, **edit the Appscript.json** **file**, copy all the code, return to the **Editor** page, paste it into the **Appsscript.json file of the new project**, and click the **Save** button to save the changes.

### Step 2: Create Project

* Go to [console.cloud.google.com](https://console.cloud.google.com/) and create **a New Project**.
* **Name your project** (e.g Keepnet Phishing Reporter Button) and select the location. Then click on **Create** to start your project.
* Go to the **APIs and Services** page. Open the **OAuth content screen** page from the left menu and click the **Get Started** button.
* **Step 1: App Information**, please fill in the following fields, then click **Next**.
  * **App Name:** Enter a name (e.g Keepnet Phishing Reporter Button)
  * **User Support Email:** Select an email account that is listed on this option.
* **Step 2: Audience,** please select **Internal** option, then click **Next**.
* **Step 3: Contact Information**, you can add your email address or the security team's email account.
* **Step 4: Finish**, accept the **Agreement** and click **Create**.

### Step 3: OAuth Content Screen Configuration

* While you are on the **OAuth Consent Screen** page, click the **Branding** option on the left menu.
* Fill in the required fields below.
  * **App Name:** Enter a name (e.g Keepnet Phishing Reporter Button)
  * **User Support Email:** Select an email account that is listed on this option.
  * **App Logo:** You can upload your company logo or use Keepnet's default logo; see the attachment below.
  * **Developer Contact Information:** Add your email address or the security team's email address.
* Click the **Save** button to apply changes.
* Go to **API & Services,** open the **Library** page to search **Gmail API,** and then **enable it**.
* Go to the project's main page by clicking the **Google Cloud logo** at the top of the page on the left, then **copy the Project Number** (save it).

{% file src="/files/agkFQq2T5io8crPZsFUh" %}

### Step 4: Change the Project Number of Script Project

* Go to [script.google.com](https://script.google.com/) and open your project.
* Click the **settings icon** on the left menu, then select **Project** **Settings**.
* Find the '**Google Cloud Platform (GCP) project'** title, click the **Change** **Project** button, **paste the** **project number,** then click **Set** **Project**.

### Step 5: Testing the Add-in

If you don't want to test the add-in in your Gmail account, please go to the "**Enable Google Workspace Marketplace SDK"** part to deploy the add-in to the organization-wide or specific groups.

If you want to test and see the add-in functionality, logos, add-in name, description, and more information, you can deploy the add-in to your Gmail account for test purposes and remove it anytime.

* Go to [script.google.com](https://script.google.com/)
* Select the add-in project.
* Click on **Deploy** **> Test Deployments > Install** butto&#x6E;**.**
* Click **Done**.

The add-in will appear on your Gmail account shortly. You can remove the add-in from the same page.

### Step 6: Enable Google Workspace Marketplace SDK

* From the **Library** page, search for the **Google Workspace Marketplace SDK** and click on it.
* Click the **Enable** button and activate the **Google Workspace Marketplace SDK**.
* Go back to [script.google.com](https://script.google.com/) and click on the **Deploy** **> New Deployment** button.
* Enter information in the **Description** field (e.g Keepnet Phishing Reporter Button), click the **Deploy** button, and copy the **Deployment ID** (save it).
* Go back to the **Console** **Cloud**. Go to the **API & Services** page, click **Library** and search for **“Google Workspace Marketplace SDK”** and click on it.
* Go to the **App Configuration** tab, and fill in the required information below.
  * **App visibility:** Select the **Private** option.
  * **Installation settings:** Select the option that suits you best, e.g., the **admin-only installation** option.
  * **App integrations:** Select the **Google Workspace Add-on**, then select **Apps Script**. Please paste the **Deployment ID** into the deployment id field.
  * **Developer information:** Fill in the following options:
    * **Developer Name:** Keepnet
    * **Developer Website URL:** <https://keepnetlabs.com/>
    * **Developer Email:** <support@keepnetlabs.com>
  * Click the **Save** **Draft** to apply the changes.
* While on the **Google Workspace Marketplace SDK** page, click the **Store** **Listing** tab and follow the steps below.
  * **App Details:** Extend this option and follow the steps below.
    * **Language:** Select a language such as **English**.
    * **Application Name:** Keepnet Phishing Reporter Button
    * **Short Description:** Keepnet Phishing Reporter helps you to report suspicious emails to the security team.
    * **Detailed Description:** Keepnet Phishing Reporter helps you to report suspicious emails to the security team for automated or manual analysis. Thank you for reporting suspicious emails to protect our organization against email-based attacks.
    * Click the **Done** button.
  * **Pricing:** Select the **Paid** option.
  * **Category:** Select the **Web Development** option.
  * **Graphic Assets:** Download the following add-in logos.zip file and upload each image for this option.
  * **Screenshots:** You can use the **'Add-in Logo 220x140.png'** logo for this option from the zip file.
  * **Support links:** Please use the following info for each field.
    * **Terms of Service URL:** <https://doc.keepnetlabs.com/legal-hub/for-everyone/website/terms-of-use>
    * **Privacy Policy URL:** <https://doc.keepnetlabs.com/legal-hub/for-everyone/website/privacy-policy>
    * **Support URL:** <https://support.keepnetlabs.com/>
  * **Distribution:** Select your **Regions** or **All** **Regions** where you will deploy the add-in.
  * Click the **Save** **Draft** button and then click the **Publish** button.

{% file src="/files/i6Rll9NTDgZtMcK00X2Y" %}
Default Phishing Reporter Add-In Logos
{% endfile %}

### Step 7: Deploy Add-in

Please follow the following steps to deploy the add-in to your target users.

* To deploy the add-in, go to [mail.google.com](https://mail.google.com/) and click on the **Google Apps** icon in the top right-hand corner of the screen.
* Scroll down to [**More from Google Workspace Marketplace**](https://workspace.google.com/u/1/marketplace) and click on it.
* Click **Internal Apps** and find the add-in. If you don't see the add-in, wait a few minutes for it to appear.
* Click the **Admin Install** button to start the deployment process.
* Click **Continue** to start the distribution of the reporter button. You can deploy the add-in to the organisation as a whole or to specific groups/organisation units.
* Accept the required permissions to complete the deployment.

{% hint style="warning" %}
It may take up to 24 hours for this app to be installed for your entire Google Workspace domain or organisational unit.
{% endhint %}

✅ **You have now deployed the Phishing Reporter.**

**Next step is to** [**Setup Incident Responder**](https://github.com/ucarozan/keepnet-docs/blob/main/next-generation-product/getting-started/7.-incident-responder-setup) **(only for customers who have purchased the Incident Responder or SOC package)**

### Step 8: Uninstall the Add-in

If you wish to uninstall the Keepnet Phishing Reporter button from all users' inboxes, please follow the steps below.

* Go to Google **Admin > Apps > Google Workspace Marketplace apps >** [App list](https://admin.google.com/u/3/ac/apps/gmail/marketplace/domaininstall) on the left menu.
* Click on the **Phishing Reporter** add-in you want to uninstall.
* Click the **Delete** **App** to complete the process.

{% hint style="warning" %}
It may take up to 24 hours for this app to be uninstalled for your entire Google Workspace domain or organizational unit.
{% endhint %}

## FAQs

### Q: Does Google charge if we deploy the add-in?

A: No, there is no charge by Google.

### Q: Can I use my phishing reporter add-in in the Gmail app on iOS or Android?

A: Yes, you can use the Phishing Reporter add-in in the Gmail App on Android or IOS.

### Q: Where do reported emails go?

A: If you purchased the Incident Responder product, the reported email will be sent to the [Incident Responder](/next-generation-product/platform/incident-responder) product for analysis. If you enabled the ['Information Email'](/next-generation-product/platform/phishing-reporter/phishing-reporter-customization#information-email) option, the reported email's original copy will be sent to the email address that is set on the related page.

### Q: Do I need to redeploy the add-in if I make add-in changes on Keepnet? (e.g. logo change)

A: Yes, if you have already deployed the Phishing Reporter button on Google Workspace for your employees and if you need to change the logo, texts or any other settings on the Phishing Reporter page on the platform, you need to download a new file and [re-deploy the button](/next-generation-product/platform/phishing-reporter/phishing-reporter-deployment/how-to-deploy-the-add-in-in-google-workspace).

### Q: Is there a quick way to redeploy the add-in if I've made changes?

A: No, you need to remove your current Phishing Reporter button from all employees and follow all the steps in the [document here](/next-generation-product/platform/phishing-reporter/phishing-reporter-deployment/how-to-deploy-the-add-in-in-google-workspace) to re-deploy the new reporter button.

### Q: Do I need to accept the permissions required for the reporter button to use?

A: Yes, once you deploy the button to your employees, when they click the reporter button to use, for a one-time purpose, they need to approve the required permissions to be able to use the reporter button.


# How to Deploy MSI Add-In in Outlook

## Diagnostic Tool

In standard Windows, the MS Outlook service does not support monitoring and reporting the functionality of the installed add-ins on it. This service has been developed in order to monitor and report whether Keepnet Outlook add-in functions properly or not.Using this service, system administrators will be aware of the potential environment-based errors which could affect the Keepnet Outlook Phishing Reporter add-in not functioning properly and be able to take action.

### Downloading Diagnostic tool <a href="#downloading-diagnostic-tool" id="downloading-diagnostic-tool"></a>

Go to **Phishing Reporter > Settings > Diagnostic Tool** to download the diagnostic tool.Configure the following settings:

* **Proxy Settings:** Enable proxy settings for the Diagnostic Tool to go internet through a proxy.
* **Optional Settings:** Select if you want the Diagnostic Tool to check the Phishing Reporter add-in and enable it automatically if disabled.

Once you're happy with your settings, click **Download** under the diagnostic tool. Then follow the steps below to install the service.

### Installation <a href="#installation" id="installation"></a>

There are two options to install the service, either install it on your computer or deploy the service to thousands of users' computers using centralized software distribution tools.

#### Normal installation <a href="#normal-installation" id="normal-installation"></a>

* Click on the **MSI package** to install it on your computer.
* Click the **Next** button and continue with the default settings.
* Click the **Yes** button to finish the installation.

#### Silent Installation <a href="#silent-installation" id="silent-installation"></a>

You can use the following commands for silent installation and removal.

| Silent Installation      | C:\Windows\System32\msiExec.exe -i "KeepnetPhishDiagInstaller.msi" /QN /norestart            |
| ------------------------ | -------------------------------------------------------------------------------------------- |
| Silent Removal           | C:\Windows\System32\msiExec.exe -x "KeepnetPhishDiagInstaller.msi" /QN /norestart            |
| Product Guid Detection   | get-wmiobject Win32\_Product \| Format-Table IdentifyingNumber, Name, LocalPackage -AutoSize |
| Remove with Product Guid | C:\Windows\System32\msiExec.exe -x {product-guid} /QN /norestart                             |

Once the installation is complete, you can confirm that the diagnostic tool has been installed by going to **Phishing Reporter > Users** and looking under the **Diagnostic tool** column.This column will show one of the following in the table below.

| Not Installed     | The diagnostic tool has not been installed                                           |
| ----------------- | ------------------------------------------------------------------------------------ |
| Online            | The diagnostic tool has been installed, and the user is online                       |
| Offline           | The diagnostic tool is installed, but the user is offline                            |
| Error/Uninstalled | There is an error with the diagnostic tool installation or the tool has been removed |

### Understand Diagnostic Tool information

To view the **Diagnostic Tool** information, go to **Phishing Reporter > Users** and look under the **Add-in Status** column. When hovering the mouse over this column under the desired user, you will see the following information below.

<table data-header-hidden><thead><tr><th width="150.5"></th><th></th><th data-hidden></th></tr></thead><tbody><tr><td>Add-in is installed and</td><td><ul><li>User is online</li><li>User is offline</li></ul></td><td></td></tr><tr><td>HKLM Number</td><td><p>List of possible <a href="https://learn.microsoft.com/en-us/visualstudio/vsto/registry-entries-for-vsto-add-ins?redirectedfrom=MSDN&#x26;view=vs-2022#LoadBehavior">values</a>:</p><p>1: Active: Don't load automatically</p><p>2: Disabled: Load at startup</p><p>3: Active: Load at startup</p></td><td></td></tr><tr><td>Boot time</td><td>How long it takes for the add-in to start</td><td></td></tr><tr><td>Outlook version</td><td>Version information of Outlook application</td><td></td></tr><tr><td>Outlook Architecture</td><td><p>Either:</p><ul><li>X32</li><li>X64</li></ul></td><td></td></tr><tr><td>OS version</td><td>User’s operating system version information</td><td></td></tr></tbody></table>

The Diagnostic Tool has been successfully installed, operated and can communicate with the platform to help you obtain Phishing Reporter status information for all target users.

## Troubleshooting

For troubleshooting purposes, you can provide the support team with the log and configuration files, which can be found in the following path on the user's computer.

* C:\Program Files (x86)\Keepnet Labs\KeepnetLabs Phishing Reporter Diagnostic Service

**✅ You have now deployed the Phishing Reporter**

**Next step is to** [**Setup Incident Responder**](https://github.com/ucarozan/keepnet-docs/blob/main/next-generation-product/getting-started/7.-incident-responder-setup) **(only for customers who have purchased the Incident Responder or SOC package)**

## Tutorial Video

This video tutorial explains how to customize the Diagnostic Tool service and download it.

{% embed url="<https://youtu.be/oI6cwzpE0Js>" %}

## FAQ

### Q: Some users have the add-in enabled, but they seem offline on the interface. Why?

A: If the add-in is installed and active, but seems Offline, then the Outlook application is closed. If Outlook is still running, but it is still Offline, it means that there is a communication problem between the add-in and the platform. You can easily detect this problem from the logs created by the add-in on the user's computer or get support from our support team.

### Q: How do I know if the add-in is disabled by the user or by Outlook?

A: If you see the “Inactive" notification, then it is disabled by the user. If it says “Disabled", it means that it is disabled by Outlook. You can also verify this from the interface of user’s Outlook Desktop in the **File > Options > Add-Ins** window.

### Q: Can I have different teams log into the Keepnet Portal and see only the Outlook detail report page?

A: With the [user role](/next-generation-product/platform/company/system-users/user-roles) feature, you can authorize your users with custom permissions.


# Troubleshooting Phishing Reporter Add-In on Outlook Desktop

If you've installed the Phishing Reporter on the Microsoft Outlook Desktop version successfully but are unable to see the Phishing Reporter button, here are some steps you can follow to troubleshoot the issue.

## Step 1: Check your Outlook Version

First, confirm that you are using a version of Outlook that is compatible with Phishing Reporter. It might be possible that your current Outlook version is outdated and not supported by the add-in. Phishing Reporter usually supports the most recent versions of Outlook, but you can double-check the specific versions from [here](https://doc.keepnetlabs.com/Next-Generation-Product/miscellaneous/platform-requirements/phishing-reporter-requirements#software-requirements).

## Step 2: Verify Installation

Make sure the Phishing Reporter Add-in was installed correctly. If the installation was interrupted or not completed, it could result in the button not appearing.

* Press the Win+S button combination on your keyboard, and find ‘Installed Apps’.
* Locate 'Phishing Reporter Outlook AddIn' in the list of installed programs.
* If you cannot find it, try reinstalling the software.

## Step 3: Enable Add-in

Sometimes, the add-in might not be enabled, or it may have been disabled. Here's how to check:

* In Outlook, go to 'File' > 'Options' > 'Add-ins'.
* In the 'Manage' dropdown, select 'COM Add-ins', then select 'Go'.
* If 'Phishing Reporter' is listed but not checked, tick the checkbox to enable it.
* If 'Phishing Reporter' is not listed, it means the add-in is not installed correctly. Try reinstalling.

## Step 4: Check the Ribbon

In some cases, the button may not be visible because it's not added to your Outlook ribbon, or it's located under a different tab.

* Right-click on the ribbon and select 'Customize the Ribbon'.
* Look for 'Phishing Reporter Add-in Name' in the list. If it's there, make sure it's ticked and placed under the Home tab.

## Step 5: Check Windows Event Logs

Sometimes, Outlook or the add-in may be experiencing issues that could be found in the Windows Event Logs.

* Type 'Event Viewer' in the Start menu and open it.
* On the left side, navigate to 'Windows Logs' > 'Application'.
* Look for any recent warnings or errors related to Outlook or the Phishing Reporter Add-in around the time you last launched Outlook. Pay particular attention to Event ID 45 and 59, which might be related to this issue.

### 5.1 - AddIn Disabled

When examining your Windows Event Logs, you may encounter a log entry indicating that the Phishing Reporter add-in has been disabled by Outlook. This typically occurs when the add-in takes too long to load at startup. Once identified, the disabled add-in can be enabled again, as outlined in Step 3 of this guide. If the issue continues after this action, please refer to Step 8 for further troubleshooting assistance.

```
Event ID:59
Source:Outlook
Log:Application
Message:Outlook disabled the following add-in(s):

ProgID: PhishingReporter.Outlook.Addin
GUID: {D0F2562C-3BC1-42E3-B34E-8A735974A173}
Name: PhishingReporterAddIn
Description: AddinModule
Load Behavior: 2
HKLM: 1
Location: C:\Program Files (x86)\Phishing Reporter\Phishing Reporter Outlook 
Threshold Time (Milliseconds): 1000
Time Taken (Milliseconds): 1875
Disable Reason: This add-in caused Outlook to start slowly.
Policy Exception (Allow List): 0
```

### 5.2 - AddIn Load Times

Microsoft Outlook Desktop may occasionally deactivate add-ins to prevent the application from crashing. By leveraging the Windows Event Logs, you can acquire valuable insights about the loading times of all add-ins. This knowledge helps identify add-ins exceeding the optimal loading time of 1000 milliseconds.

Outlook loaded the following add-in(s):

```
Name: Microsoft Exchange Add-in
Description: Exchange support for Unified Messaging, e-mail permission rules, and calendar availability.
ProgID: UmOutlookAddin.FormRegionAddin
GUID: {F959DBBB-3867-41F2-8E5F-3B8BEFAA81B3}
Load Behavior: 3
HKLM: 1
Location: C:\Program Files\Microsoft Office\root\Office16\ADDINS\UmOutlookAddin.dll
Boot Time (Milliseconds): 0

Name: Skype Meeting Add-in for Microsoft Office
Description: Skype Meeting Add-in for Microsoft Office
ProgID: UCAddin.LyncAddin.1
GUID: {A6A2383F-AD50-4D52-8110-3508275E77F7}
Load Behavior: 3
HKLM: 1
Location: C:\Program Files\Microsoft Office\root\Office16\UCAddin.dll
Boot Time (Milliseconds): 15

Name: PhishingReporterAddIn
Description: AddinModule
ProgID: PhishingReporter.Outlook.Addin
GUID: {D0F2562C-3BC1-42E3-B34E-8A735974A173}
Load Behavior: 3
HKLM: 1
Location: C:\Program Files (x86)\Phishing Reporter\Phishing Reporter Outlook AddIn\adxloader64.dll
Boot Time (Milliseconds): 146
```

```
Request url: https://addin-api.keepnetlabs.com/api/heartbeat response content : RestHttpClient.cs : Post : 109
System.Net.Http.HttpRequestException: An error occurred while sending the request. ---> System.Net.WebException: The remote name could not be resolved: 'keepnetaddin.xcompany.local'
```

### 7.3 - Unable to connect to the remote server

This log indicates a network connectivity error during an HTTP request.

This error usually stems from the following situations:

* The network connection dropped or there is a temporary problem in the network. In this case, the network connection should be checked and, if necessary, the network may need to be restarted or the network settings may need to be checked.
* The client side is using an incorrect IP address or port number. In this case, the target and parameters of the request should be checked.
* The connection is being blocked due to a firewall or other network security settings. In this case, the security settings should be checked.

**Error Log:**

```
Request url : https://addin-api.keepnetlabs.com/api/notify/email response content :   : RestHttpClient.cs : Post : 104
System.Net.Http.HttpRequestException: An error occurred while sending the request. ---> System.Net.WebException: Unable to connect to the remote server ---> System.Net.Sockets.SocketException: A connection attempt failed because the connected party did not properly respond after a period of time, or established connection failed because connected host has failed to respond 1.1.1.1:235
```

### 7.4 - The remote name could not be resolved

This log represents a network error situation.

This error usually stems from the following situations:

* Network connection problems. In this case, the network connection should be checked, and it should be ensured that the computer has general access to the internet.
* The DNS server is not functioning correctly. In this case, the DNS server should be checked, if necessary, restarted, or DNS settings should be reviewed.

**Error Log:**

```
Request url: https://addin-api.keepnetlabs.com/api/heartbeat response content : RestHttpClient.cs : Post : 104
System.Net.Http.HttpRequestException: An error occurred while sending the request. ---> System.Net.WebException: The remote name could not be resolved: 'addin-api.keepnetlabs.com'
```

## Step 8: Contact Support

If the above steps don't resolve your issue, it's suggested to ask for assistance from the Keepnet support team. There are two primary ways to get in touch with them:

1. **Email:** You can send an email to <support@keepnetlabs.com>. Make sure to include all relevant details about your problem, such as your Outlook version, OS version, and any other pertinent information about your system.
2. **Support Portal:** Alternatively, you can submit a ticket directly via the Keepnet support portal at <https://support.keepnetlabs.com/portal/en/home>.

For additional information on how to contact support, please refer to our [Help Desk](/resources/keepnet-support-help-desk) documentation.


# Integrate Native Microsoft Phishing Report Button with Keepnet

This integration allows your employees to continue using **Microsoft’s** **Phishing** **Reporting** button to report suspicious emails to your **SOC** **team** or **Microsoft** **Defender**. Along with that, this integration adds new benefits by forwarding reported emails to **Keepnet’s** **Incident** **Responder**. This ensures deeper analysis and tracking capabilities while maintaining your existing reporting process.

**Key Benefits:**

* **Dual Reporting:** Emails reported via the Microsoft Phishing Reporting Button are sent to both Microsoft Defender and Keepnet's Incident Responder product for advanced analysis.
* **Simulation Tracking:** During phishing simulation campaigns, Keepnet tracks employees who report simulated phishing emails, helping administrators measure awareness and provide training.

## Steps to Set Up the Integration

### **Step 1: Create a Shared Mailbox for Reports**

If you don’t already have a shared inbox for phishing reports:

1. Log into the [**Microsoft Exchange Admin Center**](https://admin.exchange.microsoft.com).
2. Navigate to **Recipients > Mailboxes > Add a Shared Mailbox**.
3. Enter a **Display** **Name** and **Email** **Address** for the shared mailbox.
4. Click the **Create** button to create a shared mailbox.

### **Step 2: Set Up a Mail Flow Rule**

Forward reported phishing emails to Keepnet using a mail flow rule:

1. Please [**contact the support team**](/resources/keepnet-support-help-desk) of Keepnet to get the **Keepnet email address for forwarding**.
2. Log into the [**Microsoft 365 Admin Center**](https://admin.exchange.microsoft.com) and open the Exchange Admin Center.
3. Go to **Mail Flow > Rules** and click **Create New Rule**.
4. Configure the rule:
   * **Name:** Enter a name such as **"Forward Reported Emails to Keepnet"**.
   * **Set Apply this rule** **if:** Select the **"The recipient"** and then select the **"is this person"** option. Please enter the shared mailbox email address that you created in the previous section.
   * **Do the following:** Select the **"Add Recipients"** and then select the **"to the To box"** option. Please enter the email address that you got from the Keepnet Support Team.
5. Leave the **"Except if"** option as default and then click **Next**.
6. Leave the **"Set rule settings"** page settings as default and then click **Next**.
7. Click **Finish** to create the rule.

### **Step 3: Configure the Microsoft Phishing Reporting Add-In**

1. Open [**User Submission Settings**](https://security.microsoft.com/securitysettings/userSubmission) in your Microsoft 365 portal.
2. Ensure **“Monitor reported messages in Outlook”** is active.
3. Choose **“Use the built-in Report button in Outlook”**.
4. Set **“Reported message destinations”** to **“Microsoft and my reporting mailbox”** or **“My reporting mailbox only”.**
5. **Add** **your** **shared** **mailbox** that you created at the beginning of the document to the **"Add an exchange online mailbox to send reported messages to:"** field and save.

### **Step 4:** Install the Microsoft Outlook 365 'Report Phishing' Add-In

If not already installed:

1. Visit **Microsoft AppSource** and search for **“Report Phishing”**.
2. Click **Get it now** and follow the installation instructions.
3. Wait up to 12 hours for the add-in to appear in Outlook.

### **Step 5: Test the Integration**

1. Launch a phishing simulation campaign through Keepnet.
2. Report a simulation email using the **Microsoft** **Phishing** **Reporting** button. Then, go to your campaign report and click the **Reporters** menu to verify that you reported the simulation email.
3. Verify the email is also visible on Keepnet’s **Incident** **Responder** page.

## Possible Considerations

* **Reporting Delays:** When Microsoft forwards reported emails to the specified email destination, there may be a delay caused by Microsoft’s internal processing. For example, some emails may appear immediately whilst other emails may take 10 minutes to get reported to Keepnet from Microsoft.
* **Blocked Emails:** Emails flagged as phishing might be quarantined by Microsoft or other security solutions, causing delays in forwarding.
* **Interference:** External security solutions, such as Data Loss Prevention (DLP) systems, may interfere with email forwarding from Microsoft to Keepnet. This can result in delays or prevent emails from being reported altogether.
* **Email Quarantine:** Emails flagged as phishing might be quarantined by Microsoft or other security solutions, causing delays in forwarding.
* **Policy Conflicts:** Custom email policies on the customer’s Microsoft tenant could block or redirect reported emails, affecting Keepnet’s tracking.
* **Server Downtime:** Temporary unavailability of Microsoft or Keepnet’s email servers can result in reporting delays.

## How to Send Only Simulation Emails to Keepnet

If your organisation doesn't prefer to send all reported emails via the Microsoft button to Keepnet for analysis and reporting, you can only send simulation emails to Keepnet.

To do this, please follow the steps below.

1. Please first complete the [Step 1](#step-1-create-a-shared-mailbox-for-reports) , [Step 2](#step-2-set-up-a-mail-flow-rule) and [Step 3](#step-3-configure-the-microsoft-phishing-reporting-add-in) sections.
2. Log in to the [Microsoft 365 Admin Centre](https://admin.exchange.microsoft.com/) and open the Exchange Admin Centre.
3. Go to **Mail Flow > Rules** and **edit the rule** that you recently created.
4. Click the **+** button next to **'Apply this rule if'** condition to create an **AND** condition.
5. Select **'The subject or body'** and then select **'subject or body matches these text patterns'** option.
6. Add this **'x-keepnet-tid: \[0-9a-zA-Z]+'** to the text field.
7. Click the **Save** button to apply the changes.

Here is a screenshot reference of the above rule:

<figure><img src="/files/GhtKMogv4ZXb4YRG8kCI" alt="Mail flow rule — subject/body pattern for forwarding only simulation emails to Keepnet." width="375"><figcaption><p>Mail flow rule — subject/body pattern for forwarding only simulation emails to Keepnet.</p></figcaption></figure>

Now, when an employee reports an email by using the Microsoft Phishing Reporter button, only simulation emails will be sent to Keepnet; any other emails will not be sent to Keepnet.


# 5. Incident Responder Setup

This is only relevant for customers who have purchased the Incident Responder module or xHRM package.

## What is the Incident Responder?

The [Incident Responder](https://keepnetlabs.com/products/incident-responder) analyses a suspicious email, and according to the results, it takes action at the inbox level. The product also analyses the URLs, IPs, and Files with the engines of different technologies it is integrated where it enables an institution to acquire the technologies that it doesn’t have.

**There are 2 steps for setting up the Incident Responder:**

1. [Integrate Threat Intel Partners](/next-generation-product/getting-started/7.-incident-responder-setup/step-1.-integrate-threat-intel-partners) - Keepnet will automatically tell you whether a suspicious email is malicious or not
2. [Mail Configuration](https://github.com/ucarozan/keepnet-docs/blob/main/next-generation-product/getting-started/7.-incident-responder-setup/step-2.-mail-configurations) - Keepnet will be able to remove malicious emails from all employees inboxes


# Step 1. Integrate Threat Intel Partners

By integrating Threat Intel partners you will automate identifying malicious emails. Each email reported through the Phishing Reporter add-in will automatically be analysed for malicious content via multiple integrations.

There are 2 steps to Integrating Threat Intel Partners:

1. Create a new integration
2. Follow relevant steps to install each threat intel partner

## **Creating New Integration** <a href="#creating-new-integration" id="creating-new-integration"></a>

Navigate to **Incident Responder > Integrations.** Click the blue **New** button. You can find all our Threat Intel partners under **Integration Type**.

<figure><img src="https://files.gitbook.com/v0/b/gitbook-x-prod.appspot.com/o/spaces%2FlKFxOYqYqSykikkXpwjG%2Fuploads%2FO9zvAviIbw4c4O7141yr%2Fthreat%20intel%20step%201.gif?alt=media&#x26;token=67ad44ca-841f-49a9-96d9-86204d2ec467" alt="Incident Responder Integrations — New button and Integration Type list."><figcaption><p>Incident Responder > Integrations — New button and Integration Type list.</p></figcaption></figure>

### **Quick links to install each Threat Intel Partner**

You can install free threat intel partners or if you already have subscriptions for paid versions, you can integrate these too! All links to install all free and paid for intel threat partners below

**Free Intel Threat Partners**

​[Google Safe Browsing](/next-generation-product/platform/incident-responder/integrations#google-safe-browsing)

[​​Zen SpamHaus​](/next-generation-product/platform/incident-responder/integrations#zen-spamhaus)

​​[Cyber X-ray](/next-generation-product/platform/incident-responder/integrations#cyber-x-ray)

[​VMRay​](/next-generation-product/platform/incident-responder/integrations#vmray)

**Paid Intel Threat Partners**

​​[Google Web Risk](/next-generation-product/platform/incident-responder/integrations#google-web-risk)

[​AnyRun​](/next-generation-product/platform/incident-responder/integrations#anyrun)

[​​OPSWAT​](/next-generation-product/platform/incident-responder/integrations#opswat)

[​FortiSandbox](/next-generation-product/platform/incident-responder/integrations#fortisandbox)

​​[Virus Total​](/next-generation-product/platform/incident-responder/integrations#virustotal)

​[IMB X-Force](/next-generation-product/platform/incident-responder/integrations#ibm-x-force)

{% hint style="success" %}
Add as many Threat Intel Partners as you would like. The more you integrate, the more thorough your analysis of suspicious emails.
{% endhint %}


# Step 2. Mail Configurations

This article section describes how to integrate the [Incident Responder](https://keepnetlabs.com/products/incident-responder) module with Google Workspace, Exchange, or Microsoft Office 365 email services. It's important to follow the steps accurately. Please contact your email server administrator if you don’t have the required permissions to make these configurations.

## Benefit of Email Server Integration

The Incident Responder module investigation tool can detect malicious emails in user inboxes and remove them automatically or can be removed by the admin as well.

Server-based integration with your email service provides the most comprehensive protection. While email investigations can be conducted with the Phishing Reporter plug-in, the user must have Outlook open and the plug-in active for the investigation to be successful. If the Outlook application is closed for any reason, a complete investigation can only be performed using a server-based integration.

The server-based integration has the advantage to start an investigation at any time.

## **Mail Configurations**

Select **Incident Responder > Mail Configurations** from the left sidebar menu of the dashboard to create a new mail configuration or view the details of an existing configuration.

To set initial configurations, select the appropriate email server integration:

* ​Office 365
* Exchange
* Google Workspace

The integration details are:

<table><thead><tr><th width="154.20164126611957"></th><th width="581.1428571428571"></th></tr></thead><tbody><tr><td>Name</td><td>Name of the configuration</td></tr><tr><td>Platform</td><td>Email service name to be integrated: Exchange EWS, Office 365, or Google Workspace</td></tr><tr><td>E-Mail</td><td>An active email address is required for testing purposes</td></tr><tr><td>Status</td><td>Status of the configuration: (running/not running)</td></tr><tr><td>Date Created</td><td>Integration start date</td></tr><tr><td>Action</td><td>Edit/remove the integration</td></tr></tbody></table>

## Shortcuts

* [How to integrate with Microsoft 365](/next-generation-product/getting-started/7.-incident-responder-setup/step-2.-mail-configurations/microsoft-365)
* [How to integrate with Google Workspace](/next-generation-product/getting-started/7.-incident-responder-setup/step-2.-mail-configurations/google-workspace-gsuite)
* [How to integrate with Exchange](/next-generation-product/getting-started/7.-incident-responder-setup/step-2.-mail-configurations/exchange-ews)


# Microsoft 365

You can integrate your Microsoft 365 environment with the Incident Responder product to start an investigation on users' email accounts by following the steps below\.You must use an account with global administrator permission.

### New Application <a href="#new-application" id="new-application"></a>

* Select [App Registration](https://portal.azure.com/#blade/Microsoft_AAD_RegisteredApps/ApplicationsListBlade) on the Microsoft Azure portal.
* Click **+New registration.**
* In the **Register an application** section, enter the name of the new application (required field).
* Select supported accounts from the **Accounts in this organizational directory only** option (auth secure login only - single-tenant).
* Select **Public client/native (mobile & desktop)** from the dropdown menu to enter a Redirect URL.
* Click **Register**. (Leave the myapp\://auth field section blank).
* The new application will now appear in the list of app registrations; click on the name of the new application.
* Under **Essentials**, you will see the following displayed:
  * Application (client) ID
  * Directory (tenant) ID
* Please take note of these as you will need this information later to set up the new configuration.

Now you are ready to proceed to the next step: the application secret key.

### Application Secret Key <a href="#application-secret-key" id="application-secret-key"></a>

An application secret key must be created for the new registration.

* Under **Manage** from the left-side menu, select **Certificates & Secrets**.
* Select **Client secrets**.
* Select **+New client secret**.
* Enter the description and expiration date and click **Add**.
* Make sure to save the secret key value before you move on to the final step.

### Application Permissions <a href="#application-permissions" id="application-permissions"></a>

The last step is to add application permissions.

* Select **Manage > API Permissions** and click **+Add permission**.
* Click **Microsoft Graph** and a new window called **Request API permissions** will appear.
* Click **Application permissions** and then choose **Application Permission** and in the **Select permissions** field, find and select the following required permissions:
  * Directory.Read.All
  * Mail.ReadWrite
  * MailboxSettings.ReadWrite
  * User.Read.All (under User)
* Click **Add permissions**.
* Click **Grant admin consent for (user).**

You can find more information about these permissions at “[About Permissions](https://app.gitbook.com/o/-LMcQ_WBbT5jibln-2Mt/s/lKFxOYqYqSykikkXpwjG/next-generation-product/getting-started/6.-incident-responder-setup/step-2.-mail-configurations/microsoft-365#about-permissions)”.

### Test the Email Server Integration <a href="#test-the-email-server-integration" id="test-the-email-server-integration"></a>

You can test the integration on the platform to make sure that it is working. Go to **Incident Responder > Mail Configurations** on the left sidebar menu of the dashboard and then click **+ NEW** and choose the mail provider - in this case, Office 365.

Complete the following fields in the Microsoft Office 365 configuration table. The integration details are:

<table><thead><tr><th width="152.54879972451124"></th><th width="581.1428571428571"></th></tr></thead><tbody><tr><td>Name</td><td>Name of the configuration</td></tr><tr><td>Application (client) ID</td><td>Application ID information is provided on the azure portal under the Overview menu.</td></tr><tr><td>Application Secret</td><td>Application Secret information is provided on the azure portal under the Overview menu.</td></tr><tr><td>Directory (tenant) ID</td><td>Directory ID information is provided on the azure portal under the Manage > Certificates &#x26; secrets menu.</td></tr><tr><td>Test Email Address</td><td>An active email address to be used for testing purposes</td></tr><tr><td>Domain Selection</td><td>Authorized domain(s) to start investigations on</td></tr><tr><td>Test Connection</td><td>Perform a test of the configuration</td></tr></tbody></table>

If the test was successful, the new email server integration will be shown in the list of mail configurations.

{% hint style="warning" %}
If an X appears, it indicates there was a problem and the email server integration failed; please wait a few minutes (5-10+min) for O365 to successfully complete the integration, and then if not work still, please review the instructions.
{% endhint %}

## About Permissions

### **Directory.Read.All (Get user list)**

This permission allows the app to read data in your organization's directory, such as users, groups, and apps. Note: Users may consent to applications that require this permission if the application is registered with their organization’s tenant.

The platform uses this permission to retrieve the client's user list when an investigation is initiated and then to access the email addresses. For example, when a user finds a suspicious email, the platform can scan all users in the list retrieved.

### Mail.ReadWrite (Get users mails)

This permission allows the app to create, read, update, and delete email in user mailboxes. It does not include permission to send mail. The platform uses this permission to scan and filter users' emails. For example, when the “From” filter is selected as a parameter to be used in an investigation, this authorization enables the creation of a list of the emails that meet this criterion. It is also used to send a warning message to users. This permission also allows the platform to scan the contents of the emails to find and match the designated investigation parameters. For example, specific filters such as regex, keywords, etc.

### MailboxSettings.ReadWrite (Warning action)

This permission allows the app to create, read, update, and delete the user's mailbox settings. It does not include permission to send mail directly, but allows the app to create rules that can forward or redirect messages. The platform uses this permission to mark emails that will receive a warning message.

### User.Read.All (Get user data)

This permission allows the app to read the full set of profile properties, reports, and managers of other users in your organization on behalf of the signed-in user. The platform uses this permission to read and filter user information during the scanning process. If user-related filters, such as specific users, are selected as scan criteria, the user information may need to be read. For example, an organization may elect to initiate an investigation of employees in a particular department.

## FAQ

### Q: Is it possible to run a suspicious email investigation on the platform 24/7?

A: Yes. The platform’s flexibility allows you to start an investigation at any time and specify how long it is to run, or to create a continuous, automatic search for harmful e-mails. Server-based integration with your email service provides the most comprehensive protection.

### Q: Is it possible to start investigations and delete harmful emails without Office 365 and Exchange EWS integration?

A: Yes. The Phishing Reporter plug-in can be used to conduct investigations and mitigation. However, the user must have Outlook open and the plug-in active. Email server integration eliminates this limitation.


# Google Workspace (Gsuite)

You can integrate your Google Workspace environment with the Incident Responder product by following the steps below.

* Log into <https://console.cloud.google.com/> using an account that has administrative permissions.
* Click **Select a project > New Project**.
* Click on the related new project.
* On the left-side menu, go to **APIs and Services > Library**, search for **Admin SDK API**, and click **Enable**.
* Return to the previous page and search for **Gmail API**, then click **Enable** to activate the API.
* Select **IAM & Admin > Service Accounts** from the left-side menu.
* Click **Create Service Account**, name it, and click **Create and Continue.**
* Select **Service Directory > Service Directory Admin** as the role and click **Continue > Done** to complete the process.
* After creating a service account, click on the related user and go to the user details page.
* Go to the **Keys** tab, click **Add Key > Create** new key.
* Select **JSON** as the key type and click **Create**. **Save** the JSON file.
* Go to the **Details** tab and copy **Unique ID** information. Save this information for the next step.

Next, log in to [admin.google.com](https://admin.google.com/).

* Go to **Security > Access and data control > API controls** on the left-side menu.
* Scroll down to **Domain-wide delegation** and click **Manage Domain-Wide Delegation**.
* Click **Add New**.
* For **Client ID**, enter the **Unique ID** information that you saved earlier.
* For **OAuth Scopes**, paste the scope information below:

<https://mail.google.com/,https://www.googleapis.com/auth/admin.directory.user,https://www.googleapis.com/auth/admin.directory.user.readonly,https://www.googleapis.com/auth/gmail.labels,https://www.googleapis.com/auth/gmail.modify>

* Click **Authorize** to complete the process.

## Test the Configuration <a href="#test-the-configuration" id="test-the-configuration"></a>

To make sure that the integration is working, you can test it on the platform. Go to **Incident Responder > Mail Configurations** on the left sidebar menu of the dashboard and then click **+ NEW** and choose the mail provider - in this case, Google Workspace.Complete the following fields in the configuration table:

| Name               | Name of the configuration                                                   |
| ------------------ | --------------------------------------------------------------------------- |
| Credential JSON    | Open the JSON file with a text editor and copy/paste all of the information |
| Test Email Address | An active email address to be used for testing purposes                     |
| Test Connection    | Perform a test of the configuration                                         |

The new configuration will now appear in the list of mail configurations if the test was successful.

{% hint style="warning" %}
If an X appears, it indicates there was a problem and the email server integration failed; please review the instructions.
{% endhint %}

## About Permissions

### Application Programming Interface (API) Scopes

API scopes identify the information an application will be able to access on a user’s behalf.

### Permissions Required by the Platform

#### Email (read/write/send) - <https://mail.google.com/>

This permission allows the app access to emails in user mailboxes. Please note, it is only used to enable investigative searches; we do not create, read, edit, or send emails using this permission.

The platform uses this permission to scan and filter users' emails. For example, when the “From” filter is selected as a criterion for investigation, this authorization enables the creation of a list of the emails that meet the specified parameter. Other uses include regex and keyword searches.

This permission enables quick deletion of malicious content without compromising user privacy.

#### View Users on the Domain - /auth/admin.directory.user.readonly

This permission allows the app to read data in the organization's user directory. The platform uses this access to retrieve a client's user list and their email addresses when an investigation has been initiated.

#### Email (Manage Labels) - /auth/gmail.labels

This permission allows the app to create, read, update, and delete labels. The platform uses this authority to mark emails in the user's inbox with a warning message when the client deems this appropriate. For example, after running an investigation, you may choose to warn the user rather than delete the email results.

## FAQ

### Q: Can I start an investigation on Incident Responder without integrating Google Workspace?

A: No. In order to be able to start an investigation and take action on emails, integration with Google Workspace is required.


# Exchange (EWS)

You can integrate your EWS environment with the Incident Responder product by following the steps below.

First, you must have or create a Microsoft user identity with either impersonation or delegation permission.

{% hint style="warning" %}
The user must have exchange admin permissions to configure these options.
{% endhint %}

Please refer to this [document](https://learn.microsoft.com/en-us/microsoft-365/admin/add-users/about-admin-roles?view=o365-worldwide) for information on how to create a service/admin user.

{% hint style="warning" %}
The impersonation option is recommended for setting up email server integration.
{% endhint %}

## Impersonation

Impersonation gives one service account access to every mailbox in a database. This enables quick and easy investigation and response to an incident.

Restrictions may also be designated for the impersonation account, depending on the policies of the organization.

The following command can be used in the Exchange Management Shell to grant the impersonation privilege to a service account. This example assigns the service account **<service@company.com>** full access permission to all user mailboxes in the company.com organization.

```
[PS] C:\Windows\system32> Get-Mailbox -ResultSize unlimited -Filter "(RecipientTypeDetails -eq 'UserMailbox') -and (Alias -ne 'Admin')" | Add-MailboxPermission -User admin@company.com -AccessRights FullAccess -InheritanceType All
```

## Delegation

The delegation privilege requires that permissions be added individually to each mailbox. The platform can access the mailboxes within the Exchange designated by the organization.

Restrictions may also be designated for the account, depending on the policies of the organization.

The following command can be used in the Exchange Management Shell to grant delegation privilege to a service account. This example assigns the service account user **<service@company.com>** full access permission to the specified ‘TargetUserName’ user mailbox.

```
[PS] C:\Windows\system32> Add-MailboxPermission -Identity "TargetUserName" -User "service@company.com" -AccessRights FullAccess 
```

## Test the Integration

To make sure that the integration is working, you can test it on the platform. Go to **Incident Responder > Mail Configurations** on the left sidebar menu of the dashboard and then click **+ NEW** and choose the mail provider - in this case, Exchange EWS. Complete the following fields in the configuration table:

The integration details are:

<table><thead><tr><th width="154.20164126611957"></th><th width="581.1428571428571"></th></tr></thead><tbody><tr><td>Name</td><td>Name of the configuration</td></tr><tr><td>Service URL</td><td>Exchange URL information</td></tr><tr><td>Exchange Version</td><td>Exchange version information</td></tr><tr><td>Account Type</td><td>Account type of the service user</td></tr><tr><td>Username</td><td>Username of the service user</td></tr><tr><td>Password</td><td>Password of the service user</td></tr><tr><td>Test Email Address</td><td>An active email address to be used for testing purposes</td></tr><tr><td>X-Anchor Mail Box Header</td><td>Check this box if the platform needs to use the X-Anchor MailBox header in connections to the Exchange server.</td></tr><tr><td>Target Groups</td><td><p>Selection of the users to be subjects of investigation</p><p><strong>All Groups:</strong> All user inboxes</p><p><strong>Specific User</strong> <strong>Groups:</strong> Selected group of user inboxes</p></td></tr><tr><td>Test Connection</td><td>Perform a test of the configuration</td></tr></tbody></table>

The new configuration will now appear in the list of mail configurations if the test was successful.

{% hint style="warning" %}
If an X appears, it indicates there was a problem and the email server integration failed; please review the instructions.
{% endhint %}

## Throttling Policy Configuration

### What is Throttling Policy?

Throttling policy is a control mechanism designed to preserve server reliability and functionality by limiting the resources consumed by a single user or application.

The Microsoft Exchange throttling policy is a default setting that restricts users on various client access protocols, such as MAPI, Activesync, OWA, POP3, etc., intended to prevent a potential crash or denial of service (DoS) via repeated requests.

{% hint style="info" %}
The default throttling policy is always active if a user has not specified an alternate throttling policy.
{% endhint %}

A successful integration between Exchange and the Incident Responder will lead to hundreds of connections on the Exchange server when an investigation begins.

The investigation may be obstructed by the throttling policy. Therefore, the default throttling policy rights of the service user defined in the Incident Responder product should be expanded to avoid this problem.

### Choose a Throttling Policy

You can use the command below in Exchange Management to view all of the available throttling policies.

```
Get-ThrottlingPolicy | where-object {$_.IsDefault -eq $true}
```

### Add a New Throttling Policy

Open the Exchange Management Shell and use the command below to create a new throttling policy.

```
New-ThrottlingPolicy KeepnetUnlimitedPolicyName
```

### Configure Authorizations for the Throttling Policy

Once you have added a new throttling policy, please enter the following command to set the permissions of the new policy.

```
Set-ThrottlingPolicy KeepnetUnlimitedPolicyName -RCAMaxConcurrency Unlimited -Exchange EWSMaxConcurrency Unlimited -Exchange EWSMaxSubscriptions Unlimited -CPAMaxConcurrency Unlimited -Exchange EWSCutoffBalance Unlimited -Exchange EWSMaxBurst Unlimited -Exchange EWSRechargeRate Unlimited -Exchange EWSFindCountLimit Unlimited
```

### Assign Throttling Policy to a Service

User Use the command below to assign a throttling policy to a specific user. Replace **“<service@company.com>”** with the service user you designated in the Incident Responder.

```
Set-Mailbox “service@company.com" -ThrottlingPolicy KeepnetUnlimitedPolicyName
```


# (Recommended) Add domains to URL Protection

{% hint style="info" %}
**Why is this Optional?** Not every customer has SafeLinks or URL Protection setup. This step is only necessary for customers who use a URL Protection tool and need to allow Keepnet domains.
{% endhint %}

Without this step, your employees will successfully receive the test phishing email but not be able to open the test phishing link without your browser security notifying the user that it may be a suspicious link. For the highest accuracy when measuring employee behaviour, you will need to allow list domains in your browser and other security solutions.

**Below are quick links for you to follow the relevant steps:**&#x200B;

[Allow List for Office 365](/next-generation-product/getting-started/recommended-add-domains-to-url-protection/allow-list-for-microsoft-365)

[​​Allow List for Google Workspace](/next-generation-product/getting-started/recommended-add-domains-to-url-protection/allow-list-for-google-workspace)

[​​Allow List for Exchange 2013/2016](/next-generation-product/getting-started/recommended-add-domains-to-url-protection/allow-list-for-exchange-2013-2016)

​​[Allow List in Security Solutions](/next-generation-product/getting-started/recommended-add-domains-to-url-protection/allow-list-in-security-solutions)

Also note, you will need to ensure the Keepnet domains are allow listed in other security solutions such as **Defender** and **ZScaler** ​who manage the security of URLs in the inbox and browser.


# Allow List for Microsoft 365

## How to Allow List Using the Safe Links Feature in Office 365 <a href="#how-to-whitelist-using-the-safe-links-feature-in-office-365" id="how-to-whitelist-using-the-safe-links-feature-in-office-365"></a>

The below instructions will show you how to allow list the emails such as notification, training, or phishing simulation emails that will be sent from the platform to users by allow listing **Domains** in the O365 environment in the **Safe** **Links** feature.

{% hint style="danger" %}
This step is suggested to prevent any false clicks on training or phishing reports.
{% endhint %}

{% hint style="info" %}
To complete this procedure, you must have security administrator privileges with the Microsoft Security & Compliance Center or be a member of the Microsoft Exchange Online Organization Management administrator group.
{% endhint %}

1. Find the list of the [phishing simulator](https://keepnetlabs.com/products/phishing-simulator) domains in **Phishing Simulator > Settings > Domains**.
2. Sign into the **Microsoft Security & Compliance** Center.
3. Click **Policies and rules** from the left sidebar menu, click **Threat** **Policies** and select **Safe Links**.
4. Click **Create**.
5. Add a name and description for your safe links policy and click **Next**.
6. Select your company domain to be included in this policy and click **Next**.
7. Deselect the **Track user clicks** option.
8. Add the **phishing domains** by using **\*.domain.com/\*** wildcard syntax to the **Do not rewrite the following URLs** section.
9. Click the **Next** button and select **Submit** to complete the process.

✅ **You have now Allow List Domains so your target users can successfully open Keepnet email links. Please also Allow List in your security solutions if you haven't already.**

**Next step is to** [**Setup your Phishing Reporter**](https://github.com/ucarozan/keepnet-docs/blob/main/next-generation-product/getting-started/6.-setup-phishing-reporter) **➡️**


# Allow List for Google Workspace

## How to Allow List an IP Address in Google Workspace <a href="#how-to-whitelist-an-ip-address-in-google-workspace" id="how-to-whitelist-an-ip-address-in-google-workspace"></a>

### Google Workspace IP Bypass <a href="#google-workspace-ip-bypass" id="google-workspace-ip-bypass"></a>

The below instructions will show you how to allow list the emails such as notification, training, or phishing simulation emails that will be sent from the platform to users by allow listing **Sender** **IPs** in the Google Workspace environment.To complete this procedure, you must have security administrator privileges with Google Workspace.

1. Note the [IP addresses](https://doc.keepnetlabs.com/Next-Generation-Product/getting-started/whitelisting#ip-addresses-and-domains-to-allow) to be allowed.
2. Sign in to [Google Admin.](https://admin.google.com/)​
3. Select **Apps > Google Workspace > Gmail** from the left sidebar menu.
4. Go to the **Spam, Phishing, and Malware** page.
5. Select the **Email allowlist** tab and click the **Edit** button.
6. Add the IP addresses that are listed here.
7. Click the **Save** button.
8. Go back to the **Spam, Phishing, and Malware** page.
9. Select the **Inbound Gateway** option and click **Enable**, if not enabled.
10. Add the IP addresses and click **Save**.
11. Select **Automatically detect external IP** if not already selected.
12. **WARNING:** Leave the option of **Reject all mail not from gateway IPs** unchecked.
    1. This option must be 'unchecked'. **Do not enable this option!**
13. Select the option of **Require TLS for connections from the email gateways listed above**.
14. Click **Save** to complete the process.

✅ **You have now Allow List Domains so your target users can successfully open Keepnet email links. Please also Allow List in your security solutions if you haven't already.**

**Next step is to** [**Setup your Phishing Reporter**](https://github.com/ucarozan/keepnet-docs/blob/main/next-generation-product/getting-started/6.-setup-phishing-reporter) **➡️**


# Allow List for Exchange 2013/2016

To complete this procedure, you must have security administrator privileges with the Microsoft Security & Compliance Center or be a member of the Microsoft Exchange Online Organization Management administrator group.

1. Note the [IP addresses](https://doc.keepnetlabs.com/Next-Generation-Product/getting-started/whitelisting#ip-addresses-and-domains-to-allow) to be allowed.
2. Log in to your exchange admin center.
3. From the left sidebar menu, go to **Mail flow > Connectors**.
4. Click **Add a connector**.
5. Select **Partner organization** in the **Connection** from the section.
6. Give the connector a name and click **Next**.
7. In the **Authenticating sent email** window, select the option that states **By verifying that the IP address of the sending server matches one of the following IP addresses that belong to your partner organization**.
8. Enter the IP addresses and click **Next**.
9. Uncheck the TLS option stating **Reject email messages if they are not sent over**.
10. Click **Next**, then click **Save** to complete the process.

You must complete the following steps once the **connector** is defined.

1. Go to the **Mail flow > Rules** page in the left sidebar menu.
2. Click the **+ icon** on the screen and select **Bypass spam filtering**.
3. In the **New rule** window, give the rule a name and select **The sender is ... > IP address is in any of these ranges or exactly matches.**
4. Enter the IP addresses and click **OK**.
5. In the **Do the following** section, select Set the message header to this value ... > Set a message header and enter **“X-MS-Exchange-Organization-Bypass Clutter”** in the text field, and click **OK**.
6. Set the value information to **true** with the enter text option on the right.
7. Click **Save** to complete the process.

✅ **You have now Allow List Domains so your target users can successfully open Keepnet email links. Please also Allow List in your security solutions if you haven't already.**

**Next step is to** [**Setup your Phishing Reporter**](https://github.com/ucarozan/keepnet-docs/blob/main/next-generation-product/getting-started/6.-setup-phishing-reporter) **➡️**


# Allow List in Security Solutions

## Allow Listing in Content Filtering (Proxy) <a href="#whitelisting-in-content-filtering-proxy" id="whitelisting-in-content-filtering-proxy"></a>

### **Allow Listing Platform Addresses**

Platform administrators must allow list **dash.keepnetlabs.com** and **api.keepnetlabs.com** on content filtering proxy solutions to use the products successfully.

{% hint style="warning" %}
If you have completed white labeling, it is sufficient to allow list the platform domain name that will be used to access to platform and api.keepnetlabs.com address.
{% endhint %}

### **Allow Listing Phishing Simulation Domain Addresses**

The domain names of the [Phishing Simulator](https://keepnetlabs.com/products/phishing-simulator) should be allow listed with content filtering (proxy) solutions to make sure that the domains can be accessed by the target users. If the target users can't access the phishing link in the network, the simulated phishing campaign might not be successful.

You can find the phishing simulation domains by logging into the platform and then go to **Phishing Simulator > Settings > Domains** page.

### **Allow Listing in Data Loss Prevention (DLP)**

System administrators may upload the target users' first name, last name, email address, department, or such other information to the platform; however, because [DLP](https://digitalguardian.com/blog/what-data-loss-prevention-dlp-definition-data-loss-prevention) can be very sensitive, the platform domain information should be allow listed to ensure DLP allows you to upload these pieces of information to the platform.

✅ **You have now Allow List Domains so your target users can successfully open Keepnet email links. Please also Allow List in your security solutions if you haven't already.**

**Next step is to** [**Setup your Phishing Reporter**](https://github.com/ucarozan/keepnet-docs/blob/main/next-generation-product/getting-started/6.-setup-phishing-reporter) **➡️**


# (Recommended) Track Opened Emails

{% hint style="info" %}
**Why is this Optional?** Some customers don't measure Opened Email as a metric as it does not indicate secure or risky behaviour. When you complete this step, simulated emails may behave differently to other external emails and attentive employees might notice the difference.
{% endhint %}

Keepnet utilizes a tracking pixel to monitor when users open phishing simulation emails. This tracking pixel is embedded in all phishing simulation emails sent through the platform. When the email is opened and its images load, the pixel sends a response to Keepnet, logging the open event.

Opening a phishing simulation email is **not** considered a failure and does **not** impact the user's gamification score. Phishing emails may also be marked as "opened" automatically when:

* **Email Reported:** the user reports the email with the **Reporter Button**.
* **Phishing Failure:** the user clicks a phishing link or opens a malicious attachment. The email is marked as opened even if the tracking pixel never loads.

## Why Some Email Opens Are Not Recorded

By default, **every Outlook client blocks the automatic download of external (internet-hosted) images** to protect users' privacy. This is standard Microsoft security behavior, not a Keepnet limitation, and it applies across classic Outlook for Windows, New Outlook for Windows, Outlook on the web (OWA), and Outlook for iOS and Android.

When images are blocked, the recipient sees a banner such as **"Some images were blocked"** or **"Download Pictures"** and can load the images manually for that message. Until the images load, the tracking pixel does not fire, so that open is not recorded by the pixel.

Most users may not click "Download Pictures," so opens often go unrecorded by the pixel. This is expected, and open tracking is an optional metric that does not affect a user's score. If you want simulation images and the tracking pixel to load **automatically** when the email is opened, without the user clicking "Download Pictures," use one of the methods below.

<figure><img src="/files/58wqITyUUmFGHypS5mZi" alt=""><figcaption></figcaption></figure>

## Which Method Applies to Which Outlook Email Client

The default behavior is the same in every client: external images are blocked until the **sender is trusted** or the user loads them manually. To make trusted-sender images load automatically, choose the method that matches your users' Outlook client.

| Your Outlook Client         | Method to Use                               |
| --------------------------- | ------------------------------------------- |
| Classic Outlook for Windows | Trusted Zone or Safe Senders (either works) |
| New Outlook for Windows     | Safe Senders only                           |
| Outlook on the web (OWA)    | Safe Senders only                           |
| Outlook for iOS / Android   | Safe Senders only                           |

**Why the difference?** The Trusted Zone method relies on Internet Explorer security zones and the classic Outlook Trust Center, which exist **only in classic Outlook**. New Outlook, OWA, and Outlook mobile are web-based clients that do not have those components; in them, automatic image loading is governed **only** by the mailbox **Safe Senders** list. The image URL or hosting domain does not change this; the decision is based on whether the message sender is trusted.

{% hint style="warning" %}
If any of your users are on New Outlook, Outlook on the web, or Outlook mobile, the Trusted Zone method will not work for them. Use **Safe Senders** (see Method 1 below).
{% endhint %}

The detailed steps for each method follow.

## Method 1: Safe Senders (works on all Outlook clients)

Adding the simulation sender domains to the mailbox **Safe Senders** list tells Outlook to download their images automatically. The Safe Senders list is stored in the Exchange mailbox, so it is honored by Classic Outlook, New Outlook, Outlook on the web, and Outlook mobile alike. This is the **only method that works for New Outlook and the web/mobile clients**.

Trade-offs to be aware of:

* All images from the trusted senders will load, so attentive users may notice that simulation emails render fully while other external emails do not.
* Keepnet sends simulations from many different sender addresses, and these are subject to change, so the list must be kept up to date.

For company-wide consistency, deploy Safe Senders centrally instead of asking each user to configure it.

### Option A: Exchange Online PowerShell (recommended for all clients)

You can add safe senders individually in each user's junk email settings, but that requires every person to configure it themselves. A more efficient approach is to apply the setting for the whole organization with PowerShell.

Run the commands from **Azure Cloud Shell** (open it at [admin.microsoft.com](https://admin.microsoft.com) or [portal.azure.com](https://portal.azure.com), signed in as global administrator), then follow the steps below.

**Step 1: Test on a single mailbox first.**

```powershell
Connect-ExchangeOnline

Set-MailboxJunkEmailConfiguration -Identity user@yourcompany.com `
  -TrustedSendersAndDomains @{Add="sim-domain1.com","sim-domain2.com"}
```

**Step 2: Roll out to all members of a security group.**

```powershell
# Connect to Exchange Online (sign in as global administrator)
Connect-ExchangeOnline

# Get the members of the target security group
$groupUsers = Get-AzADGroup -DisplayName "YOUR GROUP NAME" | Get-AzADGroupMember

# Add the simulation sender domains to each member's Safe Senders list
foreach ($user in $groupUsers) {
    Set-MailboxJunkEmailConfiguration -Identity $user.UserPrincipalName `
      -TrustedSendersAndDomains @{Add="sim-domain1.com","sim-domain2.com"}
}
```

Notes:

* Replace `YOUR GROUP NAME` with your group, and replace the example domains with your simulation sender domains (comma-separated). Find them under **Phishing** > **Settings** > **Domains** in the Keepnet Platform, or contact Keepnet Support.
* The script only affects users who are in the group when it runs. For longer campaigns, re-run it periodically (for example, when new people join).
* After applying, send a phishing test campaign and confirm that opens are recorded.

### Option B: Group Policy

If you manage **Classic Outlook clients** through **Group** **Policy**, you can deploy the **Safe** **Senders** **list** centrally instead of using PowerShell. Rather than repeat the steps here, follow Microsoft's official guide:

* Microsoft Learn: [Deploy junk email settings by using Group Policy](https://learn.microsoft.com/microsoft-365-apps/outlook/email-security/deploy-junk-email-settings)

Use your simulation sender domains, available under **Phishing** > **Settings** > **Domains** in the Keepnet Platform.

## Method 2: Trusted Zone in Outlook (classic Outlook only)

{% hint style="info" %}
This method applies to **Classic Outlook for Windows only**. It has no effect in New Outlook, Outlook on the web, or Outlook mobile.
{% endhint %}

In **Classic** **Outlook**, you can create a **Group** **Policy** **Object** in **Active Directory** to update the Trusted Zone so that tracking pixels load without loading every other simulation image:

1. Navigate to your **Local Group Policy Editor**.
2. Go to **User Configuration** > **Windows Settings** > **Administrative Templates** > **Windows Components** > **Internet Explorer** > **Internet Control Panel** > **Security Page**.
3. Double-click the **Site to Zone Assignment List** policy to modify the policy.
4. Enable the policy by selecting the **Enabled** option.
5. Under the **Options** area, click **Show**.
6. From the **Show Contents** window, enter the phish link domain used in your test in the **Value Name**. You can also use wildcards to indicate a phish link subdomain.
7. For the **Value**, enter "2", which corresponds to "Trusted Zone".
8. Click **OK**.
9. Navigate to **Outlook**.
10. Select **Options** > **Trust Center** > **Trust Center Settings**, then select **Allow downloads from Websites in this security zone: Trusted Zone**.

We recommend sending a phishing test campaign to yourself once these settings are saved to confirm opens are being tracked.

Please contact the [support team](/resources/keepnet-support-help-desk) if you require more information.


# Customer Success

Welcome to the Customer Success Hub! This is your one-stop destination for guidance, best practices, and resources to help you get the most out of Keepnet. This self-service model is designed to put success at your fingertips, so you can find the answers you need quickly and start seeing results right away.

<table data-view="cards"><thead><tr><th></th><th data-type="content-ref"></th><th></th><th data-hidden data-card-cover data-type="image">Cover image</th></tr></thead><tbody><tr><td>How-to Videos</td><td><a href="/pages/ZPPM6tQaoFzCHIToPxWS">/pages/ZPPM6tQaoFzCHIToPxWS</a></td><td>Quick, practical walkthroughs to guide you through common tasks</td><td><a href="https://images.unsplash.com/photo-1673515336391-c63034623475?crop=entropy&#x26;cs=srgb&#x26;fm=jpg&#x26;ixid=M3wxOTcwMjR8MHwxfHNlYXJjaHw4fHxob3clMjB0b3xlbnwwfHx8fDE3NjczNzA2MTZ8MA&#x26;ixlib=rb-4.1.0&#x26;q=85">https://images.unsplash.com/photo-1673515336391-c63034623475?crop=entropy&#x26;cs=srgb&#x26;fm=jpg&#x26;ixid=M3wxOTcwMjR8MHwxfHNlYXJjaHw4fHxob3clMjB0b3xlbnwwfHx8fDE3NjczNzA2MTZ8MA&#x26;ixlib=rb-4.1.0&#x26;q=85</a></td></tr><tr><td>Campaign Strategy Guide</td><td><a href="/pages/Yyej0etZmiDLFWPmHA2k">/pages/Yyej0etZmiDLFWPmHA2k</a></td><td>Expert advice on planning and running effective security awareness campaigns.</td><td><a href="https://images.unsplash.com/photo-1493612276216-ee3925520721?crop=entropy&#x26;cs=srgb&#x26;fm=jpg&#x26;ixid=M3wxOTcwMjR8MHwxfHNlYXJjaHwxfHxjYW1wYWlnbnxlbnwwfHx8fDE3NjczNzA0MDh8MA&#x26;ixlib=rb-4.1.0&#x26;q=85">https://images.unsplash.com/photo-1493612276216-ee3925520721?crop=entropy&#x26;cs=srgb&#x26;fm=jpg&#x26;ixid=M3wxOTcwMjR8MHwxfHNlYXJjaHwxfHxjYW1wYWlnbnxlbnwwfHx8fDE3NjczNzA0MDh8MA&#x26;ixlib=rb-4.1.0&#x26;q=85</a></td></tr><tr><td>Most Loved Scenarios</td><td><a href="/pages/Q5sLe11janrCWkZV0avh">/pages/Q5sLe11janrCWkZV0avh</a></td><td>Hand-picked simulations from our Customer Success team, showcasing the scenarios customers love most</td><td><a href="https://images.unsplash.com/photo-1518199266791-5375a83190b7?crop=entropy&#x26;cs=srgb&#x26;fm=jpg&#x26;ixid=M3wxOTcwMjR8MHwxfHNlYXJjaHwxfHxoZWFydHxlbnwwfHx8fDE3NjczNzA0NjB8MA&#x26;ixlib=rb-4.1.0&#x26;q=85">https://images.unsplash.com/photo-1518199266791-5375a83190b7?crop=entropy&#x26;cs=srgb&#x26;fm=jpg&#x26;ixid=M3wxOTcwMjR8MHwxfHNlYXJjaHwxfHxoZWFydHxlbnwwfHx8fDE3NjczNzA0NjB8MA&#x26;ixlib=rb-4.1.0&#x26;q=85</a></td></tr><tr><td>Multi-Language Features</td><td><a href="/pages/m5O5MEtb0Ci7fm9Krdol">/pages/m5O5MEtb0Ci7fm9Krdol</a></td><td>Tools to run global programmes with local impact through training, localisation, and hyper-personalisation</td><td><a href="https://images.unsplash.com/photo-1592487501226-7ed5e5dc80f2?crop=entropy&#x26;cs=srgb&#x26;fm=jpg&#x26;ixid=M3wxOTcwMjR8MHwxfHNlYXJjaHwzfHxlbmdsaXNoJTIwZnJlbmNoJTIwZ2VybWFufGVufDB8fHx8MTc2NzM3MDU1Nnww&#x26;ixlib=rb-4.1.0&#x26;q=85">https://images.unsplash.com/photo-1592487501226-7ed5e5dc80f2?crop=entropy&#x26;cs=srgb&#x26;fm=jpg&#x26;ixid=M3wxOTcwMjR8MHwxfHNlYXJjaHwzfHxlbmdsaXNoJTIwZnJlbmNoJTIwZ2VybWFufGVufDB8fHx8MTc2NzM3MDU1Nnww&#x26;ixlib=rb-4.1.0&#x26;q=85</a></td></tr><tr><td>Communication Tips</td><td><a href="/pages/hk8Wips5jU3LmoiPcHFC">/pages/hk8Wips5jU3LmoiPcHFC</a></td><td>Email templates you can use to share changes with your entire organisation</td><td><a href="https://images.unsplash.com/photo-1563986768609-322da13575f3?crop=entropy&#x26;cs=srgb&#x26;fm=jpg&#x26;ixid=M3wxOTcwMjR8MHwxfHNlYXJjaHwxMHx8Y29tbXVuaWNhdGlvbnxlbnwwfHx8fDE3NjczNzA1NzZ8MA&#x26;ixlib=rb-4.1.0&#x26;q=85">https://images.unsplash.com/photo-1563986768609-322da13575f3?crop=entropy&#x26;cs=srgb&#x26;fm=jpg&#x26;ixid=M3wxOTcwMjR8MHwxfHNlYXJjaHwxMHx8Y29tbXVuaWNhdGlvbnxlbnwwfHx8fDE3NjczNzA1NzZ8MA&#x26;ixlib=rb-4.1.0&#x26;q=85</a></td></tr><tr><td>FAQs</td><td><a href="/pages/XW7D8oAgbeQ99ANioiWw">/pages/XW7D8oAgbeQ99ANioiWw</a></td><td>Frequently asked questions from other Keepnet customers</td><td><a href="https://images.unsplash.com/photo-1633613286848-e6f43bbafb8d?crop=entropy&#x26;cs=srgb&#x26;fm=jpg&#x26;ixid=M3wxOTcwMjR8MHwxfHNlYXJjaHwxfHxxdWVzdGlvbnN8ZW58MHx8fHwxNzY3MzcwNjAwfDA&#x26;ixlib=rb-4.1.0&#x26;q=85">https://images.unsplash.com/photo-1633613286848-e6f43bbafb8d?crop=entropy&#x26;cs=srgb&#x26;fm=jpg&#x26;ixid=M3wxOTcwMjR8MHwxfHNlYXJjaHwxfHxxdWVzdGlvbnN8ZW58MHx8fHwxNzY3MzcwNjAwfDA&#x26;ixlib=rb-4.1.0&#x26;q=85</a></td></tr></tbody></table>

.


# How-to Videos

Our Customer Success team have put together a page of resources to help you hit the ground running with Keepnet. Learn how to setup your campaigns and enrollments to align with you business goals!

Our collection of short, step-by-step video guides is designed to help you get the most out of Keepnet’s security awareness tools. From setting up and running phishing simulations, to delivering engaging training, through to deploying the Phishing Reporter button, each video provides clear, practical guidance to make every stage simple and effective.

<table data-view="cards"><thead><tr><th></th><th data-type="content-ref"></th><th data-hidden data-card-cover data-type="image">Cover image</th></tr></thead><tbody><tr><td>Emali Threat Simulator</td><td><a href="/pages/WkBVRzRZfrBZTwLlHBcw">/pages/WkBVRzRZfrBZTwLlHBcw</a></td><td></td></tr><tr><td>Phishing Simulator</td><td><a href="/pages/6lLQDITo05XkwKoLTrql">/pages/6lLQDITo05XkwKoLTrql</a></td><td></td></tr><tr><td>Callback Simulator</td><td><a href="/pages/Ma1Zrkfz4EB0aSrzup91">/pages/Ma1Zrkfz4EB0aSrzup91</a></td><td></td></tr><tr><td>Vishing Simulator</td><td><a href="/pages/jaVNCxsPkFWWr7SMKgww">/pages/jaVNCxsPkFWWr7SMKgww</a></td><td></td></tr><tr><td>Smishing Simulator</td><td><a href="/pages/LsfPmJz0JIQk2O9rtpj5">/pages/LsfPmJz0JIQk2O9rtpj5</a></td><td></td></tr><tr><td>Quishing Simulator</td><td><a href="/pages/AqIPDP0pMSMm2RT9ewnI">/pages/AqIPDP0pMSMm2RT9ewnI</a></td><td></td></tr><tr><td>Awareness Educator</td><td><a href="/pages/S2Tg1Z8ifpIWJjhKSqGx">/pages/S2Tg1Z8ifpIWJjhKSqGx</a></td><td></td></tr><tr><td>Phishing Reporter Button</td><td><a href="/pages/HWHtkkauJ4lm8IWSeqPS">/pages/HWHtkkauJ4lm8IWSeqPS</a></td><td></td></tr><tr><td>Incident Responder</td><td><a href="/pages/FHn2m7IkmQGelfqVQb7e">/pages/FHn2m7IkmQGelfqVQb7e</a></td><td></td></tr></tbody></table>


# Email Threat Simulator

Our Email Threat Simulator is an easy way to see how many real threats are currently able to bypass your email security. Quickly review which ones aren't blocked and take action to block these in the future. Each time there is a new threat vector, we will add this to Email Threat Simulator so you can consistently stay informed about which active threats can bypass your current SEGs.

{% embed url="<https://youtu.be/WT-QQCyqXOs?feature=shared>" %}


# Phishing Simulator

Explore our quick step-by-step videos to get the most out of the Phishing Simulator. From sending campaigns to customising templates and reviewing reports, these guides make it easy to launch & manage

## Scheduling your Phishing Campaigns

{% embed url="<https://www.loom.com/share/c3b8db8e4b4f434cbf0f79eafcb58d61?sid=0a830bbc-1f32-4216-933e-3fdd335389a4>" %}

{% embed url="<https://www.loom.com/share/0d9d8452ecbe4505aa2b0253cfdbc75a?sid=95569ca1-8128-45bb-849d-6f5cd3f1f552>" %}

{% embed url="<https://www.loom.com/share/aebdba7bb2a84bd9bbc5b7446a190641?sid=293f6ffb-b42a-4973-9d17-c518066075da>" %}

## Customising your Phishing Templates

We have over 16,000 templates you can start using immediately. However, many customers love to customise the templates available for their own business. Alternatively, some customers have emails they want to import to Keepnet to use as a Phishing scenario.

{% embed url="<https://www.loom.com/share/47cca6a655f44bafb8edf8d064ef9dd2?sid=db3084ff-be5c-46e2-9c43-cc09beba36f5>" %}

{% embed url="<https://www.loom.com/share/a2ee344e41a4438d9f5d377f71866a0f?sid=a7f1d2e3-24d4-4ddb-93e4-a63b705aeb44>" %}

{% embed url="<https://www.loom.com/share/4ff7681ccb1e4069bd71d6b6f824654f?sid=a7c65b5f-c5b2-48bc-80be-7e7a1826b4ee>" %}

{% embed url="<https://www.loom.com/share/63573d378a8e4e23b5dd1e8c3b6d1e2b?sid=95010646-e161-4f3b-8e81-0fe914110578>" %}

{% embed url="<https://www.loom.com/share/e899debb32cb491b8e97c064fabb7a7a?sid=67c87a55-1515-469e-a0e6-1313b1a8f1e7>" %}

{% embed url="<https://www.loom.com/share/6e1e3f3343474deaa45e8124f033f7f6>" %}

## View Reporting for your Campaigns

{% embed url="<https://www.loom.com/share/d0c88895fccf4e158d853ce4bff4a983?sid=31c87d09-c18e-42da-a9eb-b51defbabe32>" %}

{% embed url="<https://www.loom.com/share/63a0f25936904cb8b3720489ea85af28?sid=5d94559f-ddbf-44ab-8a8b-4f4ee019b6ca>" %}


# Callback Simulator

Explore our quick step-by-step videos to get the most out of the Callback Simulator. From sending campaigns to customising templates and reviewing reports, these guides make it easy to launch & manage

### Send a Callback Campaign

{% embed url="<https://youtu.be/vNps_if7IVQ?feature=shared>" %}

### Customise your Callback Campaign

{% embed url="<https://youtu.be/P_eXk0GP-1g?feature=shared>" %}

{% embed url="<https://youtu.be/j3W4JLCeLXM?feature=shared>" %}

### View Reporting For Callback Campaigns

{% embed url="<https://youtu.be/nHOEMGiW-7U?feature=shared>" %}


# Vishing Simulator

Explore our quick step-by-step videos to get the most out of the Vishing Simulator. From sending campaigns to customising templates and reviewing reports, these guides make it easy to launch & manage

### Send a Vishing Campaign

{% embed url="<https://youtu.be/jcScUso-zWI?feature=shared>" %}

### Create Custom Vishing Templates

{% embed url="<https://youtu.be/qvKO6lWCDA4?feature=shared>" %}

### Review your Vishing Campaign Report

{% embed url="<https://youtu.be/KM5pFrJcJfU?feature=shared>" %}


# Smishing Simulator

Explore our quick step-by-step videos to get the most out of the Smishing Simulator. From sending campaigns to customising templates and reviewing reports, these guides make it easy to launch & manage

### Send a Smishing Campaign

{% embed url="<https://youtu.be/qzB-9OiTo1M?feature=shared>" %}

### Customise your Smishing Campaigns

{% embed url="<https://youtu.be/Rl37XfHm9tE?feature=shared>" %}

{% embed url="<https://youtu.be/h1hVDYTpFh8?feature=shared>" %}

### Review Reporting for your Smishing Campaigns

{% embed url="<https://youtu.be/262xOxfGtA4?feature=shared>" %}


# Quishing Simulator

Explore our quick step-by-step videos to get the most out of the Quishing Simulator. From sending campaigns to customising templates and reviewing reports, these guides make it easy to launch & manage

### Send a Quishing Campaign

{% embed url="<https://youtu.be/h13p5CtQ9Rg?feature=shared>" %}

### Customise your Quishing Campaigns

{% embed url="<https://youtu.be/RnbfRh7KGVI?feature=shared>" %}

{% embed url="<https://youtu.be/j69ht6Me6Do?feature=shared>" %}

{% embed url="<https://youtu.be/t1adYT2Y7Fs?feature=shared>" %}

### Review Reporting For Your Quishing Campaign

{% embed url="<https://youtu.be/f-0zggMD_98?feature=shared>" %}


# Awareness Educator

These step-by-step quick tutorials show you how to send training, how employees access training, how to view reports, deliver in multiple languages and automating training for new users or groups.

## Scheduling Training Enrollments

{% embed url="<https://www.loom.com/share/5a399c0b05a647eb9302a98239f0e7da?sid=229b4980-0e0a-4dfa-a5cb-4e16329834d0>" %}

{% embed url="<https://www.loom.com/share/4a0c97943a34410798591f3093c2ee72?sid=4ee600b8-7a48-4057-9d18-4b8dff156851>" %}

{% embed url="<https://www.loom.com/share/0abf70277ee24cadb7496ddd00d40875?sid=ac1880fc-15f7-4039-a40e-0b2cb2216f50>" %}

{% embed url="<https://www.loom.com/share/8052d3c0cc194419a53b3f0028d7a973?sid=f304088d-6c80-4582-ab0a-bf2dff8d14a0>" %}

{% embed url="<https://www.loom.com/share/aebdba7bb2a84bd9bbc5b7446a190641?sid=2c7a4156-24b5-4be4-90ce-84a1deeb906c>" %}

## How Your Employees Receive & Access Training

{% embed url="<https://www.loom.com/share/f2596ed5c6794646bc8e366e877278f1?sid=60ad6ba2-6176-46bf-977b-3f8ce8ee1f51>" %}

{% embed url="<https://www.loom.com/share/c49360e9a6c842c98fd6bbb93b5838e1?sid=4a21fc30-a0cd-4c80-b642-45488d7d7b48>" %}

{% embed url="<https://youtu.be/uqML_S2aZgI?feature=shared>" %}

## View Reporting For Training Enrollments

{% embed url="<https://www.loom.com/share/d1e1b0fa27474f318fb11260a9742250?sid=e08b25b5-1770-4bd1-a3ad-51e3d17e9ae0>" %}

{% embed url="<https://www.loom.com/share/e4836b5752094fa08f54e180311d5f33?sid=9651c1c5-e67b-4436-bc02-c941078db0bd>" %}


# Phishing Reporter Button

Our video guides walk you through customising the Phishing Reporter button, testing deployment, and rolling it out across your entire organisation with ease.

{% embed url="<https://www.loom.com/share/5292688813614075bd4535c806050651?sid=6be9bab7-2918-4465-82cf-40204ae1d58b>" %}


# Incident Responder

Responding swiftly to email attacks is significant, as each passing minute escalates the threat. On average, it takes 9 hours to detect and remove a malicious email, significantly amplifying the risk. Keepnet's automated phishing incident response tool allows businesses to identify and respond to email attacks in minutes

{% content-ref url="/pages/dVnVgTOylDAiJNAqxO2l" %}
[Setup Required](/next-generation-product/customer-success/how-to-videos/incident-responder/setup-required)
{% endcontent-ref %}

{% content-ref url="/pages/QwZp2NlDsdUjfgb5v9h5" %}
[Default Behaviour of Incident Responder](/next-generation-product/customer-success/how-to-videos/incident-responder/default-behaviour-of-incident-responder)
{% endcontent-ref %}

{% content-ref url="/pages/sGbKZTdCzSTl5wdCRebG" %}
[Popular Customisations](/next-generation-product/customer-success/how-to-videos/incident-responder/popular-customisations)
{% endcontent-ref %}

### **Here's our Understanding Incident Responder Slide Deck 📍**

{% file src="/files/7eR7VdgBdyPKRxJsiZ9A" %}


# Setup Required

For successful analysis, you need to integrate one or many Threat Intel Partners. By integrating Threat Intel partners you will automate identifying malicious emails. Each email reported through the Phishing Reporter add-in will automatically be analysed for malicious content via multiple integrations.

## **1. Create a New Integration** <a href="#creating-new-integration" id="creating-new-integration"></a>

Navigate to **Incident Responder > Integrations.** Click the blue **New** button. You can find all our Threat Intel partners under **Integration Type**.

<figure><img src="https://files.gitbook.com/v0/b/gitbook-x-prod.appspot.com/o/spaces%2FlKFxOYqYqSykikkXpwjG%2Fuploads%2FO9zvAviIbw4c4O7141yr%2Fthreat%20intel%20step%201.gif?alt=media&#x26;token=67ad44ca-841f-49a9-96d9-86204d2ec467" alt="Incident Responder — New integration, select Threat Intel partner type."><figcaption><p>Incident Responder — New integration, select Threat Intel partner type.</p></figcaption></figure>

#### **Quick links to install each Threat Intel Partner**

You can install free threat intel partners or if you already have subscriptions for paid versions, you can integrate these too! All links to install all free and paid for intel threat partners below

**Free Intel Threat Partners**

​[Google Safe Browsing](/next-generation-product/platform/incident-responder/integrations#google-safe-browsing)

[​​Zen SpamHaus​](/next-generation-product/platform/incident-responder/integrations#zen-spamhaus)

​​[Cyber X-ray](/next-generation-product/platform/incident-responder/integrations#cyber-x-ray)

[​VMRay​](/next-generation-product/platform/incident-responder/integrations#vmray)

**Paid Intel Threat Partners**

​​[Google Web Risk](/next-generation-product/platform/incident-responder/integrations#google-web-risk)

[​AnyRun​](/next-generation-product/platform/incident-responder/integrations#anyrun)

[​​OPSWAT​](/next-generation-product/platform/incident-responder/integrations#opswat)

[​FortiSandbox](/next-generation-product/platform/incident-responder/integrations#fortisandbox)

​​[Virus Total​](/next-generation-product/platform/incident-responder/integrations#virustotal)

​[IMB X-Force](/next-generation-product/platform/incident-responder/integrations#ibm-x-force)

{% hint style="success" %}
Add as many Threat Intel Partners as you would like. The more you integrate, the more thorough your analysis of suspicious emails.
{% endhint %}

## 2. Complete Mail Configuration

Please follow the steps for Mail Configuration for your email provider:

{% content-ref url="/pages/yknIaDueUuk1iOSRsGQc" %}
[Microsoft 365](/next-generation-product/getting-started/7.-incident-responder-setup/step-2.-mail-configurations/microsoft-365)
{% endcontent-ref %}

{% content-ref url="/pages/hChzCm717sMDo1NrGvG6" %}
[Google Workspace (Gsuite)](/next-generation-product/getting-started/7.-incident-responder-setup/step-2.-mail-configurations/google-workspace-gsuite)
{% endcontent-ref %}

{% content-ref url="/pages/7vv57UN7TFixxVA7jixl" %}
[Exchange (EWS)](/next-generation-product/getting-started/7.-incident-responder-setup/step-2.-mail-configurations/exchange-ews)
{% endcontent-ref %}


# Default Behaviour of Incident Responder

### **🤖 Analysis**

1. An employee reports a suspicious email using the *Keepnet Reporter Button* or *Native Microsoft Report button*
2. Keepnet analysis the reported email for malicious content in seconds using 5+ integrations simultaneously
3. Keepnet automatically shares the analysis result with the employee via email

<div align="left"><figure><img src="/files/RqWEOP5tAKoMv6kLDEpo" alt="Incident Responder — employee reports email, analysis result sent." width="375"><figcaption><p>Incident Responder — employee reports email, analysis result sent.</p></figcaption></figure></div>

### **🔎 Investigate**

1. When analysis result is “Malicious”, Keepnet starts an automatic investigation to find all instances of the malicious content
2. Once investigation is complete, Keepnet System Admins receive Investigation Report
3. Keepnet System Admin can then log into Keepnet and delete all instances of malicious emails in a few clicks

<div align="left"><figure><img src="/files/O2p2XAB6WJ2SYeUjATk5" alt="Incident Responder — investigation report, delete malicious instances." width="375"><figcaption><p>Incident Responder — investigation report, delete malicious instances.</p></figcaption></figure></div>


# Popular Customisations

Some customers like to customise the default behaviour of the Incident Responder and the relevant Notification Templates associated with the default workflow. Below are some popular customisation our customers request and how to achieve each one:

* [Customise Notifications](#customise-notifications)
* [Auto-delete Malicious Emails](#auto-delete-malicious-emails)

## Customise Notifications

Customers can fully customise notifications employees and system admins receive when they report an email for Analysis Results & Investigation Updates. You can view the default notification template [here](/next-generation-product/customer-success/how-to-videos/incident-responder/default-behaviour-of-incident-responder)

To make customisations, please go to:

1. Company > Company Settings > Notification Templates
2. Filter **Category** by "Incident Responder"
3. Click on the 3 dots to the right then select "Duplicate" to be able to edit
4. Make all the customisations you would like, including:
   1. **Email Delivery** (select Direct Email Creation if setup)
   2. **Subject Line**
   3. **From Name**
   4. **From Email Address** (must be keepnetlabs.com unless you have selected [Direct Email Creation](/next-generation-product/platform/company/company-settings/direct-email-creation) or [setup your own SMTP](/next-generation-product/platform/company/company-settings/smtp-settings#how-to-configure-the-smtp))
   5. **Body of the Email**
5. Once you're happy with your edits, Save the template
6. Set this template as default by click on the 3 dots and selecting "Make Default" - don't forget this step!

<div align="left"><figure><img src="/files/wTB51ctvzbhLgJ7B5dQM" alt="Notification Templates — Incident Responder category, duplicate and make default." width="563"><figcaption><p>Notification Templates — Incident Responder category, duplicate and make default.</p></figcaption></figure></div>

{% hint style="warning" %}
Please note: If you have not purchased the Incident Responder, you will not be able to see Notification Templates for the Incident Responder module.
{% endhint %}

{% embed url="<https://www.loom.com/share/110f0f651a0e40f9a5c3f1a68d3ddb3c?sid=b2e7bdcc-165f-46b0-9753-03ecb7e55209>" %}

## Auto-delete Malicious Emails

As you will have seen, the [Default Behaviour of Incident Responder](/next-generation-product/customer-success/how-to-videos/incident-responder/default-behaviour-of-incident-responder) automatically analyses reported email and then automatically runs an investigation for all emails which are found malicious. To take this one step further, you can automate the deletion of all instances of malicious emails.

This is not enabled by default, allowing system admins to decide whether emails should be deleted - especially in rare cases where a safe email may be incorrectly flagged as malicious.

To set this up, please follow the below instructions:

1. Incident Responder > Playbook
2. Create a new Playbook by click on the blue +NEW button
3. **Rule Info:** Name the playbook and add a description
4. **Conditions:** Set to From > exists (this will cover all reported emails)
5. **Actions:** Create a new workflow
   1. Select "Analyse" from the drop down
   2. Select all Integrations (if you don't have any setup, please follow [these steps](/next-generation-product/getting-started/7.-incident-responder-setup/step-1.-integrate-threat-intel-partners))
   3. Tick the box - "Investigate according to analyze results"
   4. Select Sources > Select the [Mail Integration](https://github.com/ucarozan/keepnet-docs/blob/main/next-generation-product/getting-started/7.-incident-responder-setup/step-2.-mail-configurations) you have setup
   5. Actions > Delete Email
   6. SAVE

{% hint style="success" %}
Top Tip: if you have multiple Playbooks running, set the priority for this one as **Very High** to ensure this rule will supersede the other rules you have in place
{% endhint %}

{% embed url="<https://www.loom.com/share/9197aa677da34c7896f847429bd80eb1?sid=9dda6c52-3f81-4864-9530-0be6835f7487>" %}


# Campaign Strategy Guide

This section explains how to structure phishing awareness campaigns using Keepnet. It introduces three approaches — **Randomised, Targeted, and The Blend** — showing how each helps you:

* Deliver relevant scenarios to employees
* Scale campaigns efficiently
* Collect meaningful data on how employees respond to phishing threats

To help you hit the ground running, our Customer Success team has **hand-picked the most popular and effective phishing campaigns**. These examples give you tried-and-tested inspiration to build an engaging programme that develops employee awareness from day one.

You can explore each approach in detail using the links below, including step-by-step guidance and tutorial videos for setting up campaigns:

* [Randomised Approach →](/next-generation-product/customer-success/campaign-strategy-guide/the-randomised-relevant-approach)
* [Targeted Approach →](/next-generation-product/customer-success/campaign-strategy-guide/the-targeted-scalable-approach)
* [The Blend →](/next-generation-product/customer-success/campaign-strategy-guide/the-blend)

**Quick visual summary:**

| Approach   | Key Feature                            | Benefit                                                               |
| ---------- | -------------------------------------- | --------------------------------------------------------------------- |
| Randomised | Unique, randomly selected scenarios    | Capture realistic employee responses while preventing alerting        |
| Targeted   | Specific scenarios selected for impact | Focus on high-risk areas and key threats                              |
| The Blend  | Combination of both approaches         | Broad awareness plus targeted focus on critical users and departments |

Use this page as your starting point to decide which approach works best for your organisation and to access tutorials for each campaign type.


# The Randomised, Relevant Approach

The Randomised Approach is ideal for organisations looking to raise awareness broadly while collecting meaningful data on employee responses. Each employee receives a unique, randomly selected scenario from categories you’ve chosen, keeping campaigns relevant to their role or department.

You can automate campaigns to run **weekly, bi-weekly, monthly, or quarterly**, keeping your approach scalable without additional manual work. This ensures you consistently gather data on how employees respond to phishing threats, **without the risk of employees alerting each other**.

**Key benefits:**

* **Broad awareness:** Employees receive different scenarios from selected categories, making training realistic and engaging.
* **Scalable:** Automate campaigns across the organisation without extra administrative effort.
* **Data-driven:** Collect consistent insights into employee behaviour to inform future campaigns.

## **Video Tutorial:**

{% embed url="<https://www.loom.com/share/b7d3270e32e94175bdf9a5217596a995?sid=50bf0a87-d206-4c7d-ba1a-c2e3d631ecfa>" %}


# The Targeted, Scalable Approach

The Targeted Approach is ideal for organisations that want to **focus on specific threats or high-risk areas**. With this method, you choose exactly which scenarios to send, giving you complete control over your campaign content and timing.

You can run campaigns in one of two ways:

1. **Distribute scenarios across your target group**
   * Distribute several specific scenarios to employees at the same time.
   * Ensures variety while keeping campaigns focused on key threats.
2. **Pre-schedule a campaign for the year**
   * Select all scenarios you want to use in advance.
   * Run them monthly (e.g., scenario 1 in month 1, scenario 2 in month 2, etc.).
   * Saves time by automating the campaign while ensuring full coverage of targeted threats.

**Key benefits:**

* **Focused impact:** Target high-risk employees or departments with scenarios that matter most.
* **Industry-relevant exposure:** Ensure every employee has experienced and seen examples of the most common phishing threats in your industry — for example, DocuSign, Microsoft notifications, or reset password scams — so your team recognises these threats in real life while you collect valuable response data.
* **Actionable insights:** Collect data on responses to specific threats, helping to prioritise training and awareness efforts.

**Getting started:**

{% embed url="<https://www.loom.com/share/d1f11b716f4b475d9581a55c632342a5?sid=292fae44-8d4b-4a39-89e8-48d2e9d0bc4a>" %}


# The Blend

The Blend Approach combines the strengths of both the Randomised and Targeted methods, giving organisations a **balanced, scalable, and highly effective phishing awareness programme**.

With this approach, you run:

1. **Monthly randomised campaigns**
   * All employees receive unique, randomly selected scenarios from categories you choose.
   * Keeps awareness broad and realistic while preventing employees from alerting each other.
2. **Quarterly targeted campaigns**
   * Focus on high-risk users, departments that need extra awareness, or key functions such as **HR, Finance, and IT**.
   * Ensure everyone in these groups experiences and sees examples of the most relevant phishing threats for their role.

**Key benefits:**

* **Comprehensive coverage:** Combines broad awareness with focused attention on high-risk areas.
* **Scalable:** Automate randomised campaigns while scheduling targeted campaigns at key intervals.
* **Industry-relevant exposure:** Employees see the most common phishing threats in your industry — for example, DocuSign, Microsoft notifications, or reset password scams — reinforcing recognition and response skills.
* **Actionable insights:** Collect detailed data on both general employee behaviour and responses from high-risk groups to prioritise further training and interventions.

**Getting started:**

{% embed url="<https://www.loom.com/share/b7d3270e32e94175bdf9a5217596a995?sid=d1cb39f8-90c1-4c0a-918e-376c7dd531af>" %}

{% embed url="<https://www.loom.com/share/d1f11b716f4b475d9581a55c632342a5?sid=292fae44-8d4b-4a39-89e8-48d2e9d0bc4a>" %}

### FAQs


# Most Loved Scenarios

With thousands of ready-to-use simulations across phishing, quishing, callback, vishing, and smishing, you have a wealth of options when shaping your organisation’s security awareness strategy. To make things easier, our Customer Success team has hand-picked their favourite and most effective scenarios from each simulator. These recommendations highlight the scenarios most loved by customers across industries and use cases, helping you quickly identify impactful options and streamline your process as you get started with Keepnet.

{% content-ref url="/pages/cHOFqTKWQE6sDmbCfjB3" %}
[Phishing](/next-generation-product/customer-success/most-loved-scenarios/phishing)
{% endcontent-ref %}

{% content-ref url="/pages/aVd2notkpMvMb7iGMwCg" %}
[Quishing](/next-generation-product/customer-success/most-loved-scenarios/quishing)
{% endcontent-ref %}

{% content-ref url="/pages/U5Uv0RhYJrovZ9vokjdo" %}
[Callback](/next-generation-product/customer-success/most-loved-scenarios/callback)
{% endcontent-ref %}

{% content-ref url="/pages/cYPa1Uam04zhp3jirkya" %}
[Smishing](/next-generation-product/customer-success/most-loved-scenarios/smishing)
{% endcontent-ref %}

{% content-ref url="/pages/g3hXRy82VhEhSX5sVRR1" %}
[Vishing](/next-generation-product/customer-success/most-loved-scenarios/vishing)
{% endcontent-ref %}


# Phishing

Traditional URL Phishing via Email

With over 16,000 phishing scenarios, our customers have a huge range of choice when planning their annual social engineering strategy. Our customer success team has cherry-picked our customers' most favourite scenarios across a number of different industries and tech stacks to help you streamline your efforts.

**Top Tip: Simply copy and paste these Scenario Titles into Keepnet to find our favourites!**

### Microsoft

Policy Announcement – Microsoft Teams

Microsoft: SETTINGS EXPIRE TODAY

New Message on Teams

Someone Sent a Document

Sharepoint: IT Support shared “To be completed” with you

Microsoft Teams: Director added you to a project team!

### Google

Google Docs: You were mentioned in a document

Google: Suspicious sign-in prevented

Google: Shared Spreadsheet

### Common Threats

DocuSign: Your Document Has BeenCompleted

DocuSign: Signature Request

IT: Back Up Your Emails

LinkedIn: Deactivation Request

Support Desk Alert

HR: All Employee Meeting

Mimecast: You have new held messages

Your Benefit Program Account has invalid information

### Impersonation

New Employee Impersonation

Action Required: Storage Quota Exceeded

CEO Fraud: Supplier Payment Approval

CEO Fraud - Payroll confirmation

CEO Fraud - Request IT Help, Locked Out

### Senior Leadership Team

CFO: Financial Report

HR: Annual Employee Growth Report

Sharepoint: New shared document

Sharepoint: IT Support shared “To be completed

OpenAI: Invited to a ChatGPT Team

### **Example:** Sharepoint: IT Support shared “To be completed

<div align="left"><figure><img src="/files/ZE49KK5cOjxdrDCpQxza" alt="Phishing scenario example — Sharepoint IT Support shared document." width="375"><figcaption><p>Phishing scenario example — Sharepoint IT Support shared document.</p></figcaption></figure></div>


# Quishing

QR Code Phishing

With over 5,500 quishing scenarios, our customers have a huge range of choice when planning their annual social engineering strategy. Our customer success team has cherry-picked our customers' most favourite scenarios across a number of different industries and tech stacks to help you streamline your efforts.

**Top Tip: Simply copy and paste these Scenario Titles into Keepnet to find our favourites!**

Microsoft: SharePoint has been set up for your account

Microsoft: Re-authenticate your account

LinkedIn Your organization can join LinkedIn Learning

DocuSign: Your Document Has Been Completed

Microsoft Teams : Urgent: Video Meeting Request

Microsoft: SharePoint has been set up for your account

Google Account Security Verification Required

Congratulations! You've Won a Reward as an Active Google User

Dropbox – Simplify Your Workflow

Your Dropbox Storage Is Almost Full

Action Required: Identity Verification

AnyDesk – Remote Desktop Solutions

### **Example:** Microsoft: Re-authenticate your account

<div align="left"><figure><img src="/files/cY3oiX4ht5n0XU1fym4i" alt="Quishing scenario example — Microsoft re-authenticate your account." width="359"><figcaption><p>Quishing scenario example — Microsoft re-authenticate your account.</p></figcaption></figure></div>


# Callback

Callback Phishing

With over 250 callback scenarios, our customers have a huge range of choice when planning their annual social engineering strategy. Our customer success team has cherry-picked our customers' most favourite scenarios across a number of different industries and tech stacks to help you streamline your efforts.

**Top Tip: Simply copy and paste these Scenario Titles into Keepnet to find our favourites!**

Please Contact Support Team

IT: Temporary IT support changes

Amazon: Order Confirmation

Slack : Reset your password

Microsoft Defender: Thank you for your auto-payment

Employee Survey Reminder

Google: Google Workspace Account Recovery

### Example: Please Contact Support Team

<div align="left"><figure><img src="/files/xN1yNzj7inIFPcf26C7P" alt="Callback scenario example — Please Contact Support Team."><figcaption><p>Callback scenario example — Please Contact Support Team.</p></figcaption></figure></div>


# Smishing

SMS Phishing

With over 6,500 smishing scenarios, our customers have a huge range of choice when planning their annual social engineering strategy. Our customer success team has cherry-picked our customers' most favourite scenarios across a number of different industries and tech stacks to help you streamline your efforts.

**Top Tip: Simply copy and paste these Scenario Titles into Keepnet to find our favourites!**

New Device Policy

Company Survey

Update MFA MS

Dropbox Verification Notice

LinkedIn Profile Notification

LinkedIn Unusual sign-in detected

Apple Apple ID login

Suspicious Login Detected

Amazon Delivery Failed

Google Account Security

Suspicious Activity on Your Google Account

Slack Security Alert

MS Teams Invite

### Example: New Device Policy

<div align="left"><figure><img src="/files/OHPTxrvfp2ZDHsSo99s7" alt="Smishing scenario example — New Device Policy." width="375"><figcaption><p>Smishing scenario example — New Device Policy.</p></figcaption></figure></div>


# Vishing

Voice Phishing

With over 5,000 vishing scenarios, our customers have a huge range of choice when planning their annual social engineering strategy. Our customer success team has cherry-picked our customers' most favourite scenarios across a number of different industries and tech stacks to help you streamline your efforts.

**Top Tip: Simply copy and paste these Scenario Titles into Keepnet to find our favourites! Get these scenarios in your local accent by duplicating the scenario and change the AI voice 🤖**

CEO Message

PayPal Fraud Alert

Tax Refund Support

Your Tax Refund is Ready: Confirm Now and Get Your Money!

Apple Gift Card Promotion

Bank Fraud Alert

### Example: CEO Message

<div align="left"><figure><img src="/files/CMJOfMBOPoP9gmGisnAV" alt="Vishing scenario example — CEO Message." width="375"><figcaption><p>Vishing scenario example — CEO Message.</p></figcaption></figure></div>


# Multi-Language Features

Keepnet makes it simple to deliver security awareness programs that feel authentic and accessible to every employee, anywhere in the world. Our multi-language features ensure your training and phishing simulations are effective across regions, cultures, and languages -without added complexity.

* [**Multi-language Training**](/next-generation-product/customer-success/multi-language-features/multi-language-training) – Set up enrolments so employees can choose their preferred language directly from the training email, ensuring inclusivity and higher engagement.
* [**Localisation**](/next-generation-product/customer-success/multi-language-features/localisation) – Instantly adapt any phishing template into multiple languages, with AI adjusting tone, dates, currencies, and formatting for cultural accuracy. Multiple localisations can be completed at once for faster, more realistic campaigns.
* [**Hyper Personalisation**](/next-generation-product/customer-success/multi-language-features/hyper-personalisation) – Launch one campaign and automatically deliver it to each employee in their local language, creating tailored, authentic simulations at scale.

Together, these features give you the flexibility to run global programmes that resonate locally—helping you strengthen security awareness across your entire workforce.


# Multi-Language Training

Keepnet makes it simple to deliver training in the languages your employees are most comfortable with. This guide will walk you through setting up training enrollments that allow employees to choose their preferred language directly from the enrollment email. You’ll also learn how to configure which languages are available for each training, ensuring a seamless experience that supports inclusivity and accessibility across your organisation.

### Step 1: Update Notification Template Email

1. Go to Company > Company Settings > Notification Templates
2. Search "Enrollment" to bring up all 7 Enrollment templates
   1. Learning Path Enrollment Reminder
   2. Learning Path Enrollment
   3. Infographic Enrollment
   4. Poster Enrollment
   5. Enrollment after Failed in a Simulation
   6. Enrollment Reminder
   7. Enrollment
3. Duplicate each one to be able to edit and add the Language Selector option
4. Replace the "Enroll" button with the "Training Language Selection" merge tag
5. Repeat for all 7 enrollment templates

Top Tip: Some customers use this opportunity to customise with their logo and branding!

{% embed url="<https://www.loom.com/share/8313c82a55144c88b851b558f6b51bab>" %}

### **Step 2: Send Training & Select Languages**

1. Go to Awareness Educator
2. Select the training module you would like to send (work best for multi-language modules)
3. Click on the 3 dots & click "Send Training"
4. Under **Content Language:**
   1. To send in all available languages: tick "All Languages"
   2. To send in only relevant languages: untick "All Languages" and tick only the languages of your choice
5. On the Summary Page - review the languages you have selected and the enrollment template

{% embed url="<https://www.loom.com/share/f853aaae357045b78f50541954f75e53?sid=679936da-fa7b-4ca3-834a-894a7f95bde2>" %}


# Localisation

Customers can take any of our 16,000+ phishing templates - or your own custom scenarios -and localise them into any language of your choice. Keepnet doesn’t just translate; it adapts the entire email, including subject lines, body text, currencies, dates, and tone, to feel natural and authentic for the target region. Multiple localisations can be completed at once, making it simple to launch truly global campaigns in minutes.

With optional human review for added quality assurance and unified reporting across all languages, you can scale phishing simulations faster, more cost-effectively, and with greater realism than ever before.

**For example:**

<figure><img src="/files/oEC9RtWNv0Ob8xoNW0Is" alt="Localisation settings in Keepnet platform."><figcaption><p>Localisation settings in Keepnet platform.</p></figcaption></figure>

### **Step-by-Step**

1. Go to Phishing Simulator > Phishing Scenarios > Email Templates
2. Duplicate or Edit any Phishing Template
3. On the **Email Settings** page, click on the **Localize** button
4. Select one or many languages you'd like the template to be localised in
5. Once complete, use the drop-down on the top left hand side to review the localisation of each language
6. Save

**Top Tip: Add this template to a Scenario to send to your employees**

### **Video: How to Localise any phishing template**

{% embed url="<https://www.loom.com/share/bd4bdfa1b7054c21bd61de226ea28267?sid=e9cdc0af-ee13-4867-8f4e-dbee5637b74b>" %}


# Hyper-Personalisation

The Hyper-Personalisation feature allows you to send phishing simulation scenarios in each recipient’s preferred language. If a preferred language is not set, the system will default to the company's preferred language.

### **Step 1: Setting Up Preferred Languages for Users**

Before launching a campaign with this feature, you must assign preferred languages to users:

1. Navigate to Company > Target Users.
   1. **Manual Upload**: Assign a preferred language to each user via CSV or manually add for each employee
   2. **Sync with Entra ID / AD:** Populate the Preferred Language property in Entra ID and Keepnet will pull this through automatically

### **Step 2: Enabling Preferred Language in a Campaign**

To launch a campaign using this feature:

1. Navigate to **Phishing Simulator > Campaign Manager**.
2. Click the **+ NEW** button to create a new campaign.
3. In the **Hyper-Personalization** section, select:
   * **"Send in the target users’ preferred language"**\
     → The system will send scenarios in each recipient’s preferred language. If no preferred language is set, the company's default language will be used.
4. Click **Next** to proceed through **scenario** **selection**, **target** **groups**, and **delivery settings**.
5. Click **Launch** to start the campaign.

### **Video Tutorial**

{% embed url="<https://www.loom.com/share/cf8a34e7b79f4122bcfa58c56bf369e8?sid=3959ddda-44fe-4116-9cb6-bf7a247aa1a1>" %}

### **How Scenarios Are Assigned Based on Language**

* If a scenario template is available in the user's preferred language, they will receive that version.
* If a scenario template is not available in the user’s preferred language, the system will send the scenario in the **company’s default language**.
* If no scenario template matches either the user's preferred language or the company’s default language, the system will prompt you to select appropriate language versions before launch.

This ensures that users receive scenarios in the most relevant language for them, improving the effectiveness of phishing simulations.


# Communication Tips

{% content-ref url="/pages/z8CHiPdPJ16lAdmnkjge" %}
[New Phishing Reporter Button Announcement](/next-generation-product/customer-success/communication-tips/new-phishing-reporter-button-announcement)
{% endcontent-ref %}

{% content-ref url="/pages/6xylillrkovdgWTfrzob" %}
[New Training Provider Announcement](/next-generation-product/customer-success/communication-tips/new-training-provider-announcement)
{% endcontent-ref %}


# New Phishing Reporter Button Announcement

This text has been prepared for customers to use who want to inform their users about the Phishing Reporter add-in.

* Replace \[Company Name] with your company name
* Replace "**Suspicious (Phishing) E-mail Reporter"** with the name of your add-in

## Email Template <a href="#to-inform-your-users-about-the-phishing-reporter-outlook-add-in-you-can-use-the-following-text" id="to-inform-your-users-about-the-phishing-reporter-outlook-add-in-you-can-use-the-following-text"></a>

Dear Employees,

We’re excited to introduce a brand-new tool that puts the power of cybersecurity right at your fingertips: the **“Suspicious (Phishing) E-mail Reporter”**

**What is it?**\
This handy add-in adds a **“Suspicious (Phishing) E-mail Reporter” button** directly to your email menu bar. With a single click, you can report suspicious emails for our Information Security Team to investigate - helping us protect the company from potential threats before they become problems.

**Why it matters:**

* **Protect yourself and your colleagues:** Reporting suspicious emails helps prevent security incidents that could affect everyone.
* **Strengthen our company’s cybersecurity:** Timely alerts mean our security team can act quickly, keeping our systems safe.
* **Stay cyber-savvy:** Each report helps you recognise phishing attempts and sharpen your awareness.

**How to use it:**

1. Spot a suspicious email.
2. Click the **“Suspicious (Phishing) E-mail Reporter”** button in your email menu.
3. Choose whether you’d like to delete the email.
4. That’s it! The Information Security Team will analyse the email and send you a quick update on what we found.

Thank you for helping us keep \[Company Name] safe and secure. Spotting and reporting suspicious emails protects the whole team.

Stay alert and stay safe,


# New Training Provider Announcement

This text has been prepared for customers to use who want to inform their users that Keepnet will be their new cybersecurity awareness training provider.

* Replace \[Company Name] with your company name

Dear \[Team Name],

We’re excited to announce that your **cybersecurity awareness training** will now be delivered through **Keepnet**! This is part of our ongoing efforts to make training simple, effective, and easy to complete.

**Here’s what to expect:**

* **Emails from Keepnet:** Look out for training invitations coming from **<noreply@keepnetlabs.com>**.
* **One-click access:** Simply click the **“Enroll”** button in the email—you’ll go straight into the training. No logins or passwords required.
* **Quick and interactive:** Each session is interactive and takes only **3–5 minutes** on average to complete.
* **Seamless experience:** We’ve designed the process to make completing training as smooth and hassle-free as possible.

By completing these sessions, you’ll be helping to strengthen our company’s cybersecurity posture and stay ahead of potential threats—all in just a few minutes.

Thank you for taking the time to stay informed and proactive. Together, we can make \[Company Name] safer for everyone.


# FAQs

Our customer success team have collected some common customer queries and added all the answers to these queries here in this section!

### **Q: When I try to log-in, I get a "invalid token" error**

A: This error message appears when customers try to access keepnet using their "account creation" link on the original email you received when joining Keepnet. Instead, navigate to dash.keepnetlabs.com to login and you won't have any issues!

<div align="left"><figure><img src="/files/0liodjRGXvLl91HPnplB" alt="Login — use dash.keepnetlabs.com to avoid invalid token." width="375"><figcaption><p>Login — use dash.keepnetlabs.com to avoid invalid token.</p></figcaption></figure></div>

### **Q: I added the new Just-in-time Red Flags landing page as a 2nd landing page for a data submission campaign. However, the email template didn't pull through when I tested.**

A: Great idea! When you copy the HTML of the Red Flags landing page to use as a 2nd step, you will also need to copy the custom javascript code. This is the code which loads the email template use in the campaign with the red flags highlighted. Below is a 5 minute video on how to resolve this!

[**https://www.loom.com/share/79889043685147479f35c80696442723**](https://www.loom.com/share/79889043685147479f35c80696442723)

We're also going to be improving the customer experience for adding 2nd landing pages which will allow you to select an existing landing page for page 2 without copying HTML at all!

### **Q: What is Bot Activity and why might I see it on my Campaign Report?**

Bot Activity means something has scanned the link on your phishing email. This could be a security tool, a chrome extension or an analysis engine. Keepnet has highly sophisticated methods of detecting bot activity to ensure your reports only include the human activity of your employees. Here is an explainer deck which covers each Bot Activity type in more detail 👇

{% file src="/files/A1u3WQkgjcbXUHPfvZCx" %}

### **Q: How do I remove users from the platform if I've used SCIM to pull in from Entra ID?**

To remove users from Keepnet when connected to Entra ID, please go to portal.azure.com and find the Enterprise Application you made for Keepnet SCIM. Navigate to **Users & Groups** and manage users from here. Add and remove users to Keepnet from this application. Microsoft updates Keepnet every 40 minutes!

**Q: Can you share the compliance information for Vishing and Smishing?**

{% file src="/files/P5mStbLmSdIy5trONrsU" %}

### **Q: Are phishing reporter and email templates customizable? Can I add my logo?**

A: Yes! You can fully customize the Phishing Reporter add-in with your logo (60×60px, PNG/JPG, max 2MB), brand name, and dialog text in multiple languages. For email templates, you can customize any of our 16,000+ phishing templates or create your own. See [Phishing Reporter Customization](/next-generation-product/platform/phishing-reporter/phishing-reporter-customization) for add-in customization, and [Email Templates](/next-generation-product/platform/phishing-simulator/manage-phishing-scenarios/email-templates) and [Localization](/next-generation-product/platform/phishing-simulator/manage-phishing-scenarios/email-templates#how-to-add-a-new-email-template) for template customization.

### **Q: What languages are supported? Can campaigns be sent in the user's language?**

A: Keepnet supports **all global languages and locales** with **no limit on language selection**. Campaigns can be automatically delivered in each user's preferred language. You can localize any phishing template into any language, and the platform adapts subject lines, body text, currencies, dates, and tone for cultural accuracy. See [Multi-Language Features](/next-generation-product/customer-success/multi-language-features), [Localization](/next-generation-product/customer-success/multi-language-features/localisation), and [Understanding the Preferred Language Setting](/next-generation-product/platform/phishing-simulator/phishing-campaign-manager#how-to-launch-scenarios-based-on-users-preferred-language) for details.

### **Q: What are the platform limits (e.g. targets per campaign, emails per minute)?**

A: Keepnet's platform is built for high-volume operations with scalable infrastructure. For detailed capacity and performance metrics across email phishing, SMS (Smishing), voice (Vishing), and training services, see [Volume & Performance](/resources/volume-and-performance).

### **Q: How do I pull through mobile numbers instead of landlines for my employees?**

To change the information which pulls through to each field in Keepnet, you will need to update the attribute mapping on your Keepnet SCIM Enterprise Application on portal.azure.com. Here's a walkthrough guide on how to set this up:

{% embed url="<https://www.loom.com/share/f2cb08b336ef4e76813a02f3e92e5aa4>" %}

### **Q: Can I attach an HTML file to an attachment phishing scenario instead of a Word or Office document?**

Yes. Keepnet supports HTML files as attachments in attachment-method phishing scenarios, alongside Word, PowerPoint, and Excel files.

To use an HTML attachment, set the scenario method to **Attachment** when creating your phishing scenario, then import your HTML file into the email template. You can include custom HTML, CSS, and JavaScript in the file, so it is well suited to replicating a convincing login page, document preview, or any other browser-rendered content.

Always send the scenario to yourself as a test before launching to your target group to confirm the tracking pixel fires correctly in your environment.


# Best Practise


# Build a CISO Report


# Incident Responder: Notify a Specific Inbox

## Notify a Specific Inbox

By default, all system admins are notified about Investigation Results. Some customers would like this email to go to just one (or more!) inboxes so this is easier to manage without notifying every system admin.

To set this up, please follow the below instructions:

1. Incident Responder > Playbook
2. Create a new Playbook by click on the blue +NEW button
3. **Rule Info:** Name the playbook and add a description
4. **Conditions:** Set to From > exists (this will cover all reported emails)
5. **Actions:** Create a new workflow
   1. Select "Analyse" from the drop down
   2. Select all Integrations (if you don't have any setup, please follow [these steps](/next-generation-product/getting-started/7.-incident-responder-setup/step-1.-integrate-threat-intel-partners))
   3. Tick the box - "Investigate according to analyze results"
   4. Select Sources > Select the [Mail Integration](https://github.com/ucarozan/keepnet-docs/blob/main/next-generation-product/getting-started/7.-incident-responder-setup/step-2.-mail-configurations) you have setup
   5. Actions > Notify
   6. SAVE


# SOAR Integration

In case the end user reports an email, the relevant email is analyzed by the services with which the Incident Responder product is integrated. If the analysis result appears to be malicious, the institution's SOC team will apply additional measures such as using antivirus, firewall, EDR, proxy etc. to target this malicious email. This manual process will take a lot of time and will delay the intervention to the incident in a timely manner.

If the email reported to the platform is determined to be phishing or malicious after analysis, your current SOAR solution can obtain this detail from the platform via API and automatically perform the necessary actions on your solutions such as EDR, Proxy, and Firewall. In this way, the process will be manageable due to the quick action taken. API usage details are explained in detail in this document.

You can perform almost every operation in the Incident Responder product using API. You can refer to our Rest API [document](https://api.keepnetlabs.com/docs/index.html) to see the details

API integration with your security orchestration, automation, and response (SOAR) solutions enables you to respond more efficiently to harmful emails.

If the [Incident Responder](https://keepnetlabs.com/products/incident-responder) API endpoints are integrated with your current SOAR products, such as antivirus, firewall, endpoint detection, and response, proxy services, etc., it will save valuable time in the response to a potential threat via API endpoints in comparison with a manual investigation of a reported email.


# Platform


# Dashboard

The **Dashboard** is the first page that the system administrator sees after logging into the platform. This section explains how to use the Dashboard widgets to enhance functionality to suit your needs.

## Shortcuts

* [How to manage Dashboard widgets](/next-generation-product/platform/dashboard/dashboard-widgets)
* [How to manage Incident Responder widgets](/next-generation-product/platform/dashboard/incident-responder-widgets)
* [How to manage Threat Sharing widgets](/next-generation-product/platform/dashboard/threat-sharing-widgets)

## Help

Click the **AI-Powered Assistant** icon **(...)** at the bottom right of the **Dashboard** to get help about any information.

## Video Tutorial

The following video tutorial contains information about how to manage dashboard.

{% embed url="<https://www.youtube.com/watch?v=0kyb5x1FzVM>" %}


# Dashboard Widgets

The widgets available will vary depending on your license type, role, and permissions.

Any actions you take will only be valid for your system users. Other users will see their own settings.

## Dashboard Actions

### Edit Dashboard

You can add, remove, or relocate a widget by clicking on the **Edit Dashboard** button at the top right. Once you have made the change, click **Save Changes**.

{% hint style="info" %}
Available widgets might vary depending on your license type, role, and permission.
{% endhint %}

### Add Widgets

Select the widget you want from the **Edit Dashboard** **> Add Widgets** menu and click **Save** **Changes** to confirm the action.

{% hint style="info" %}
You'll find newly added widgets at the bottom of the page.
{% endhint %}

### Remove Widgets

When you click **Edit Dashboard**, an **‘X’** icon will be visible at the top right of each widget. Click the **‘X’** to delete a widget and click **Save Changes** to confirm the action.

### Relocate Widgets

Click the **Edit Dashboard** button and drag and drop the widget to the desired location. Click **Save** **Changes** to confirm the action.

{% hint style="info" %}
All the actions you take on the relevant page will only be valid for your system users. The other system users on the platform will see their default settings.
{% endhint %}


# Incident Responder Widgets

Your license model determines which widgets are available on the Dashboard page.

## Investigations

The Investigations widget displays a summary of the number of automated and manual investigations your company has launched.

Click the (icon symbol) button in the upper right corner of the widget to see detailed information about all of the investigations.

You can visit this [document](/next-generation-product/platform/incident-responder/investigations) for detailed information about investigations.

## ROI Summary

This widget summarizes the estimated return on investment, or savings achieved using the Incident Responder product.

For this feature to produce accurate results, you will need to enter the time and cost information specific to your business.

Go to the **Incident Responder > Incident Responder** page and click the **Settings** button at the top right of the **ROI Summary** window and provide the following elements for the calculation:

<table><thead><tr><th width="206.7328291248856"></th><th width="540.6329273888532"></th></tr></thead><tbody><tr><td>Average hours saved per reported email</td><td>The average time spent investigating a reported suspicious email manually (per email)</td></tr><tr><td>Average total cost per hour</td><td>The average cost to investigate a reported suspicious email manually (per hour)</td></tr></tbody></table>

## Phishing Reporter

The Phishing Reporter widget shows the number of people who have the plugin installed and the number of users who have been active in the previous 4 minutes. Visit this [link](/next-generation-product/platform/phishing-reporter/phishing-reporter-customization) to learn more detailed information about the technical structure of the Phishing Reporter plugin.

## Incident Analysis

The Incident Analysis widget displays the total number of suspicious emails reported and the number of emails confirmed to be malicious. Visit this [page](/next-generation-product/platform/incident-responder) for detailed information about the process used to analyze suspicious emails.

## Reported Email Trends

The Reporter Email Trends widget provides a monthly analysis of the previous 6 months that includes the total number of malicious, phishing, or undetected emails, and the recent trend in activity.

## Recently Reported Incidents

The Recently Reported Incidents widget shows the subject line, the status of the analysis (open, closed, in-progress, false-positive), and the result of the analysis (undetected, phishing, malicious, simulation) of the last five suspicious emails reported.

You can click on the title of each reported email to see specific summary information.

Click the **All** button on the top right of the widget to display all of the reported emails in detail.

## Recent Investigations

The Recent Investigations widget shows the subject of the last five investigations, the progress of the investigations (%), and the current status (running, canceled, finished, expired). You can view a summary of the investigation by clicking on an investigation title.

Click the **All** button at the top right of the widget to go to the Investigations page.

## Reporters

The Reporters widget shows the five most reliable users who report suspicious emails to the platform. The reliability score improves when the reported email is confirmed to be a phishing or otherwise malicious message. The reliability score will drop if the reported suspicious email does not contain irrelevant and/or harmful content.

Reliability status is classified as follows:

<table><thead><tr><th width="151.57142857142856"></th><th width="596.8914728682171"></th></tr></thead><tbody><tr><td>Very Low</td><td>Reliability score of 0-20</td></tr><tr><td>Low</td><td>Reliability score of 20-40</td></tr><tr><td>Medium</td><td>Reliability score of 40-60</td></tr><tr><td>High</td><td>Reliability score of 60-80</td></tr><tr><td>Very high</td><td>Reliability score of 80-100</td></tr></tbody></table>

You can click the **All** button at the top right of the widget to see a list of all of the users who have reported suspicious activity to the platform.

## Recent Incidents

This widget shows the last five reported email incidents and their results. You can access to the last five reported email incidents with their status and you can click on the related incident to access details.

## Top Rules

The Rules box displays the **top 5 playbook rules**, the criteria used to analyze emails, defined in the Incident Responder platform that was met the most often.


# Threat Sharing Widgets

Your license model determines which widgets are available on the dashboard.

## Top Posts

The Top Posts box shows the five messages shared on the Threat Sharing platform that have generated the most interaction. Click on the title of a post to see more information.

The **All** button at the top right of the box will take you to the Threat Sharing section.

## Recently Posted Threats

The Recently Posted Threats box displays the title of the last five posts shared on the Threat Sharing platform, the name of the malicious content in the post, and the name of the community where it was shared.

The **All** button at the top right of the box will take you to the Threat Sharing section.


# Phishing Simulator Widgets

Your license model determines which widgets are available on the dashboard.

## **Phishing Campaign Trends**

This widget shows a summary graph of the overall performance of your phishing campaign for the last 6 months. The graph is organized by the number of users(Y-axis) and date(X-axis). The widget represents how many users have fallen to the phishing campaign for Click Only, Data Submission, and Attachment types of campaigns.

You can view your phishing campaign reports by clicking on the Campaign Reports shortcut.

## **Recent Campaigns**

This widget shows the name of the last five phishing campaigns, the launch date of the campaign, and the current stats (no response, clicked, opened, submitted). You can go to report the campaign by clicking on the name of the campaign.

You can click **ALL** shortcuts to go to the campaign reports page to view all phishing campaigns.

## **Most Phished Users**

This widget shows the names of the top five phished users for all the time, their email addresses, and the number of times they’ve been phished. The number of times is unique. As an example, if it says five that means the user received five unique phishing campaigns and phished to all five campaigns.

## **Most Engaged Campaigns**

This widget shows the names of the last five phishing campaigns that have the most successfully phished users and the number of phished users. You can view the campaign report by clicking on the name of the campaign.

## **Top Phishing Simulation Reporters**

This widget shows the names of the top five users that report phishing simulation emails, the email of the user, and the number of reported emails. It won’t matter if the user phished and then reported the email or not phished and reported the emails, both actions will be shown on the widget.

{% hint style="warning" %}
The campaign reports which has been Marked As Test will not be included in the widgets.
{% endhint %}


# Threat Intelligence

Technical documentation for Keepnet Threat Intelligence, explaining how to monitor breached accounts, export breach data, configure domain allowlists, and work with breach tables and actions.

This guide explains the Threat Intelligence product and how to use it.

This includes:

* What is Threat Intelligence?
* How to export a list of breached accounts?

## What is Threat Intelligence?

The **Threat Intelligence** product scans the web, searching for signals and data that may represent a breach of your data security and a threat to your business. The constant vigilance afforded to you by the Threat Intelligence product shortens the time between the potential data breach and defensive response, reducing the opportunity for fraudulent activity.

In the Threat Intelligence product, you can check for data leaks for your previously allowed email domains in the **Domain** **Allowlist** menu.

Please find the documentation for the domain allowlist [here](/next-generation-product/platform/company/company-settings/allowed-domains).

Go to the **Threat Intelligence** menu from the left menu on the dashboard to review the following functions.

## **Breached Accounts**

This table contains all breached email accounts. This table includes information such as breached account, the source of the breach, the password type of the email account, and the leak date.

The components of the **Breached Accounts** page are explained in the table below.

<table><thead><tr><th width="129.5"></th><th></th></tr></thead><tbody><tr><td>Breached Account</td><td>Information about the breached email account is located in this column.</td></tr><tr><td>Source</td><td>This column shows from which source the account was leaked or under what name it was leaked.</td></tr><tr><td>Password Type</td><td>Indicates the status of the password information contained in the data leak. eg. Cleartext, hash, MD5, etc.</td></tr><tr><td>Leak Date</td><td>This column shows the information about the date when the data leak was disclosed.</td></tr></tbody></table>

## Table Actions

You can take manual actions on breached accounts table. You can click the buttons top of the data table for the appropriate steps you want to perform.

<table><thead><tr><th width="130.5"></th><th></th></tr></thead><tbody><tr><td>Download</td><td>The list of the breached accounts can be downloaded. You can click the button to download all pages or the current page and download the data in the table in XLSX, CSV and PDF formats.</td></tr><tr><td>Refresh</td><td>By clicking this button, you can reload the page and view it if new data has been added.</td></tr><tr><td>Table Settings</td><td>With the table settings button, you can show and hide the columns or freeze the columns.</td></tr><tr><td>Sorting</td><td>According to which column you want to sort, you can change the order when you click on the relevant column heading.</td></tr></tbody></table>

## Video Tutorial

This tutorial explains the Threat Intelligence product and how to use it.

{% embed url="<https://youtu.be/uj_hEFv0lFc>" %}

## FAQ

### Q: Can I delete breached account from the platform?

A: No, you can only list, copy to clipboard and download the list of the breached accounts.

### Q: Can I integrate the breached accounts with my SOAR products by obtaining the details using the API?

A: You can perform almost every operation in the Threat Intelligence product using API. You can refer to our Rest API document to see the details.


# Email Threat Simulator

Technical documentation for the Keepnet Email Threat Simulator, detailing how to start threat scans, view simulation reports, configure test email accounts, and analyze email security results.

Our [Email Threat Simulator](https://keepnetlabs.com/products/email-threat-simulator) allows institutions to defend against major attack vectors. In recent years, the number of target-oriented attacks has increased significantly. Most often, the targets of attacks are large corporations, government agencies, and political organizations. However, any institution that collects data seen as valuable faces a risk of cyberattack. Awareness of potential exposure and preparation to resist an attack are critical in today’s world.

## Shortcuts

* [How to start Email Threat Simulator to test account](/next-generation-product/platform/email-threat-simulator/start-scan)
* [How to view Email Threat Simulator report](/next-generation-product/platform/email-threat-simulator/view-scan-report)
* [How to create trusted and restricted Exchange test email account](/next-generation-product/platform/email-threat-simulator/create-trusted-account-on-exchange)

## Video Tutorial

This video tutorial will cover how to start scan, view report on the Email Threat Simulator.

{% embed url="<https://youtu.be/FupCJOc333c>" %}


# Start Scan

Go to the **Email Threat Simulator** page from the left menu on the dashboard to see the following fields.

## Scans

The components of the scans page are explained in the table below.

<table data-header-hidden><thead><tr><th width="139"></th><th></th></tr></thead><tbody><tr><td>Date Created</td><td>The date and time the scan was created</td></tr><tr><td>Status</td><td>Current status of the scan</td></tr><tr><td>Domain</td><td>Domain address of the email used to initiate the scan</td></tr></tbody></table>

## Actions

You can delete or duplicate a scan as well as to view detailed reports of a scan.

<table data-header-hidden><thead><tr><th width="127"></th><th></th></tr></thead><tbody><tr><td>View Report</td><td>Access detailed reports of a scan. You can find more information about the report details here</td></tr><tr><td>Delete</td><td>Delete the scan</td></tr><tr><td>Duplicate</td><td>Create a copy of the scan</td></tr></tbody></table>

## How to Start a New Email Threat Simulator

The Email Threat Simulator has only one mandatory component: the test email address. Follow the steps below to start a new scan:

* Click the **+NEW** button in the upper right corner of the **Email Threat Simulator > Scans** page.
* **Test Email Address:** Enter your ETS test email address to which you want all attack vectors to be sent.
* **Choose an Option:** Please select one of the following suitable options for your ETS scan.
  * **Manual (no password is required):** The malicious emails will be sent to your email inbox, and the automated checks, such as how many email is reached in the inbox or not, will not be performed. You will need to manually confirm how many malicious emails reached the inbox.
  * **Automate with password:** The malicious emails will be sent to your email inbox, and the automated check, such as how many emails have reached the inbox or not, will be performed automatically.
    * **OWA:** If your Microsoft 365 email inbox is accessible from the internet, click the OWA option and define your Outlook Web Access URL and Username information.
    * **Google Workspace:** If you want to use your Google Workspace email inbox with a password, please use [this document](/next-generation-product/platform/email-threat-simulator/start-scan-on-google-workspace-email-account) for more information.
  * **Continue with Microsoft Office 365:** The malicious emails will be sent to your inbox, and the automated checks, such as how many emails have reached your inbox or not, will be performed automatically. Please learn how to start a scan on a Microsoft 365 email account [here](/next-generation-product/platform/email-threat-simulator/start-scan-on-o365-email-account).
  * Click the **Next** button and check the **Continuous** **Scan** box if you want it to be included in this scan automatically when a new attack vector is added.
* Define the delivery interval for emails in the **Distribution** section and click the **Next** button.
* Accept the **User** **Agreement** and click the **Start** button.

{% hint style="info" %}
If your Office 365 test account has MFA (Multi Factor Authentication) option that can not let Email Threat Simulator to log in related account, please follow Microsoft's "[Manage app passwords for two-step verification](https://support.microsoft.com/en-us/account-billing/manage-app-passwords-for-two-step-verification-d6dc8c6d-4bf7-4851-ad95-6d07799387e9)" to complete this step.
{% endhint %}

## Attack Vectors

The **Attack Vectors** page lists all available attack vectors that can be sent to your test email inbox to test your email security gateway infrastructure.

Here are the fields for each attack vector:

<table><thead><tr><th width="187.703125"></th><th></th></tr></thead><tbody><tr><td>Attack Vector Name</td><td>The display name of the attack vector.</td></tr><tr><td>Type</td><td>The category of the attack vector, such as malware, malicious, or other categories.</td></tr><tr><td>Hash</td><td>The hash of the attack vector.</td></tr><tr><td>SHA256</td><td>The SHA-256 hash value of the attack vector.</td></tr><tr><td>Severity</td><td>The severity level of the attack vector. Enter a number from 1 to 10 (1 = lowest severity, 10 = highest).</td></tr><tr><td>Status</td><td>When set to active, this attack vector will be sent to the test email inbox.</td></tr><tr><td>Date Created</td><td>The date and time when the attack vector was added.</td></tr></tbody></table>

### Actions

These settings give you the ability to **edit**, **enable/disable**, or **delete** attack vectors.

{% hint style="info" %}
In the first version of the Email Threat Simulator, only the support team is able to add new attack vectors or take action on existing attack vectors
{% endhint %}

**.**&#x43;lick on the **three dots** **“︙”** button under the **Action** heading to adjust the following

<table data-header-hidden><thead><tr><th width="115"></th><th></th></tr></thead><tbody><tr><td>Edit</td><td>Change the settings of the relevant attack vector</td></tr><tr><td>Enable/Disable</td><td>Enable or disable existing attack vectors. Disabled attack vectors will not be sent in new scans.</td></tr><tr><td>Delete</td><td>Delete the attack vector</td></tr></tbody></table>

## **FAQ**

### Q: Can I start a duplicate continuous scan for the same domain?

A: No. You may not duplicate continuous scans for the same domain; however, you are able to start multiple scans without selecting the continuous scan option.

### Q: Can I edit a scan?

A: No. You cannot edit a scan, but you can delete a previous scan and start a new scan.

### **Q: Why is the New button disabled (gray) on the attack vectors page?**

A: You are not permitted to add new attack vectors or take action on existing attack vectors.


# View Scan Report

This section describes the capabilities and features of the threat simulation reports that can be generated using the **Email Threat Simulator > Scan > Report** button.

The components of the **Scan Reports** page are explained below.

## Summary

The **Summary** provides a brief synopsis of the threat scan and options for further action.

### Summary Widgets

<table data-header-hidden><thead><tr><th width="146"></th><th></th></tr></thead><tbody><tr><td>Total Attacks Sent</td><td>The number of emails sent to the target email address.</td></tr><tr><td>Secure Endpoints</td><td>The number of emails successfully blocked by email security solutions.</td></tr><tr><td>Insecure Endpoints</td><td>The number of emails that could not be blocked by email security solutions</td></tr><tr><td>Unchecked Emails</td><td>The number of emails not checked by the platform because the automated scan was not enabled or authentication of a target email account failed</td></tr></tbody></table>

### Scan Info

<table data-header-hidden><thead><tr><th width="117"></th><th></th></tr></thead><tbody><tr><td>Start Date</td><td>The date and time the scan of a target email address was initiated</td></tr><tr><td>Status</td><td>The status of the scan: completed, continuous or in progress</td></tr><tr><td>Email</td><td>The attack vector target email address</td></tr></tbody></table>

### Threat Scan Score

The score is calculated based on the number of emails determined to be insecure and the severity value of the risk posed by these emails.

### Stats

The attack vectors are listed by attack type or by email status: **Malicious** **Attachments**, **Ransomware** **Samples** or **Insecure** **Emails**.

## Attacks Sent

This section provides a summary report of the attack vectors exploited to target an email address.

<table data-header-hidden><thead><tr><th width="126"></th><th></th></tr></thead><tbody><tr><td>Attack Vector</td><td>The name of the attack vector</td></tr><tr><td>Extention</td><td>The extention of the file.</td></tr><tr><td>Category</td><td>The type of the attack vector</td></tr><tr><td>Hash</td><td>The hash of the file.</td></tr><tr><td>SHA256</td><td>The SHA256 of the file.</td></tr><tr><td>Severity</td><td>The risk level of each attack, shown as a severity rating from 1 (lowest risk) to 10 (highest risk).</td></tr><tr><td>Status</td><td><p>Send status of the attack vector: in progress, successful, or error</p><ul><li><strong>In</strong> <strong>Progress:</strong> The attack vector email is in the queue to be sent.</li><li><strong>Successful:</strong> The attack vector email was sent successfully.</li><li><strong>Error:</strong> An error occurred in the delivery of the attack vector.</li></ul></td></tr><tr><td>Result</td><td><p>The results of the attack: Secure, Insecure or Unchecked.</p><ul><li><strong>Secure:</strong> The attack vector was sent successfully but not delivered.</li><li><strong>Insecure:</strong> The attack vector was sent successfully and delivered to the inbox.</li><li><strong>Unchecked:</strong> The attack vector might be sent successfully but delivery is not checked.</li></ul></td></tr><tr><td>Email Sent Date</td><td>Date and time that attack vector email was sent to the target email address.</td></tr></tbody></table>

## **FAQ**

### Q: Can I download a list of the attack vectors sent?

**A:** Yes, you can download a detailed report of the launched attack vectors in .xls, .pdf, or .csv format using the **Download** button.

### Q: Can I export reports into my own reporting tool (e.g., Qlik Sense, Tableau, PowerBI)?

A: Yes. You can transfer all of our reports through an API. This flexibility allows you to use the information as needed to suit your business.


# Create Trusted Account on Exchange

Our [E-Mail Threat Simulator](https://keepnetlabs.com/products/email-threat-simulator) requires a test account for making and reporting the tests listed here. This document contains sample configurations for making possible security and reliability checks with this test account.

The test account will only receive email and will not be able to send mail to any internal or external email address except us. This is a safe configuration option that will prevent potential violations.

## Create Test Account

Customers who use an Exchange email server must create a restricted email account. Customers who use Google Workspace, Microsoft 365, or other services may skip this step.

Use the Exchange Server PowerShell administrative interface to create a test account with the command below.

{% hint style="warning" %}
Organization administrator permissions are required to use the Exchange Management Shell.
{% endhint %}

{% code overflow="wrap" %}

```
New-Mailbox -UserPrincipalName “UserPrincipalName” -Alias “Mail Alias” -Name “Mailbox Account Name” -Database “Database Name” -OrganizationalUnit “” -ResetPasswordOnNextLogon $false –password (ConvertTo-SecureString -String “Password” -AsPlainText -Force)
```

{% endcode %}


# Start Scan on O365 Email Account

This document will provide information on how to start the Email Threat Simulator scan to the email inbox by using the **“Continue with Microsoft Office 365”** feature.

Microsoft O365 requires extra configuration steps in order to use the Email Threat Simulator with an O365 email account.

## Create Microsoft Azure Application

Follow the steps to create and configure the application on Microsoft Azure.

* Login to [Microsoft Azure](https://portal.azure.com/#home).
* From the **Home** page, go to the **App** **Registrations** menu from the **Azure** **Services** page
* Create a new application by clicking on the **+New Registration** button.
* Fill in the following fields on the **Register** **an** **Application** page and then click the **Register** button.
  * **Name:** Enter a name for your application.
  * **Supported account types:** Select the **“Accounts in this organizational directory only (Single tenant)”** option.
  * **Redirect URI:** Leave this field blank.
* After creating the application, copy the **“Application (client) ID”** and **“Directory (tenant) ID”** from the **Overview** page to use it in the platform later.

Follow the steps to assign the required **permission** to the application that has been created on Microsoft Azure.

* To assign **EWS.AccessAsUser.All** permission;
  * Click **API** **Permissions** from the left menu and click the **+Add a permission** button.
  * Click **APIs** **my** **organization** **users** title on the **Request** **API** **Permissions** page.
  * Select **Delegated** **permissions** option on the **Office** **365** **Exchange** **Online** page.
  * Enable the **EWS.AccessAsUser.All** permission in the **EWS** field and then click **Add** **Permission** button.
* To assign **Mail.Read** permission;
  * Click **API** **Permissions** from the left menu and click the **+Add a permission** button.
  * The **Microsoft** **APIs** field will appear by default on the **Request** **API Permission** page.
  * Click on **Microsoft** **Graph** and select **Delegated** **Permissions** option.
  * Enable the **Mail.Read** permission in the **Mail** field and after that click **Add** **Permission** button.

{% hint style="danger" %}
Click the **Grant admin consent for “CompanyName”** button to successfully grant these permissions to the application.
{% endhint %}

Follow the steps to configure **Authentication** configuration in order to start a simulation from the platform.

Set permissions on the Web Applications field from the Authentication menu;

* Click on the **Authentication** from the left menu and then click on the **+Add a platform** button from the **Platform** **Configurations** page.
* From **Configure** **Platforms** page, under the **Web** **Applications** title, click on the **Single-page Application** button.
* Under the **Configure** **Single-page Application** title, find **Redirect** **URLs** and **Front-Channel Logout URL** and then write **<https://ets-api.keepnetlabs.com/>** to both fields.
* Under the **Implicit Grant** and **Hybrid** **Flows** title, enable the **Access** **tokens** **(used for implicit flows)** and **ID tokens (used for implicit and hybrid flows)** options.
* Click on **Configure** button to finish this configuration steps.

Set permissions on the **Mobile and Desktop Applications** field from the **Authentication** menu;

* Click on the **+Add a platform** button from the **Platform** **Configurations** page.
* From **Configure** **Platforms** page, under the **Mobile and Desktop Applications** title, click on the **Mobile and Desktop Applications** button.
* Under the **Configure** **Desktop** **+ Devices** title, find **Redirect** **URLs** and then select the **“<https://login.microsoftonline.com/common/oauth2/nativeclient”>** address.
* Click on **Configure** button to finish this configuration steps.

Set permissions on the **Advanced** **Settings** field from the **Authentication** menu;

* From the **Authentication** menu, under the **Advanced** **Settings** title, find **Allow Public Client Flows** field and activate the **“Enable the following mobile and desktop flows:”** option.
* Click the **Save** button to finish this configuration steps.

{% hint style="danger" %}
Please make sure that the 2FA authentication is disabled on the email account before starting a simulation on the platform.
{% endhint %}

{% hint style="danger" %}
Azure might need approximately 30-60 minutes to apply the changes on their side. If you see an error while starting a simulation, please wait a few hours and then try again.
{% endhint %}

## How to start the simulation with the “Continue with Microsoft Office 365“ feature?

Follow the following steps to start the simulation from the platform.

* Go to **Email Threat Simulator > Scans** page from the left menu on the platform.
* Click on the **+NEW** button to start a new simulation.
* Read the warning message and then click the **“I Understand”** button.
* Follow the steps in the following table for further steps to start a simulation.

You can find more information about the **Email** **Threat** **Simulator** [here](/next-generation-product/platform/email-threat-simulator/start-scan).

<table><thead><tr><th width="174.5"></th><th></th></tr></thead><tbody><tr><td>Test Email Address</td><td>The email address that the simulation will be started on.</td></tr><tr><td>Choose an Option</td><td>Select the “Continue with Microsoft Office 365” option.</td></tr><tr><td>Password</td><td>The password of the email address that will be used in the simulation</td></tr><tr><td>Application (Client) ID</td><td>The Application (Client) ID information that is visible in the application that is created in the Azure platform.</td></tr><tr><td>Directory (Tenant) ID</td><td>The Directory (Tenant) ID information that is visible in the application that is created in the Azure platform.</td></tr></tbody></table>

Click on the **Next** button to go to the next page and customize the options as wished on “the **“Scan and Delivery Settings”** page and then go to the last page to agree on the **“User Agreement”** to start the simulation.

## Troubleshoot

If you’re unable to start an ETS scan on an O365 email account, follow these steps to troubleshoot:

1. **Check Sign-In Logs**: Navigate to the **User Sign-In** logs for the email account used for the ETS scan. Review the logs to identify any technical issues preventing Keepnet from connecting to the account.
2. **Verify MFA/2FA Settings**: Ensure that Multi-Factor Authentication (MFA) or Two-Factor Authentication (2FA) is disabled for the email account used for the ETS scan.
3. **Allow Time for Settings to Apply**: After configuring the account settings according to the documentation, wait at least 60 minutes before initiating the ETS scan. Microsoft may require some time to apply the changes across your organization.

If you still can't start an ETS scan on the email account, please [contact the support team](/resources/keepnet-support-help-desk) for further assistance.


# Start Scan on Google Workspace Email Account

This document will provide information on how to start an Email Threat Simulator scan to the email inbox using a Google Workspace account.

To use the Email Threat Simulator with a Google Workspace email account, the app requires a password.

## Create an app password

Follow the steps to create the app password for the Google Workspace account.

1. Go to your [Google Account](https://myaccount.google.com/) (for test mail address)
2. Select **Security**.
3. Under “**How to sign in to Google**”, select **2-Step Verification**.
4. At the bottom of the page, select **App** **passwords**.
5. **Enter** **a** **name** to help you remember where to use the app password.
6. Select **Create**.
7. **Copy and save the app password** for use in the Keepnet interface.
8. The app password is a 16-character code generated on your device.
9. Select **Done**.

## How to start a simulation with a Google Workspace account?

This section describes the steps to start a scan with Google Workspace in the Email Threat Simulator product.

1. Go to **Email Threat Simulator > Scans** page from the left menu on the platform.
2. Click on the **+NEW** button to start a new simulation.
3. Read the warning message and then click on the “**I Understand**” button.
4. Fill in the **Test Email Address** field.
5. Check '**Automate with password**' under **Choose** **an** **Option**.
6. In the **Password** field, enter the app password value you created before.
7. Click on the **Next** button.
8. In the **Scan** **and** **Delivery** step, set the delivery speed as desired.
9. Click on the **Next** button.
10. Confirm the **User Agreement**.
11. Start the simulation by clicking on the **Save** button.

Use the document [here](https://doc.keepnetlabs.com/next-generation-product/platform/email-threat-simulator/view-scan-report) to understand the details of the scan report.


# Threat Sharing

Technical documentation for Keepnet Threat Sharing, explaining how to join or create threat-sharing communities, investigate shared incidents, and use intelligence for response and protection.

The Threat Sharing Community platform is an early warning system deployed across a network that provides inbox-level incident response and investigation capability, giving users maximum agility and reducing response time. Users have the ability to expand their threat intelligence reach by using their collective network knowledge, as well as reduce their costs and accelerate implementation of a response. Users can also preemptively initiate inbox investigations before suffering a malicious attack, which provides proactive protection.

You can access the **Threat** **Sharing** product from the left-hand panel after logging in to the platform.

## **6. FAQ**

### **‌**Q: Can I hide my identity when I post an incident to a community?

‌‌A: Yes. If you do not want to disclose your name and organization when posting an incident, you can select the anonymous option offered in the preview section.

### **Q**: How do I launch an investigation to assess the threat at my company?

A: When you see an incident posted and shared by a fellow member of a community, you can easily begin an investigation to determine potential risk to your firm by selecting the Investigate option. You will be prompted to add the criteria, target users, duration, and other details to be used as part of the investigation.

For more information, go to [How to Edit, Investigate, Share, or Delete an Incident](/next-generation-product/platform/threat-sharing/incidents).

### **‌**‌Q: Is it possible to invite someone from a company that is not currently a client to join a community?

‌A:‌ No. Community membership is limited to employees of organizations that have registered to the platform. Once an organization has registered, all registered users of that organization are eligible to participate, if they choose to do so.

For more information about invitations, go to Invitations or Invite New Members.

### Q: Where are shared incidents stored?

A: Shared incidents will be maintained in the database

### **‌**Q: What is the reliability of shared posts/incidents?

A: A user must accept terms and conditions before a post will be accepted in order to ensure maximum reliability of the shared information.

### **‌Q**: Are shared threats/incidents/posts human-verified?

A: No, they are not verified. However, threat sharing communities are peer-to-peer networks formed and built on trust. This can be used to verify the posts/incidents.

### Q: Is there any limit to the number of posts that can shared in a community?

A: No. You can share as many as you want to.

### Q: Is it possible to leave a community of which I am the owner? Can I transfer ownership?

A: Yes. The owner of a community may transfer ownership to another member of the group. Select the name of the member to become the new owner, click on the three dots next to their name, and you have the option to Assign as Owner.

If you do not wish to assign a new owner, you also have the option to delete the community, however, please all posts and the data of the community will be erased.

### Q: What is the reliability of shared posts/incidents?

A: A user must accept terms and conditions before a post will be accepted in order to ensure the maximum reliability of the shared information.

## 7. Use Cases

### **U**se Case: Keep details private when posting an incident to avoid exposing confidential information

The best solution would be to post anonymously. The poster’s profile details – including the name of the individual and that of the organization - are withheld. It is also possible to select the attributes of the incident that will be visible or hidden in the Header field or Body or Attachment to provide additional confidentiality.

### Use Case: Limit membership to a community

When setting up a community, the owner has a high degree of control about who can access and view that community information. The public, private, and hidden types of community offer different levels of disclosure and participation. Only public communities have unrestricted membership.

The owner of a private or hidden community has administrator rights and controls membership.

The name of a private community is displayed on the Communities homepage; however, membership is restricted.

### **U**se Case: Find communities related to a particular industry or sector

The search option on the Communities page allows you to locate established groups in industries or sectors most relevant to your interests. For example, a user who works in financial services can search for communities concerned with banking, brokerage, investment banking, or private equity and, if the privacy options allow, become a member of those communities. It is also possible to search for industries and sectors according to the privacy option.

The Treat Sharing page also suggests communities that may be of potential interest.

### **U**se Case: There are no communities related to my sector. What can I do?

If there are no existing communities of interest to join, this is an opportunity to create a new community for members of an unrepresented industry or sector.

This could be a great way to establish a presence for your community and become a thought leader within your industry or sector.

### Use Case: Searching for specific incidents in the threat sharing database

The Incidents section offers several ways to search for a particular incident to determine if it may have already impacted your organization. The keyword, company, and threat fields can be used to filter the results.

This can provide excellent insights into past, present, and future threats to an organization, as well as guidance for targeted awareness training and to address any vulnerabilities in information security systems and networks.

### **U**se Case: Assessing the threat of an incident

Community members can see which incidents are and have been considered the most harmful. The most dangerous attributes are flagged in the post, and members can immediately access the specific details and take the appropriate action for their organization.

### Use Case: Using invitations to grow a community and improve security posture

Invitations are an invaluable way to expand and enrich communities. A large community has greater resources and expanded ability to improve cyber resilience. The member organizations will be better prepared for attacks based on the knowledge shared by others in the community.

There is no limit to the number of invitations to a public community, and all members may invite a colleague to join. The owner of a hidden or private community serves as a gatekeeper to membership and is the ultimate decision-maker of how many invitations are issued and to whom.

### Use Case: Ensuring and enhancing the value of a community for the owner and members

The best way to make a community successful is the proactiveness of the membership, and in particular, the community owner. The larger the community, the more useful and valuable it will be for everyone, but the integrity and caliber of the membership provides additional strength, trust, and reliability.

### **U**se Case: Defining the purpose of a community

The intended vision and goals of a community are provided when it is created and serve as a guide to activities and membership.

### **U**se Case: What action can community members take in response to a posted incident?

Users have a range of options to choose from in response to a posted incident according to their own organization’s cybersecurity protocols and incident response procedures. Valuable information is provided related to both actual and potential threats and may be used according to individual needs.

### **U**se Case: The community has lost its way. How can it be saved?

Priorities always change in an organization, and the same is true in the threat sharing world of communities. If the owner of a community no longer feels that it is functional, relevant or the purpose no longer exists, then the community can be deleted, and all incidents reported and which members were part of it will be destroyed as well.


# Communities

## **How to Use the Threat Sharing Community**

You must either a) create a community, or b) become a member of an existing community. You can access the Communities page by **Dashboard > Threat Sharing > Communities**.\
\
The sub pages of the community page are explained below.

<table data-header-hidden><thead><tr><th width="161.55078125"></th><th></th><th data-hidden></th></tr></thead><tbody><tr><td>Your Communities</td><td>The communities you are enrolled in</td><td></td></tr><tr><td>All</td><td>All Communities on the platform</td><td></td></tr><tr><td>Invitations</td><td>Invitations waiting for you to accept or decline</td><td></td></tr></tbody></table>

The fields of the community page are explained below.

<table data-header-hidden><thead><tr><th width="225"></th><th></th><th data-hidden></th></tr></thead><tbody><tr><td>Community Name</td><td>The name of the post</td><td></td></tr><tr><td>Users</td><td>Number of users in the community</td><td></td></tr><tr><td>Industry</td><td>The industry for to the community</td><td></td></tr><tr><td>Last Update</td><td>The date and time the last post was made</td><td></td></tr><tr><td>Three Dots (Actions)</td><td><ul><li>Edit Community</li><li>Notification Settings</li><li>Leave</li><li>Delete</li></ul></td><td></td></tr></tbody></table>

A search window is available to help quickly find a name on the community homepage.

### **How to create a Community?**

Go to **Dashboard > Threat Sharing > Communities** and click on the **Create** **Community** button.

Next, you willl be asked to enter the following from the table below:

<table data-header-hidden><thead><tr><th width="166"></th><th></th><th data-hidden></th></tr></thead><tbody><tr><td>Community Name</td><td>The name for your community</td><td></td></tr><tr><td>Community Description</td><td>A description of the community with its rules and goals (max. 300 words)</td><td></td></tr><tr><td>Industry</td><td>The industry most relevant to the community</td><td></td></tr><tr><td>Privacy</td><td><ul><li><strong>Public:</strong> Anyone can find the community and see posted threats</li><li><strong>Private:</strong> Only members invited by the community owner can see posted threats, but the name of the community is listed publicly in the communities list</li><li><strong>Hidden:</strong> Only members can see posted threats and the name of the group is not displayed in the list of communities</li></ul></td><td></td></tr></tbody></table>

Please read and accept the terms and conditions. Then click on **Create** to complete the process.

After creating your community, you willl be directed to the new Threat Sharing Community homepage.

You will now be able to **post your first incident**.

### Community Settings

Go to **Dashboard > Threat Sharing > Communities** and click on the **Three Dots.** You will be able to edit the interaction with the fields in the table below.

<table><thead><tr><th width="178.5"></th><th></th><th data-hidden></th></tr></thead><tbody><tr><td>Edit Community</td><td>Edit the general information and settings of the community.</td><td></td></tr><tr><td>Notification Settings</td><td><ul><li>Enable Email notifications</li><li>Disable Email notifications</li></ul><p>NOTE: If you disable the first notifications setting, no notifications will be sent out to the community to inform them of posted incidents.</p></td><td></td></tr><tr><td>Leave</td><td>To withdraw from the community.<br>NOTE: You will no longer be able to post incidents to this community; you willl have to rejoin or be re-invited.</td><td></td></tr><tr><td>Delete</td><td>To delete the community</td><td></td></tr></tbody></table>

### **How to Transfer Ownership of a Community**

If you no longer wish to be the owner of a community, you have the option to transfer ownership to a fellow member.

* Go to the **Communities** dashboard
* Select the community for which ownership is to be transferred
* Go to Members menu
* Select the member who will be the new owner
* Click on the three dots to the right of the member’s name and click 'Assign as owner' button
* Confirm that you are willing to give admin privileges (includes rights to remove users and delete the community) to the new owner
* Click **Accept** to complete the transfer of ownership
* A message will appear to confirm that the transfer of the community’s ownership has been successful.

**Invite new members to your Community**

Once a community has been established, you are able to invite members to join the group. A maximum of five can be invited at one time.

To invite new members;

* Go to the right-hand pane of the community homepage
* Under **About Community**, click **+Invite** and enter the email address of the invite
* Click **Invite** to send your request

**Requests**

Individuals who are not currently members of the community can request to join. These requests are visible under the Requests option on the community homepage.

### **Members Page**

The names of the members of your threat sharing community are visible under the Members page. You wil be able to see the following information.

<table data-header-hidden><thead><tr><th width="158"></th><th></th><th data-hidden></th></tr></thead><tbody><tr><td>Company</td><td>The Company that created the threatsharing community</td><td></td></tr><tr><td>Users</td><td>The number of users</td><td></td></tr><tr><td>Industry</td><td>The industry for the community</td><td></td></tr><tr><td>Posts</td><td>The number of posts made</td><td></td></tr><tr><td>Three Dots (Actions)</td><td>See posted incidents</td><td></td></tr></tbody></table>

A search window is available to help quickly find a name on the community homepage.

**Incidents Page**

The names of the incidents of your threat sharing community are visible under the Incidents Page. You will be able to see the following information.

<table data-header-hidden><thead><tr><th width="163"></th><th></th><th data-hidden></th></tr></thead><tbody><tr><td>Incident Name</td><td>The name of the post</td><td></td></tr><tr><td>Created by</td><td>The name of the user that created the post and the company that the user belongs to</td><td></td></tr><tr><td>Date Created</td><td>The date and time the post was made</td><td></td></tr><tr><td>Security Label</td><td>Security labels to inform recipients about how to share sensitive information. Please visit <a href="https://www.cisa.gov/tlp">Traffic Light Protocol</a> for more information.</td><td></td></tr><tr><td>Details</td><td>A preview of the reported threat</td><td></td></tr><tr><td>Three Dots (Actions)</td><td>See posted incidents</td><td></td></tr></tbody></table>

A search window is available to help quickly find a name on the community homepage.


# Incidents

This page is currently under construction.


# Phishing Simulator

Technical documentation for the Keepnet Phishing Simulator, covering phishing campaign setup, scenario configuration, templates, user targeting, and result analysis.

The [**Phishing Simulator**](https://keepnetlabs.com/products/phishing-simulator) allows you to create a realistic simulated phishing email that is sent to employees in order to assess their ability to recognize suspicious emails and their response to attacks that could compromise organizational data and systems.

The product provides the capability to customize and target a phishing campaign suited to your organization and to evaluate the results.

## Shortcuts

* [How to see or create phishing scenarios and launch the target users](/next-generation-product/platform/phishing-simulator/manage-phishing-scenarios/phishing-scenarios)
* [How to see or create phishing email templates](/next-generation-product/platform/phishing-simulator/manage-phishing-scenarios/email-templates)
* [How to see or create phishing landing pages](/next-generation-product/platform/phishing-simulator/manage-phishing-scenarios/landing-pages)
* [How to launch a campaign to target users with advanced options](/next-generation-product/platform/phishing-simulator/phishing-campaign-manager)
* [How to see phishing domains or integrate my phishing domain to the platform](/next-generation-product/platform/phishing-simulator/settings/dns-services-and-domains)
* [How to exclude IP addresses to prevent false positives reporting](/next-generation-product/platform/phishing-simulator/settings/exclude-ip-address)

## FAQ

### Q: When executing a phishing simulator attack, you will receive a “test” email prior to execution. Is there a way currently to turn that off?

A: Currently, no - it’s mandatory to see the campaign tested before making any mistake. You will receive the email on the Delivery Settings page. The system automatically sends a test email and notifies you about this action

### Q: Some subdomains are banned such as Microsoft.domain.com. Is it possible for these to be unbanned?

A: If the microsoft name is used in a subdomain there are many threat intelligence services, chromium based browsers, URL filtering tools easily detect and block this domain. If you need this, please reach out to <support@keepnetlabs.com>

### Q: What would be the steps to get additional URLs added to Keepnet’s Phishing Simulator? For example, if you already own several through GoDaddy.

A: We can only host domains verified through Cloudflare. Please refer to [this document](/next-generation-product/platform/phishing-simulator/settings/dns-services-and-domains) for more information.

### Q: What is a Double Barrel scenario?

A: Double Barrel is a phishing Method that sends two emails in sequence within the same thread — a **Lure** email that builds trust without any link, followed by a **Payload** email that carries the phishing link. It simulates a multi-stage social-engineering attack. You build the two-email template on the Email Templates page and configure send order, delay, and other options under Double Barrel Settings when you launch the campaign. [Click here for more information.](/next-generation-product/platform/phishing-simulator/manage-phishing-scenarios/email-templates#how-to-add-a-double-barrel-email-template)

### Q: How can I combine the Email Template and Landing Page to create a phishing scenario?

A: You can easily create a customized phishing scenario to suit your organization. You will find the instructions [here](/next-generation-product/platform/phishing-simulator/manage-phishing-scenarios/phishing-scenarios).

### Q: Can I delete System Scenarios/Email/Landing Pages?

A: The System templates can't be deleted by the admin users. The admins are able to delete their custom templates.

### Q: Which tracking domain is used for Attachment type campaigns?

A: The platform automatically generates unique tracking links for attached files for each target user for Attachment type campaigns. The domain that is used for the attachment type campaign are dynamics. Please make sure you allow list all the simulation domains.

### Q: Emails do not arrive to the target users

A: The delivery status can be checked on Sending Report menu in the campaign report to see if the emails have been delivered successfully to the users. If the emails are successfully delivered, please check your [allow listing settings](/next-generation-product/miscellaneous/allow-listing).

### Q: Why the domain that is used for the campaign gives a red screen on Google?

A: If the campaign contains an HTML page where it contains any words, pictures or links related to Google, Facebook, Twitter, Apple, Microsoft or other such major companies, Google will easily identify it as suspicious and as a result, the user will see red screen after click the link in the simulated phishing email.

* Please make sure not to use real words, pictures or links that are related to major companies.
* The platform offers approximately fifty domains to be used in campaigns. The admin can also try to change the phishing domain to a new one and then launch the campaign with the new domain.

### Q: Why I see phishing email looks not properly in Outlook Desktop App?

A: The Outlook Desktop application doesn't read CSS styles which cause sometimes the email not to look properly as it was seen on the platform. You may contact the support team to check if the phishing email could be optimized.

### Q: How Is the Difficulty Level Determined?

A: The difficulty level of email templates and landing pages is determined based on several factors, including but not limited to:

* **Sophistication of Phishing Techniques:** The use of advanced spoofing methods, such as display name spoofing, domain similarity, and the inclusion of personalized information, can make a phishing attempt more difficult to recognize.
* **Quality of the Content:** The presence of grammatical errors, unusual requests, or other indicators typically associated with phishing can vary. Templates with fewer errors and more realistic scenarios are considered more difficult.
* **Design and Presentation:** For landing pages, the visual design and how closely it mimics legitimate websites play a crucial role. High-quality designs that closely resemble real sites increase the difficulty level.
* **Context and Relevance:** Attempts that leverage current events, believable scenarios, or target specific job roles can be harder to identify as phishing, especially if they align closely with the recipient's expectations or experiences.

**Criteria for Difficulty Levels**

* **Easy:** These attempts may contain obvious signs of phishing, such as poor spelling and grammar, generic greetings, or implausible requests. They are typically easier for users to identify with basic awareness training.
* **Medium:** These attempts are more sophisticated, with fewer obvious errors and more believable scenarios. They might have email addresses and websites that look like they are real, but if you look closely, you can still find some mistakes.
* **Hard:** These are highly sophisticated attempts that closely mimic legitimate emails and websites, often using personalized information and current events to create convincing scenarios. Recognizing these requires advanced awareness of identity phishing tactics.

### Q: **Why can't I see the X-Keepnet-TID header in phishing simulation emails once it is forwarded?**

A: If you can't see the X-Keepnet-TID header in phishing simulation emails, it's likely due to how the email was forwarded. If the simulation email was forwarded using the "Forward as Attachment" or "Normal Forward" options in Outlook, Microsoft may alter the email headers.

When a message is forwarded as an attachment in the Outlook desktop application, the attachment is often compressed to reduce its size. This compression can strip the original message headers, including the EOP headers we need to analyze.

To ensure the original message and its headers remain intact, save the message to your desktop first, compress it (we recommend adding it to a .zip archive), and then send the compressed file as an attachment. The Outlook Desktop client will not modify the message within a zip file, ensuring that the complete message with all headers arrives at its destination.

For more details, please refer to the following article: <https://learn.microsoft.com/en-us/archive/blogs/eopfieldnotes/1986>

### **Q: How does failure tracking work in attachment-based phishing simulations?**

A: Tracking behaviour depends on the file type:

<table><thead><tr><th width="101.17578125">File Type</th><th>Must Be Opened In</th><th>Action Required to Register Failure</th></tr></thead><tbody><tr><td><code>.docx</code></td><td>Microsoft Word (desktop)</td><td>Click <strong>Enable Editing</strong></td></tr><tr><td><code>.xlsx</code></td><td>Microsoft Excel (desktop)</td><td>Click <strong>Enable Editing</strong></td></tr><tr><td><code>.pptx</code></td><td>Microsoft PowerPoint (desktop)</td><td>Click <strong>Enable Editing</strong></td></tr><tr><td><code>.html</code></td><td>Any modern browser</td><td>Open the file on browser.</td></tr></tbody></table>

For Office files, simply opening the attachment is not enough. Microsoft opens files in **Protected View** by default, which blocks all external connections including Keepnet's tracking link. The failure is only recorded once the user clicks **Enable Editing**.

Attachment tracking is not supported for users opening files via Google Docs, Google Sheets, or Gmail, as these environments strip out external tracking links. For Google Workspace organisations, use Click-Only, Data Submission, or MFA-based simulations instead.


# Manage Phishing Scenarios

This section will help you comprehend and utilize the fundamental features within the Phishing Scenarios page. Below, we have provided shortcuts to the parameters within the Phishing Scenarios page.

## Shortcuts

* [How to see or create phishing scenarios and launch the target users](/next-generation-product/platform/phishing-simulator/manage-phishing-scenarios/phishing-scenarios)
* [How to see or create phishing email templates](/next-generation-product/platform/phishing-simulator/manage-phishing-scenarios/email-templates)
* [How to see or create phishing landing pages](/next-generation-product/platform/phishing-simulator/manage-phishing-scenarios/landing-pages)
* [How to see or create red flag email templates](/next-generation-product/platform/phishing-simulator/manage-phishing-scenarios/email-templates#how-to-add-a-new-email-template-with-red-flags)
* [How to see or create red flag landing page templates](/next-generation-product/platform/phishing-simulator/manage-phishing-scenarios/landing-pages#how-to-add-a-new-landing-page-template-with-red-flags)
* [How to create a Double Barrel email template](/next-generation-product/platform/phishing-simulator/manage-phishing-scenarios/email-templates#how-to-add-a-double-barrel-email-template)


# Phishing Scenarios

The [**Phishing Simulator**](https://keepnetlabs.com/products/phishing-simulator) **> Phishing Scenarios > Scenarios** page provides a selection of ready-to-use phishing campaigns. These standard system scenarios are available to all clients and can be launched with just a few clicks. You also have the option to customize a scenario to your needs or to create a unique phishing campaign.

The components of the **Scenarios** page are explained below.

<table><thead><tr><th width="150"></th><th width="590.1428571428571"></th></tr></thead><tbody><tr><td>Scenario name</td><td>The name of the phishing template</td></tr><tr><td>Category</td><td>Category is used to classify phishing scenarios by threat type.</td></tr><tr><td>Method</td><td><p>The phishing technique.</p><ul><li><strong>Data Submit:</strong> Used to detect target users who submit data on the landing page</li><li><strong>Attachment:</strong> Used to detect target users who download the attachment in the phishing simulation email</li><li><strong>Click-Only:</strong> Used to detect target users who click unknown links in the phishing email.</li><li><strong>MFA:</strong> Used to detect target users who enter their MFA codes on the landing page</li><li><strong>Double Barrel:</strong> Sends two emails in sequence — a trust-building Lure email with no links, followed by a Payload email that carries the phishing link — to mimic a multi-stage social-engineering attack.</li></ul></td></tr><tr><td>Languages</td><td>Filter scenarios based on your preferred languages.</td></tr><tr><td>Roles</td><td>Filter scenarios based on the roles.</td></tr><tr><td>Tags</td><td>Tags can be added to the phishing scenario to enable viewing using related tag lists.</td></tr><tr><td>Difficulty</td><td>The level of difficulty to recognize a phishing attempt <strong>(Easy, Medium, Hard).</strong> Please <a href="/pages/ucto9lOcZl07Ay1czet4#q-how-is-the-difficulty-level-determined">click here</a> to see how the difficulty level is determined.</td></tr><tr><td>Created By</td><td><p><strong>System:</strong> Standard phishing scenario templates provided with the product.</p><p><strong>Custom:</strong> Phishing scenarios created or customized by system users.</p></td></tr><tr><td>Date Created</td><td>The date and time the phishing scenario was created.</td></tr></tbody></table>

{% hint style="info" %}
Keepnet uses a tiny, 1x1 pixel image from a remote URL to track when files are opened in Microsoft Office applications like Excel, Word.\
\
This method does not work with Macbook Numbers, which does not support URL-based images in cells, preventing file tracking.\
\
For broader compatibility in phishing attacks across Microsoft, Mac, and Android devices, use HTML file attachments, which support complex elements across diverse devices and software environments.
{% endhint %}

## Phishing Scenario Actions

This section explains how to initiate a phishing campaign.

### How to Launch a Phishing Campaign

Once you have selected a phishing template for your campaign and identified the targets, click on the **Launch '➤'** button in the **Actions** menu on the far right of the page.

You will be presented with options to specify or modify various elements of the campaign.

#### Campaign Settings

<table><thead><tr><th width="150"></th><th width="576.3496376811595"></th></tr></thead><tbody><tr><td>Campaign Name</td><td>The name used to identify the phishing campaign and the name that will be used on the report generated at the conclusion of the campaign</td></tr><tr><td>Target Groups</td><td>The group(s) selected to receive the phishing campaign message</td></tr><tr><td>Mark as Test</td><td>The phishing report can be removed from other reporting areas of the platform</td></tr><tr><td>Limit Recipients</td><td>The phishing campaign can be designed to be sent to random users in the target group according to a percentage or user count.</td></tr></tbody></table>

#### Campaign Summary

Once you designed the proposed campaign and clicked the **Next** button, you will be provided with a summary. The components are explained below.

<table><thead><tr><th width="166.19942884934343"></th><th width="576.3496376811595"></th></tr></thead><tbody><tr><td>Scenario Info</td><td>Basic information about the phishing campaign</td></tr><tr><td>Settings</td><td>Settings information of the phishing campaign</td></tr><tr><td>Other</td><td>Any other additional information about the campaign</td></tr><tr><td>Target Users</td><td>The users to whom the phishing campaign will be sent</td></tr><tr><td>Email that will be sent to users</td><td>Preview of the phishing email that will be sent</td></tr><tr><td>Landing page for users who click the phishing link</td><td>Preview of the landing page when a user clicks the phishing link used in this campaign</td></tr></tbody></table>

### How to Edit a Phishing Campaign

Click on the three dots '⋮' button in the **Actions** option on the far right of the relevant page, and then click the **Edit** button.

### How to Preview a Phishing Campaign

Click on the three dots '⋮' button in the **Actions** option on the far right of the relevant page, and then click the **Preview** button to view what will be sent to the targeted users.

### How to Duplicate a Phishing Campaign

Click on the three dots '⋮' button in the **Actions** option on the far right of the relevant page, and then click the **Duplicate** button to recreate a previous campaign.

### How to Delete a Phishing Campaign

Click on the three dots '⋮' button in the **Actions** option on the far right of the relevant page, and then click the **Delete** button to delete a phishing campaign.

### How to View Scenario Statistics

This option gives you an overview of phishing templates on the platform, grouped by region (e.g., EMEA, NAM), brand (e.g., Microsoft, Google), industry (e.g., finance, IT), attack type (e.g., click-only), language, and emotional triggers (e.g., urgency, excitement). It helps you explore and select the most relevant templates for your campaigns.

To access it, go to **Phishing** **Simulator > Scenarios** and click the "**Scenario** **Statistics**" button at the top-right of the scenarios page.

### How to View Scam of the Week Scenarios

The **Scam of the Week** category highlights phishing scenarios that are based on the most recent and trending cybersecurity threats. These scenarios are updated weekly and curated by security experts to help you quickly launch timely and realistic phishing simulations.

To view scam of the week scenarios, go to **Phishing Simulator > Phishing Scenarios**, select **Scam of the Week** from the **Category** filter.

## How to Add a New Phishing Scenario

Phishing scenarios have two components: the phishing email template and the landing page. Follow the steps below to add a new phishing scenario:

1. Click the **+NEW** button in the upper right corner of the **Phishing Simulator > Phishing Scenarios** page.
2. Complete the required fields on the first page, then click **Next**.
   1. **Scenario Name:** Enter a name for your scenario.
   2. **Description:** Describe the template briefly for your reference.
   3. **Category:** Select the threat type that classifies your phishing scenario.
   4. **Method:** Choose the appropriate phishing strategy for your scenario.
      1. **Click-Only:** Redirect users to a specific landing page, and see who clicks the phishing link within the report.
      2. **Data Submission:** Redirect users to a page where they must enter requested credentials and see who submits this information in the report.
      3. **Attachment:** Redirect users to download a file attached within the simulated email, and see who opens the file within the report.
      4. **MFA:** Redirect users to a Multi-Factor Authentication (MFA) page where they must input a received MFA code to continue, and see who submits MFA codes in the report.
      5. **Double Barrel:** Send two emails in sequence — a Lure email that builds trust without any link, then a Payload email containing the phishing link. See [How to Add a Double Barrel Email Template](/next-generation-product/platform/phishing-simulator/manage-phishing-scenarios/email-templates#how-to-add-a-double-barrel-email-template) to build the two-email template, and configure delivery under Double Barrel Settings.
   5. **Roles:** Add roles to the scenario that fit specific roles.
   6. **Tags:** Define tags for the scenario.
   7. **Make Available For:** Make your scenario available to be used by the other customers under your organization. This feature is only available to admins who have Reseller permissions.
   8. Click **Next** to go to the **Email** **Template** page.
   9. On the **Email Template** page\*\*,\*\* select the e-mail template you want to use and then click the **Next** button.
   10. Select the **Landing Page** template you want to use and then click the **Next** button to move on to the **Summary** page.
       1. If the **MFA** **method** is selected, you'll find a sub-menu titled **"MFA Settings"** on the **Landing** **Page**. Here, you can customize the "**Sender** **Phone** **Number"** and the text for the "**SMS** **Verification** **Message".**
       2. If the **Attachment** **method** is selected, the Landing Page selection is not supported for this method. The attachment scenarios only support Word, PowerPoint, Excel or HTML files.
   11. The **Summary** page provides you with an overview of the proposed phishing campaign, including the type of campaign, the targeted users, and other important details.

Now you can click the **Save** button to create your scenario. Now, you are ready to launch your scenario either using [Fast Launch](#how-to-launch-a-phishing-campaign) or [Campaign Manager](/next-generation-product/platform/phishing-simulator/phishing-campaign-manager#create-a-campaign).

## How to Create a Scenario with Just-in-time Learning Page

The **Just-in-time Learning Page** is an intelligent feature that automatically highlights warning signs (red flags) in simulated phishing emails. It provides employees with instant, contextual training at the exact moment of risk.

When a user reaches the Just-in-Time (JIT) learning page (red flags in the simulated email), the platform shows **how many points they will earn** before they start reviewing the red flags. After they complete the training, it confirms **how many points they earned**. This makes rewards clear and the experience more motivating.

To set this up, you first need to create both the **Just-in-time Learning Page** and the **Red Flag Email Template**. Once completed, you can combine them to build a phishing scenario and launch it to your employees.

[Here's a quick video tutorial!](https://www.loom.com/share/e899debb32cb491b8e97c064fabb7a7a?sid=6b725e25-86e8-4269-b783-e8d2ef0d26d8)

If you are ready, please follow the steps to create a scenario.

{% hint style="warning" %}
Before you proceed with this section, please make sure you have created the [just-in-time learning page](/next-generation-product/platform/phishing-simulator/manage-phishing-scenarios/landing-pages#how-to-add-a-new-just-in-time-learning-page) and [red flag email template](/next-generation-product/platform/phishing-simulator/manage-phishing-scenarios/email-templates#how-to-add-a-new-email-template-with-red-flags).
{% endhint %}

1. Click the **+NEW** button in the upper right corner of the **Phishing Simulator > Phishing Scenarios** page.
2. Complete the required fields on the first page, then click **Next**.
   1. **Scenario Name:** Enter a name for your scenario.
   2. **Description:** Describe the template briefly for your reference.
   3. **Category:** Select the threat type that classifies your phishing scenario.
   4. **Method:** Choose the appropriate phishing strategy for your scenario. Please make sure the method is the same as your email template and landing page category.
      1. **Click-Only:** Redirect users to a specific landing page, and see who clicks the phishing link within the report.
      2. **Data Submission:** Redirect users to a page where they must enter requested credentials and see who submits this information in the report.
      3. **Attachment:** Redirect users to download a file attached within the simulated email, and see who opens the file within the report.
      4. **MFA:** Redirect users to a Multi-Factor Authentication (MFA) page where they must input a received MFA code to continue, and see who submits MFA codes in the report.
      5. **Double Barrel:** Send two emails in sequence — a Lure email that builds trust without any link, then a Payload email containing the phishing link. See [How to Add a Double Barrel Email Template](/next-generation-product/platform/phishing-simulator/manage-phishing-scenarios/email-templates#how-to-add-a-double-barrel-email-template) to build the two-email template, and configure delivery under Double Barrel Settings.
   5. **Roles:** Add roles to the scenario that fit specific roles.
   6. **Tags:** Define tags for the scenario.
   7. **Make Available For:** Make your scenario available to be used by the other customers under your organization. This feature is only available to admins who have Reseller permissions.
   8. Click **Next** to go to the **Email** **Template** page.
   9. On the **Email Template** page\*\*,\*\* select the **red flags email template** you created and then click the **Next** button.
   10. On the **Landing Page** page, select the **just-in-time learning page** and then click the **Next** button to move on to the **Summary** page.
       1. If the **MFA** **method** is selected, you'll find a sub-menu titled **"MFA Settings"** on the **Landing** **Page**. Here, you can customize the "**Sender** **Phone** **Number"** and the text for the "**SMS** **Verification** **Message".**
   11. The **Summary** page provides you with an overview of the proposed phishing campaign, including the type of campaign, the targeted users, and other important details.

Now you can click the **Save** button to create your scenario. Now, you are ready to launch your just-in-time learning page scenario either using [Fast Launch](#how-to-launch-a-phishing-campaign) or [Campaign Manager](/next-generation-product/platform/phishing-simulator/phishing-campaign-manager#create-a-campaign).

## Video Tutorial

This tutorial will cover the **Scenarios** that are created by combining the **Email** **Template** and/or **Landing** **Page** and making the campaign ready to send to the target users.

{% embed url="<https://youtu.be/y1BPobrQXIU>" %}

## FAQs

### Q: Can I add a landing page to Attachment scenarios?

A: No. Landing pages are not supported for Attachment scenarios. These scenarios only support Word, Excel, PowerPoint, and HTML attachments. User activity is tracked when the attachment is opened or executed on the device, which is an action users should normally avoid.


# Email Templates

The [**Phishing Simulator**](https://keepnetlabs.com/products/phishing-simulator) **> Phishing Scenarios > Email Templates** page provides you with system default phishing email templates. You can use them as they are or customize them as needed for your phishing campaign.

The components of the **Email Templates** page are explained below.

<table><thead><tr><th width="150"></th><th width="590.1428571428571"></th></tr></thead><tbody><tr><td>Template name</td><td>Name of the email template</td></tr><tr><td>Method</td><td><p>The phishing technique employed.</p><ul><li><strong>Data Submit =</strong> Used to detect target users who submit data on the landing page</li><li><strong>Attachment =</strong> Used to detect target users who download the attachment in the phishing simulation email</li><li><strong>Click-Only =</strong> Used to detect target users who click unknown links in the phishing email</li><li><strong>Double Barrel =</strong> A two-email template — a Lure email (no links) followed by a Payload email that carries the phishing link — used to run multi-stage attack simulations.</li></ul></td></tr><tr><td>Languages</td><td>Filter email templates based on your preferred languages.</td></tr><tr><td>Tags</td><td>Tags can be added to the email template to enable viewing using related tag lists.</td></tr><tr><td>Difficulty</td><td>The level of difficulty to recognize a phishing attempt <strong>(Easy, Medium, Hard).</strong> Please <a href="/pages/ucto9lOcZl07Ay1czet4#q-how-is-the-difficulty-level-determined">click here</a> to see how the difficulty level is determined.</td></tr><tr><td>Creation Type</td><td>Filter email templates based on their creation type (e.g., Manual or AI Ally).</td></tr><tr><td>Created By</td><td><p><strong>System:</strong> Standard phishing email templates are provided with the product.</p><p><strong>Custom:</strong> Phishing email created or customized by users</p></td></tr><tr><td>Date Created</td><td>The date and time the email template was created</td></tr></tbody></table>

## Email Template Actions

This section explains how to edit, preview, clone, or delete an e-mail template.

### How to Edit an Email Template

Click on the three dots '⋮' button in the **Actions** option on the far right of the relevant page, and then click the **Edit** button.

### How to Preview an Email Template

Click on the three dots '⋮' button in the **Actions** option on the far right of the relevant page, and then click the **Preview** button.

### How to Clone an Email Template

Click on the three dots '⋮' button in the **Actions** option on the far right of the relevant page, and then click the **Duplicate** button.

### How to Delete an Email Template

Click on the three dots '⋮' button in the **Actions** option on the far right of the relevant page, and then click the **Delete** button.

## How to Add a New Email Template

Follow the steps below to create a new email template for use in a new or existing phishing campaign:

1. Click the **+New** button in the upper right corner of the **Phishing Simulator > Phishing Scenarios > Email Templates** page.
2. Complete the required fields on the first page, then click **Next**.
3. Complete the sections below on the **Email Settings** page:
   1. **Subject:** Subject line of the phishing email
   2. **From Name:** Sender name that will be visible to the target recipient
   3. **From Email Address:** Sender email address information that will be visible to the target recipient
   4. **CC:** Add a CC email address to your phishing simulation email.
   5. **Attach File:** If desired, you can attach a file to the phishing email. This option is available when the email template method is **Attachment**, and on the **Payload Email** of a **Double Barrel** template. Supported files: Word, Excel, PowerPoint, or HTML, up to 5 MB.
   6. **View/Edit Template:** View and edit the available email templates in localized languages.
   7. **Localize:** Localize your main email template to different languages. Click [here](https://localization.keepnetlabs.com/) to learn the benefits of the feature and more information.
   8. **Show Red Flags:** Let AI Ally scan the email template and highlight suspicious elements—such as mismatched sender addresses, fake buttons, or misleading icons—while employees are expected to spot these red flags on their own.
   9. **Import Email:** Use the three-dot button to import an MSG or EML file and customize it.
4. Click **Edit** to make any changes or **Save** to complete the process.

### How to Add a Double Barrel Email Template

A Double Barrel template is made up of two emails sent in sequence within the same conversation thread: a **Lure Email** and a **Payload Email**. The Lure email builds trust without asking the user to do anything, and the Payload email — sent later — delivers the phishing link. This mimics a multi-stage social-engineering attack and gives a more realistic test than a single email.

When you create or edit a Double Barrel email template, the **Email Settings** page shows two tabs:

* **Lure Email** — the first message. It **must not contain links or the {PHISHINGURL} tag**. Set its Subject, From Name, From Email Address, and CC here.
* **Payload Email** — the follow-up message. It **may contain links and the {PHISHINGURL} tag**. Its sender (From and CC) is **inherited from the Lure email**, so you do not set those again. You can also attach a file on this tab (Word, Excel, PowerPoint, or HTML, up to 5 MB).

To create one:

1. Click the **+New** button on the **Phishing Simulator > Phishing Scenarios > Email Templates** page.
2. On the **Template Info** page, set the method to **Double Barrel**, complete the required fields, then click **Next**.
3. On the **Lure Email** tab, write the trust-building message and set the Subject, From Name, From Email Address, and CC. Do not add any link or the {PHISHINGURL} tag.
4. Switch to the **Payload Email** tab and write the message that contains the phishing link {PHISHINGURL}. Add an attachment here if needed. The sender details carry over from the Lure email.
5. Click **Save** to finish.

{% hint style="info" %}
The Lure email is intentionally restricted from containing links or the {PHISHINGURL} tag. Keep the call-to-action and the phishing link in the Payload email. Delivery order and timing of the two emails are configured per campaign under Double Barrel Settings.
{% endhint %}

## How to Add Email Template with Red Flags

Follow the steps below to create a new email template with red flags for use in a new or existing phishing campaign:

1. Click the **+New** button in the upper right corner of the **Phishing Simulator > Phishing Scenarios > Email Templates** page.
2. Complete the required fields on the first page, then click **Next**.
3. Complete the sections below on the **Email Settings** page:
   1. **Subject:** Subject line of the phishing email
   2. **From Name:** Sender name that will be visible to the target recipient
   3. **From Email Address:** Sender email address information that will be visible to the target recipient
   4. **CC:** Add a CC email address to your phishing simulation email. This is optional.
   5. **Attach File:** If desired, you can attach a file to the phishing email. This option is available when the email template method is **Attachment**, and on the **Payload Email** of a **Double Barrel** template. Supported files: Word, Excel, PowerPoint, or HTML, up to 5 MB.
   6. **View/Edit Template:** View and edit the available email templates in localized languages.
   7. **Localize:** Localize your main email template to different languages.
   8. **Import Email:** Use the three-dot button to import an MSG or EML file and customize it.
4. **Show Red Flags:** Click the button for AI Ally to scan the email template and highlight suspicious elements—such as mismatched sender addresses, fake buttons, or misleading icons—while employees are expected to spot these red flags on their own.
5. Click **Edit** to make any changes or **Save** to complete the process.

Once you save your email template, now click [here](/next-generation-product/platform/phishing-simulator/manage-phishing-scenarios/landing-pages#how-to-add-a-new-landing-page-template-with-red-flags) to learn how to create and use the email template with just-in-time learning page.

## How to Add a New Email Template with AI

Follow the steps below to effortlessly create custom email templates with the help of **AI** **Ally**. Once your template is ready, it can be used in a new or existing phishing campaign:

* Click the **+New** button in the upper right corner of the **Phishing Simulator** > **Phishing Scenarios** > **Email Templates** page.
* Complete the required fields on the first **Template** **Info** page, then click **Next**.
* Click on **Use AI Ally** and describe the scenario and key details for the email template you want to generate.
  * Once described, select the **Language** in which the email template will be created.
  * If you prefer a plain text email template, do not select the **Enable styled HTML format** option. For an HTML-formatted email template, you may choose this option.
* After providing the scenario details, click the **Generate Email Template** button to create your template.
* Once the template is generated, complete the following sections on the **Email Settings** page:
  * **Subject:** AI Ally will write a subject for your email template; you may customize it.
  * **From Name:** Specify the sender's name that will be visible to the recipient.
  * **From Email Address:** Provide the sender's email address that will be visible to the recipient.
  * **CC:** Add a CC email address to your phishing simulation email.
  * **Attach File:** If desired, you can attach a file to the phishing email. This option is only available if the email template method type is set to **Attachment**.
* Click **Edit** to make any changes, or **Save** to finalize the email template creation process.

Here are some helpful ready-to-use AI prompts for creating email templates.

<table><thead><tr><th width="174">Template Name</th><th>Command Prompt</th></tr></thead><tbody><tr><td>IT Policy Update Request</td><td>Make a template that looks like it is coming from our organization’s IT department, notifying the user about a critical policy update that requires their immediate review. The email should contain a link to a document that they need to acknowledge by the end of the day to remain compliant. Make the tone serious, emphasizing the importance of adhering to the new policy.</td></tr><tr><td>Finance Department Alert</td><td>Create a template that appears to be from our Finance Department, asking the user to verify a payment that is scheduled for today. Include a link that directs them to a secure page to review the details. The tone should be urgent and professional, with an emphasis on preventing unauthorized transactions.</td></tr><tr><td>HR Benefits Update</td><td>Make a template that looks like it is coming from our HR department, informing the user about changes to their benefits package. They are asked to log in to the benefits portal via a provided link to review and accept the new terms. The tone should be informative yet urgent, stressing the need to complete this before the end of the week.</td></tr><tr><td>CEO Urgent Assistance Request</td><td>Create a template that appears to come from our CEO, requesting the user’s urgent help in reviewing a confidential document. The CEO should mention that they are relying on the user’s expertise and that a quick response is needed due to a tight deadline. The tone should be friendly but emphasize the urgency of the task.</td></tr><tr><td>Suspicious Login Alert</td><td>Make a template that looks like it is coming from the organization’s security team, warning the user about a suspicious login attempt on their account. The email should urge them to click a link to verify their identity and secure their account. The tone should be urgent, with a focus on protecting the user’s account from unauthorized access.</td></tr><tr><td>Coworker Sharing a Resource</td><td>Create a template that looks like it’s coming from a coworker, sharing a useful resource or guide related to the user’s recent project. The email should include a link that appears to be to a legitimate document-sharing service. The tone should be casual and collaborative, encouraging the user to check it out.</td></tr><tr><td>Payroll Adjustment Notification</td><td>Make a template that seems to be from the Payroll Department, informing the user of a recent adjustment to their paycheck due to an error. Include a link where they can view the updated payment details. The tone should be apologetic for the error but emphasize the need for the user to verify the correction.</td></tr><tr><td>Company Event Registration</td><td>Create a template that looks like it’s from the company’s event planning team, inviting the user to register for an upcoming company-wide event. The email should include a link to a registration page and stress that space is limited, so they should register as soon as possible. The tone should be enthusiastic and encouraging.</td></tr><tr><td>Account Deactivation Notice</td><td>Make a template that looks like it’s from the user’s account management system, warning them that their account will be deactivated if they do not confirm their details by clicking a provided link. The tone should be formal and emphasize the importance of maintaining active status.</td></tr><tr><td>Software Update Required</td><td>Create a template that looks like it’s from the IT department, informing the user that a critical software update is required to maintain system security. The email should include a link to start the update process and make the tone urgent, with a focus on preventing potential security vulnerabilities.</td></tr></tbody></table>

## **Utilizing Merge Tags in Email Templates**

Here's a list of merge tags to help you make your email template more personal. Adding these tags can make your phishing campaign more tailored to the recipient.

<table><thead><tr><th width="172.6571044921875">Merge Tag Name</th><th width="284.2664794921875">Description</th><th width="294.9862060546875">Merge Tag Code</th></tr></thead><tbody><tr><td>Full Name</td><td>Inserts the target user's first and last name.</td><td>{FULLNAME}</td></tr><tr><td>First Name</td><td>Inserts the target user's first name.</td><td>{FIRSTNAME}</td></tr><tr><td>Last Name</td><td>Inserts the target user's last name.</td><td>{LASTNAME}</td></tr><tr><td>Phishing URL</td><td>Inserts a phishing simulation URL for the recipient to click and view the landing page.</td><td>{PHISHINGURL}</td></tr><tr><td>Email</td><td>Inserts the target user's email address.</td><td>{EMAIL}</td></tr><tr><td>From Name</td><td>Inserts the sender's name from the associated email template for this landing page scenario.</td><td>{FROMNAME}</td></tr><tr><td>From Email</td><td>Inserts the sender's email address from the associated email template for this landing page scenario.</td><td>{FROMEMAIL}</td></tr><tr><td>Subject</td><td>Inserts the subject line from the associated email template for this landing page scenario.</td><td>{SUBJECT}</td></tr><tr><td>Company Logo</td><td>Displays your organization's logo, sourced from the <a href="/pages/F7cK7i3rDA7b52wU6ltz">Whitelabeling</a> page.</td><td>Drag the Company logo option into the email template &#x26; it appears as an image placeholder</td></tr><tr><td>Company Name</td><td>Displays your organization's name, sourced from the company profile.</td><td>{COMPANYNAME}</td></tr><tr><td>Date Sent</td><td>Inserts the date when the campaign is launched.</td><td>{DATE_SENT}</td></tr><tr><td>Current Date</td><td>Inserts the current date when the campaign is launched.</td><td>{CURRENT_DATE}</td></tr><tr><td>Current Date Plus 10 Days</td><td>Inserts a date that is 10 days after the campaign's launch date.</td><td>{CURRENT_DATE_PLUS_10_DAYS}</td></tr><tr><td>Current Date Minus 10 Days</td><td>Inserts a date that is 10 days before the campaign's launch date.</td><td>{CURRENT_DATE_MINUS_10_DAYS}</td></tr><tr><td>Random Number One Digit</td><td>Generates and inserts a random one-digit number.</td><td>{RANDOM_NUMBER_1_DIGIT}</td></tr><tr><td>Random Number Two Digit</td><td>Generates and inserts a random two-digit number.</td><td>{RANDOM_NUMBER_2_DIGITS}</td></tr><tr><td>Random Number Three Digit</td><td>Generates and inserts a random three-digit number.</td><td>{RANDOM_NUMBER_3_DIGITS}</td></tr></tbody></table>

## Video Tutorial

The Email Templates page provides you with system-default phishing email templates. You can use them as they are or customize them as needed for your phishing campaign.

{% embed url="<https://youtu.be/SWuM7K3TvAY>" %}


---

[Next Page](/llms-full.txt/1)